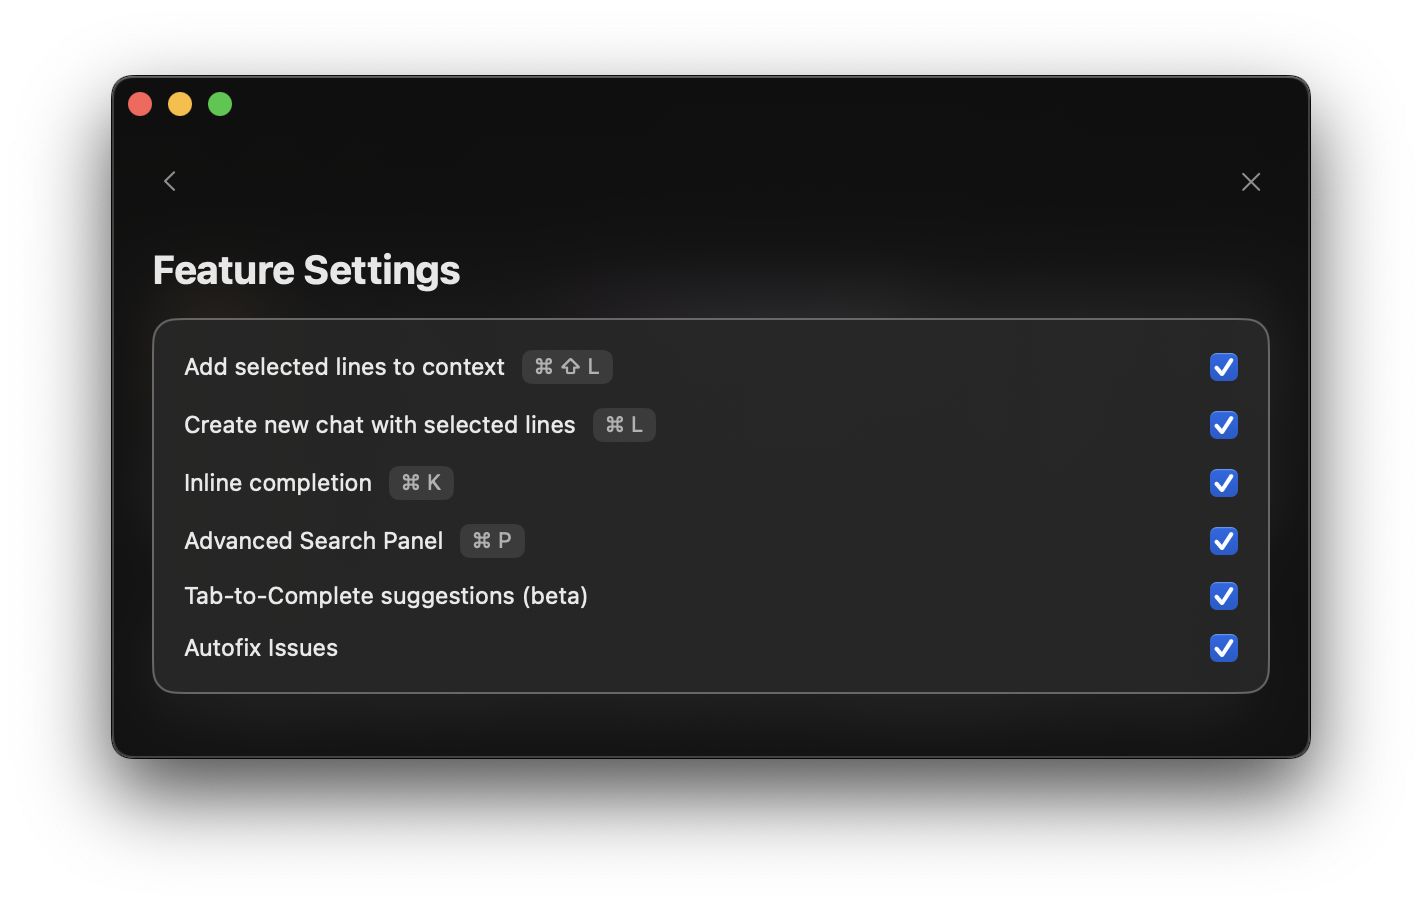
# Best Practices
Source: https://alexcode.ai/docs/chat/best-practices
Guidelines for effective code assistance and documentation usage in Alex Sidebar
## Writing Effective Prompts
* Be specific about your goals
* State what you want to achieve
* Provide clear success criteria
* Share relevant code snippets
* Include error messages
* Mention project requirements
## Using Think First Mode
* Complex architectural decisions
* Bug investigation
* Performance optimization
* Security considerations
* Quick syntax questions
* Simple code completions
* Documentation lookups
* Basic refactoring
### Tips for Think First Mode
* Allow extra time for the dual-model processing
* Provide detailed context for better analysis
* Use it for mission-critical code changes
* Consider disabling for rapid prototyping phases
### Examples
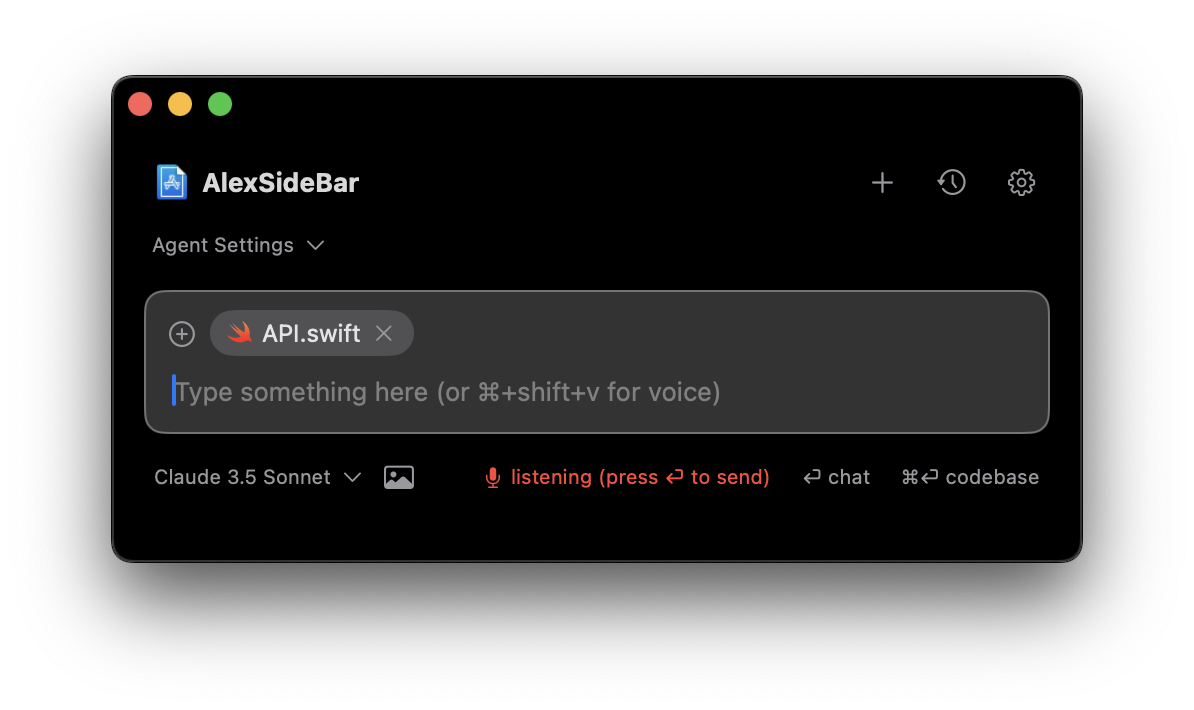
❌ **Ineffective**: `My code isn't working. Can you help?`
✅ **Effective**: `I'm getting a 'Thread 1: Fatal error: Unexpectedly found nil' when trying to unwrap an optional UIImage in my custom UICollectionViewCell. Here's my cellForItemAt implementation...`
✅ **Feature Request**: `I need to implement a custom tab bar in SwiftUI that shows a circular progress indicator around the selected tab icon. The progress should be animated. Here's my current TabView implementation...`
## Managing Context
* Use @ Files to add specific files
* Include related dependencies
* Share configuration files
* Use @ Codebase for framework-level questions
* Reference specific components
* Share relevant modules
### Examples
❌ **Limited**: `How do I update this delegate method?`
✅ **Complete**: `I need to update this UITableViewDelegate method to handle custom swipe actions. Here's my current implementation (@Files TableViewController.swift) and the custom SwipeActionView (@Files Views/SwipeActionView.swift) I want to integrate.`
✅ **Framework**: `I'm building a custom networking layer (@Codebase Networking/*). Can you help me implement proper retry logic with exponential backoff?`
## Using Documentation
* Use @ Apple Docs for framework reference
* Reference specific APIs
* Include version information
* Use @ Apple Docs (Individual) for specific methods
* Reference specific classes
* Include parameter details
### Examples
❌ **Vague**: `How do I use Core Data?`
✅ **Specific**: `I need help implementing NSFetchedResultsController (@Apple Docs NSFetchedResultsController) with multiple sections based on dates. Here's my current Core Data model (@Files Model.xcdatamodeld)...`
✅ **API Reference**: `Can you explain how to use URLSession's (@Apple Docs URLSession) background download tasks with proper delegate handling (@Apple Docs URLSessionDownloadDelegate)?`
## Platform-Specific Best Practices
* Use Swift-specific terminology
* Reference Swift documentation
* Include Swift version
* Reference UI frameworks
* Include view hierarchy
* Share layout constraints
### Examples
❌ **Ambiguous**: `How do I create a button?`
✅ **SwiftUI**: `I'm using SwiftUI (iOS 16+) and need to create a custom button with a gradient background, dynamic shadow, and haptic feedback. Here's my current Button implementation...`
✅ **UIKit Integration**: `I need to embed this SwiftUI view (@Files CustomView.swift) into my existing UIKit navigation stack. Here's my current UIHostingController setup...`
## Common Scenarios
* Share error messages
* Include stack traces
* Reference relevant code
* Explain current structure
* Describe desired outcome
* Share relevant files
### Examples
❌ **Unclear**: `The app crashes sometimes.`
✅ **Detailed**: `The app crashes when switching between tabs while a network request is in progress. Here's the crash log and relevant networking code (@Files NetworkManager.swift). The issue started after implementing async/await...`
✅ **Refactoring**: `I want to refactor this massive view controller (@Files ProfileViewController.swift) into smaller components using MVVM. Here's my planned architecture diagram...`
### Examples
❌ **Too Much**: `Sharing entire project files for a simple UI fix`
✅ **Just Right**: `Continuing from our previous chat about the networking layer (see chat history), I need to add request caching. Here's the specific RequestCaching protocol I want to implement...`
✅ **Breaking Down**: \`I need to migrate this UIKit project to SwiftUI. Let's break it down:
1. First, let's handle the navigation structure
2. Then, convert each view controller individually
3. Finally, implement the data flow with @StateObject and ObservableObject\`
## Working with Build Errors
* Use for automatic error resolution
* Alex handles the entire build-fix cycle by using Xcode's build system
* No manual intervention needed
* Continues until build succeeds
### When to Use Automatic Build & Fix
* Multiple compilation errors
* Missing imports or protocols
* Type mismatches
* Initialization errors
* Access control issues
* Complex architectural decisions
* Business logic errors
* Performance optimizations
* Custom framework integration
### Examples
✅ **Automatic Fix**: `Click "Build & Fix Errors" when you see multiple red errors in Xcode. Alex will handle missing imports, protocol conformance, and type issues automatically one by one until the build succeeds.`
### Build Error Best Practices
1. **Let Alex Work**: Do not interrupt the build-fix loop unless necessary
2. **Review Changes**: Always review the final working code
3. **Save Progress**: Use checkpoints after successful builds
## Community Resources
Need more help? Join the [Discord community](https://discord.gg/T5zxfReEnd)
for support and tips from other developers.
# Agents
Source: https://alexcode.ai/docs/chat/context/agents
AI agents specialized for development tasks
Alex Sidebar's agents are specialized AI assistants, each trained for specific development tasks. Alex automatically selects the right agent for your workflow for autonomously handling your development tasks!
Agent mode is now always on! Claude Sonnet 4 is the recommended model for its superior code generation capabilities, but you can now use other supported models including:
* Claude 3.5 Sonnet
* Gemini 2.5 Pro
* Gemini 2.5 Flash
* OpenAI o3
* OpenAI o4 Mini
* OpenAI GPT 4.1
* DeepSeek R1
* DeepSeek V3 (03.24)
Choose your preferred model from the model selector while maintaining all agent capabilities.
## Quick Actions
One-click automatic build, error detection, and fix application. Alex continuously rebuilds until your project compiles successfully.
Let agents handle repetitive tasks while you focus on core development work.
Switch between different AI models while maintaining agent capabilities and context.
## Understanding Agents
Agents work best by:
* Learning your project structure and patterns
* Maintaining contextual understanding across sessions
* **Automatically building and running your app after changes**
* **Detecting and fixing compilation errors in a continuous loop**
* **Taking screenshots for verification and debugging**
You can make agents more effective over time by providing more notes about your project and coding preferences. Learn more about project notes [here](/chat/context/memory).
## Getting Started
Press **Command + Shift + A** to toggle auto-apply for code changes. When enabled, code suggestions will be automatically applied to your files.
Use voice or text to describe your project:
```swift
"This is an iOS app using SwiftUI and MVVM architecture.
The main features include user authentication and data persistence."
```
The agent will:
* Analyze project structure
* Study coding patterns
* Build contextual understanding
* Use regex search to find relevant code patterns
## Automatic Build & Run
Alex Sidebar's agent automatically builds and runs your project after making changes, creating a seamless development experience.
While the agent handles most errors automatically, always review the final changes to ensure they align with your project's requirements.
## Best Practices
Provide specific requirements and context for best results
Break complex tasks into smaller, manageable steps
Always review and test agent-suggested modifications
Keep project notes updated for better agent performance
# Commands
Source: https://alexcode.ai/docs/chat/context/commands
Available commands and shortcuts in Alex Sidebar's chat interface
## Available Commands
 Access and reference files in your project directly from the chat interface.
Search and reference your entire codebase context during chat conversations.
Search and reference official Apple documentation without leaving the chat.
Access specific Apple documentation entries for targeted reference.
## Using Commands
Type `@` or click the + button in the chat interface to see available commands.
Use the search bar at the top to filter available commands and find what you
need quickly.
Commands help you efficiently access resources and context without leaving
your chat workflow.
## Files Command
Access your project files directly within the chat interface. Browse, search, and reference specific files during your conversations.
Access and reference files in your project directly from the chat interface.
Search and reference your entire codebase context during chat conversations.
Search and reference official Apple documentation without leaving the chat.
Access specific Apple documentation entries for targeted reference.
## Using Commands
Type `@` or click the + button in the chat interface to see available commands.
Use the search bar at the top to filter available commands and find what you
need quickly.
Commands help you efficiently access resources and context without leaving
your chat workflow.
## Files Command
Access your project files directly within the chat interface. Browse, search, and reference specific files during your conversations.
 ## Codebase Command
Search through your entire codebase context, find specific implementations, and reference code snippets in your discussions.
## Codebase Command
Search through your entire codebase context, find specific implementations, and reference code snippets in your discussions.
 ## Apple Documentation Command
Search and browse through the complete Apple documentation library without switching contexts or leaving your chat.
## Apple Documentation Command
Search and browse through the complete Apple documentation library without switching contexts or leaving your chat.
 ## Individual Apple Documentation Command
Access and reference specific documentation entries, methods, or APIs for technical discussions.
## Individual Apple Documentation Command
Access and reference specific documentation entries, methods, or APIs for technical discussions.
 # Project Memory
Source: https://alexcode.ai/docs/chat/context/memory
Remember context across conversations with Alex
Project Memory enables Alex to remember context across conversations by using terms like "remember this" or "keep this in mind". This helps maintain continuity and provides more contextually relevant responses over time.
## Understanding Project Memory
When enabled, you can ask Alex to remember context across conversations by using phrases like:
* "Remember this"
* "Keep this in mind"
* "Remember that..."
* "Take note of..."
This allows Alex to:
* Maintain important context between chat sessions
* Remember project-specific requirements and patterns
* Provide more consistent and personalized responses
* Reference previously discussed solutions
## Managing Project Memory
### Accessing Memory Settings
To manage your project memory:
1. Open Settings (gear icon)
2. Navigate to **Tools & Features** → **Project Memory**
3. Toggle **Enable Memory** on/off using the switch
### Searching Memories
Once memories are saved, you can:
* Use the search bar to find specific memories
* View all stored memories in the list
* Delete individual memories as needed
### Creating Memories
Simply tell Alex what to remember during any conversation:
* "Remember that our app uses SwiftUI and MVVM architecture"
* "Keep in mind that we're targeting iOS 17+"
* "Note that all API calls should use async/await"
## Privacy and Security
All project memory data is:
* Stored locally on your device
* Never shared with external services
* Fully under your control
## Best Practices
### What to Remember
Use project memory for:
* **Project architecture**: "Remember we're using MVVM with Combine"
* **Coding standards**: "Keep in mind we use 2-space indentation"
* **API details**: "Remember our API base URL is api.example.com"
* **Team preferences**: "Note that we prefer guard statements over if-let"
* **Dependencies**: "Remember we're using Firebase for authentication"
### Memory Management Tips
1. **Be specific**: Clear, specific memories are more useful than vague ones
2. **Update regularly**: Remove outdated memories to keep context relevant
3. **Use search**: Quickly find memories using the search feature
4. **Review periodically**: Check your stored memories to ensure they're still accurate
Project Memory is especially useful for long-term projects where maintaining consistent context across multiple coding sessions is important.
# Image to Code
Source: https://alexcode.ai/docs/chat/input-modes/image-to-code
Transform designs into code by dragging images into Alex Sidebar
The Image-to-Code feature allows you to quickly convert design mockups, screenshots, or UI elements into code. You can input images through multiple methods:
## Input Methods
Use **Command + Shift + 6** to:
* Take window screenshots
* Capture specific UI selections
* Perfect for quick UI component captures
Drag images directly into the chat interface from:
* Finder
* Browser
* Design tools
## Screenshot Tool (⌘ + ⇧ + 6)
The built-in screenshot tool provides a quick way to capture UI elements and convert them to code. You can customize its behavior in the settings to match your workflow.
### Capture Options
Capture entire windows with a single click. Perfect for:
* Full screen interfaces
* Complete view hierarchies
* Dialog boxes and alerts
Select specific areas to capture. Ideal for:
* Individual UI components
* Specific sections of an interface
* Custom-sized regions
### Settings Customization

You can customize the screenshot tool in three ways:
#### 1. Quick Access Menu
When you click the screenshot button or use ⌘ + ⇧ + 6, a dropdown menu appears with three options:
* **Capture window**: Take a screenshot of the entire window
* **Capture selection**: Draw a selection box around the desired area
* **Attach file**: Choose a file from your system instead
#### 2. Default Behavior Settings
You can set your preferred default screenshot behavior in Settings:
1. Open Settings
2. Navigate to "Chat Settings"
3. Look for "Default Screenshot Behavior" under the chat options
4. Choose between:
* Capture window (automatically capture the entire window)
* Capture selection (start with selection tool)
* Show options (always show the dropdown menu)
#### 3. Customize Keyboard Shortcut
You can change the default ⌘ + ⇧ + 6 shortcut:
1. Open Settings
2. Go to "Chat Settings"
3. Find "Take Screenshot" in the list
4. Click on the current shortcut (⌘ + ⇧ + 6) to change it
5. Press your desired key combination
Even with a default behavior set, you can always access other capture modes through the dropdown menu or by using your configured keyboard shortcut.
### Best Practices for Screenshots
1. **Clean Captures**
* Close unnecessary windows or tabs
* Hide sensitive information
* Ensure the UI is in its final state
2. **Component Focus**
* Zoom in for small components
* Include padding for context
* Capture in the correct state (hover, active, etc.)
## Getting Started
Supported formats:
* PNG
* JPEG
* Screenshots directly from Xcode/Figma
For best results, ensure your images clearly show the UI elements you want to convert.
Choose your preferred method:
1. Use **Command + Shift + 6** to take a screenshot
2. Drag and drop images into the chat
3. Copy-paste images directly
The eligible model will analyze the images and generate corresponding code. You can:
* Copy the code directly
* Request modifications
* Ask for explanations of specific parts
## Best Practices
### Image Preparation
* Use high-resolution images for better accuracy
* Crop to include only relevant UI elements
* Ensure good contrast between elements
* Include any specific styling details as prompt you want to capture
### Code Generation
* Start with simple components before complex layouts
* Review generated code for customization needs
* Use follow-up questions to refine the output
* Consider breaking complex UIs into smaller pieces
For complex designs, try generating code for individual components first, then
combine them into the final layout.
## Example Workflows
### Basic UI Component
Take a screenshot of a button or card design
Drag the image into Alex Sidebar
```swift
// Generated code example
struct CustomButton: View {
var body: some View {
Button(action: {}) {
Text("Get Started")
.font(.headline)
.foregroundColor(.white)
.padding(.horizontal, 24)
.padding(.vertical, 12)
.background(Color.blue)
.cornerRadius(8)
}
}
}
```
### Complex Layout
Identify main components in your layout. You can:
* Split your design into logical sections
* Take screenshots of individual components
* Prepare multiple images for different parts
You have two options:
* Drag multiple component images at once to generate all parts simultaneously
* Generate code for each major section individually
Ask Alex to help combine components into a cohesive layout. You can:
* Request adjustments to match the overall design
* Fine-tune spacing and alignment
* Add container views and navigation elements
## Troubleshooting
### Common Issues
* Ensure image quality is high
* Try cropping closer to the component
* Use screenshots rather than photos
* Provide additional context in your prompt
* Specify exact colors if known
* Include style guide references
* Ask for specific modifications
* Use follow-up questions for refinement
* Break complex layouts into sections
* Specify constraints explicitly
* Ask for alternative layout approaches
* Provide reference screenshots
## Tips for Better Results
1. **Start Simple**: Begin with basic components before attempting complex layouts
2. **Iterate**: Use follow-up questions to refine the generated code
3. **Combine Methods**: Use both image and text descriptions for better results
4. **Review Output**: Always review and test generated code in your project
Remember that Image-to-Code is a starting point. You can always ask Alex to
modify the generated code to better match your needs.
# Voice Mode
Source: https://alexcode.ai/docs/chat/input-modes/voice-mode
Use voice commands to interact with Alex Sidebar more naturally
## Overview
Voice Mode allows you to interact with Alex Sidebar using speech instead of typing, making code discussions more natural and efficient. This feature is particularly useful when you need to explain complex problems or want to reduce typing fatigue.
# Project Memory
Source: https://alexcode.ai/docs/chat/context/memory
Remember context across conversations with Alex
Project Memory enables Alex to remember context across conversations by using terms like "remember this" or "keep this in mind". This helps maintain continuity and provides more contextually relevant responses over time.
## Understanding Project Memory
When enabled, you can ask Alex to remember context across conversations by using phrases like:
* "Remember this"
* "Keep this in mind"
* "Remember that..."
* "Take note of..."
This allows Alex to:
* Maintain important context between chat sessions
* Remember project-specific requirements and patterns
* Provide more consistent and personalized responses
* Reference previously discussed solutions
## Managing Project Memory
### Accessing Memory Settings
To manage your project memory:
1. Open Settings (gear icon)
2. Navigate to **Tools & Features** → **Project Memory**
3. Toggle **Enable Memory** on/off using the switch
### Searching Memories
Once memories are saved, you can:
* Use the search bar to find specific memories
* View all stored memories in the list
* Delete individual memories as needed
### Creating Memories
Simply tell Alex what to remember during any conversation:
* "Remember that our app uses SwiftUI and MVVM architecture"
* "Keep in mind that we're targeting iOS 17+"
* "Note that all API calls should use async/await"
## Privacy and Security
All project memory data is:
* Stored locally on your device
* Never shared with external services
* Fully under your control
## Best Practices
### What to Remember
Use project memory for:
* **Project architecture**: "Remember we're using MVVM with Combine"
* **Coding standards**: "Keep in mind we use 2-space indentation"
* **API details**: "Remember our API base URL is api.example.com"
* **Team preferences**: "Note that we prefer guard statements over if-let"
* **Dependencies**: "Remember we're using Firebase for authentication"
### Memory Management Tips
1. **Be specific**: Clear, specific memories are more useful than vague ones
2. **Update regularly**: Remove outdated memories to keep context relevant
3. **Use search**: Quickly find memories using the search feature
4. **Review periodically**: Check your stored memories to ensure they're still accurate
Project Memory is especially useful for long-term projects where maintaining consistent context across multiple coding sessions is important.
# Image to Code
Source: https://alexcode.ai/docs/chat/input-modes/image-to-code
Transform designs into code by dragging images into Alex Sidebar
The Image-to-Code feature allows you to quickly convert design mockups, screenshots, or UI elements into code. You can input images through multiple methods:
## Input Methods
Use **Command + Shift + 6** to:
* Take window screenshots
* Capture specific UI selections
* Perfect for quick UI component captures
Drag images directly into the chat interface from:
* Finder
* Browser
* Design tools
## Screenshot Tool (⌘ + ⇧ + 6)
The built-in screenshot tool provides a quick way to capture UI elements and convert them to code. You can customize its behavior in the settings to match your workflow.
### Capture Options
Capture entire windows with a single click. Perfect for:
* Full screen interfaces
* Complete view hierarchies
* Dialog boxes and alerts
Select specific areas to capture. Ideal for:
* Individual UI components
* Specific sections of an interface
* Custom-sized regions
### Settings Customization

You can customize the screenshot tool in three ways:
#### 1. Quick Access Menu
When you click the screenshot button or use ⌘ + ⇧ + 6, a dropdown menu appears with three options:
* **Capture window**: Take a screenshot of the entire window
* **Capture selection**: Draw a selection box around the desired area
* **Attach file**: Choose a file from your system instead
#### 2. Default Behavior Settings
You can set your preferred default screenshot behavior in Settings:
1. Open Settings
2. Navigate to "Chat Settings"
3. Look for "Default Screenshot Behavior" under the chat options
4. Choose between:
* Capture window (automatically capture the entire window)
* Capture selection (start with selection tool)
* Show options (always show the dropdown menu)
#### 3. Customize Keyboard Shortcut
You can change the default ⌘ + ⇧ + 6 shortcut:
1. Open Settings
2. Go to "Chat Settings"
3. Find "Take Screenshot" in the list
4. Click on the current shortcut (⌘ + ⇧ + 6) to change it
5. Press your desired key combination
Even with a default behavior set, you can always access other capture modes through the dropdown menu or by using your configured keyboard shortcut.
### Best Practices for Screenshots
1. **Clean Captures**
* Close unnecessary windows or tabs
* Hide sensitive information
* Ensure the UI is in its final state
2. **Component Focus**
* Zoom in for small components
* Include padding for context
* Capture in the correct state (hover, active, etc.)
## Getting Started
Supported formats:
* PNG
* JPEG
* Screenshots directly from Xcode/Figma
For best results, ensure your images clearly show the UI elements you want to convert.
Choose your preferred method:
1. Use **Command + Shift + 6** to take a screenshot
2. Drag and drop images into the chat
3. Copy-paste images directly
The eligible model will analyze the images and generate corresponding code. You can:
* Copy the code directly
* Request modifications
* Ask for explanations of specific parts
## Best Practices
### Image Preparation
* Use high-resolution images for better accuracy
* Crop to include only relevant UI elements
* Ensure good contrast between elements
* Include any specific styling details as prompt you want to capture
### Code Generation
* Start with simple components before complex layouts
* Review generated code for customization needs
* Use follow-up questions to refine the output
* Consider breaking complex UIs into smaller pieces
For complex designs, try generating code for individual components first, then
combine them into the final layout.
## Example Workflows
### Basic UI Component
Take a screenshot of a button or card design
Drag the image into Alex Sidebar
```swift
// Generated code example
struct CustomButton: View {
var body: some View {
Button(action: {}) {
Text("Get Started")
.font(.headline)
.foregroundColor(.white)
.padding(.horizontal, 24)
.padding(.vertical, 12)
.background(Color.blue)
.cornerRadius(8)
}
}
}
```
### Complex Layout
Identify main components in your layout. You can:
* Split your design into logical sections
* Take screenshots of individual components
* Prepare multiple images for different parts
You have two options:
* Drag multiple component images at once to generate all parts simultaneously
* Generate code for each major section individually
Ask Alex to help combine components into a cohesive layout. You can:
* Request adjustments to match the overall design
* Fine-tune spacing and alignment
* Add container views and navigation elements
## Troubleshooting
### Common Issues
* Ensure image quality is high
* Try cropping closer to the component
* Use screenshots rather than photos
* Provide additional context in your prompt
* Specify exact colors if known
* Include style guide references
* Ask for specific modifications
* Use follow-up questions for refinement
* Break complex layouts into sections
* Specify constraints explicitly
* Ask for alternative layout approaches
* Provide reference screenshots
## Tips for Better Results
1. **Start Simple**: Begin with basic components before attempting complex layouts
2. **Iterate**: Use follow-up questions to refine the generated code
3. **Combine Methods**: Use both image and text descriptions for better results
4. **Review Output**: Always review and test generated code in your project
Remember that Image-to-Code is a starting point. You can always ask Alex to
modify the generated code to better match your needs.
# Voice Mode
Source: https://alexcode.ai/docs/chat/input-modes/voice-mode
Use voice commands to interact with Alex Sidebar more naturally
## Overview
Voice Mode allows you to interact with Alex Sidebar using speech instead of typing, making code discussions more natural and efficient. This feature is particularly useful when you need to explain complex problems or want to reduce typing fatigue.
 ## Quick Actions
Toggle voice recording on/off. Use this shortcut to quickly start or stop voice input without clicking.
Click the microphone icon in the chat input area to start/stop recording.
## Using Voice Mode
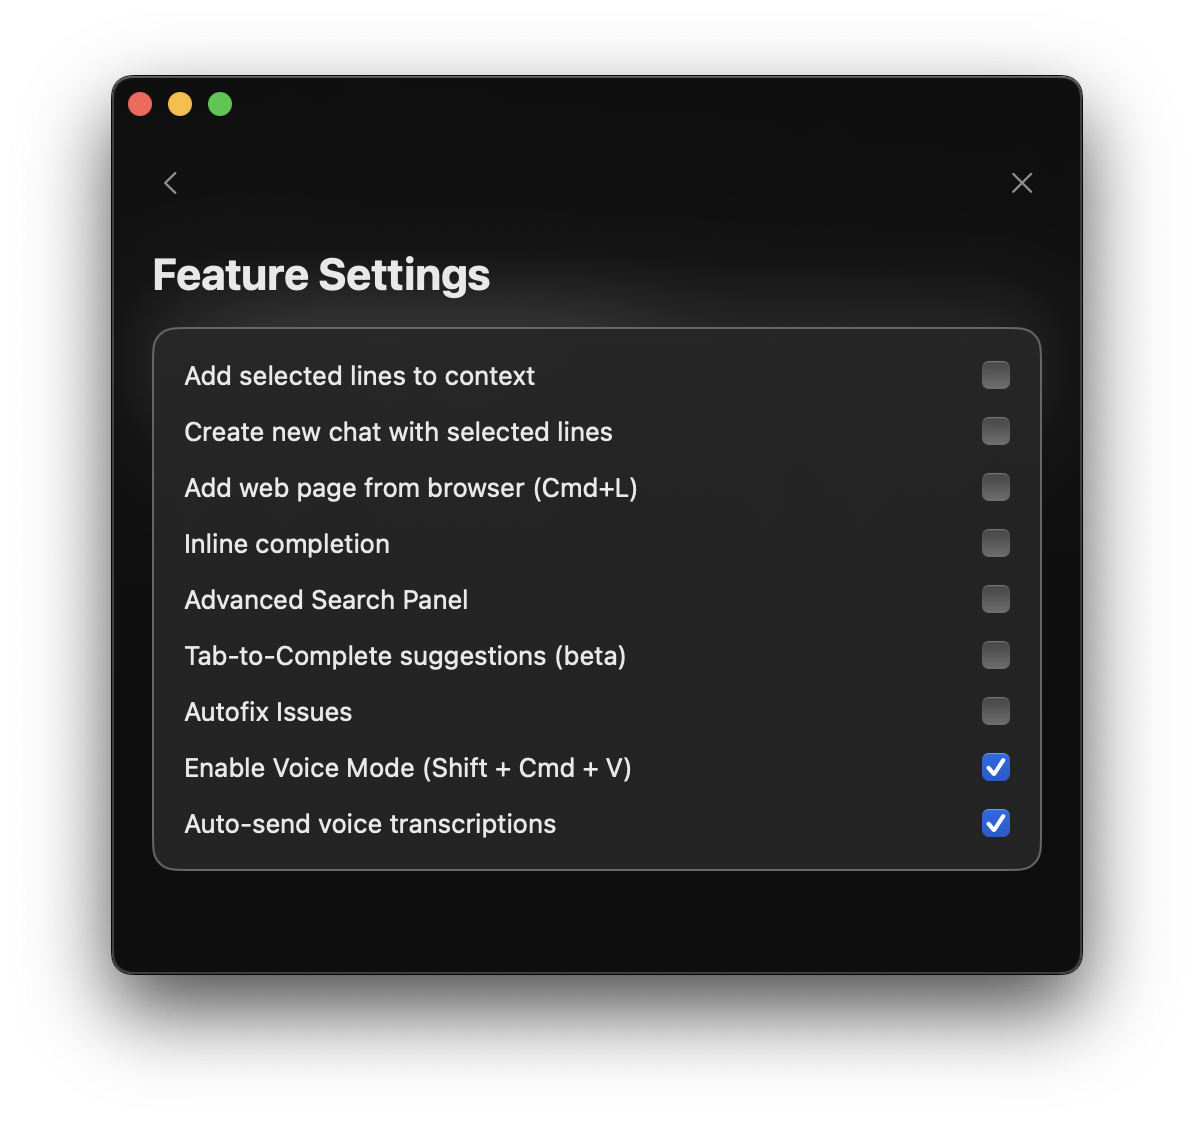
1. Open Settings (gear icon)
2. Navigate to Chat Settings
3. Enable Voice Mode
## Quick Actions
Toggle voice recording on/off. Use this shortcut to quickly start or stop voice input without clicking.
Click the microphone icon in the chat input area to start/stop recording.
## Using Voice Mode
1. Open Settings (gear icon)
2. Navigate to Chat Settings
3. Enable Voice Mode
 Voice Mode requires microphone permissions. You will be prompted to grant access when first enabling this feature.
Two ways to start:
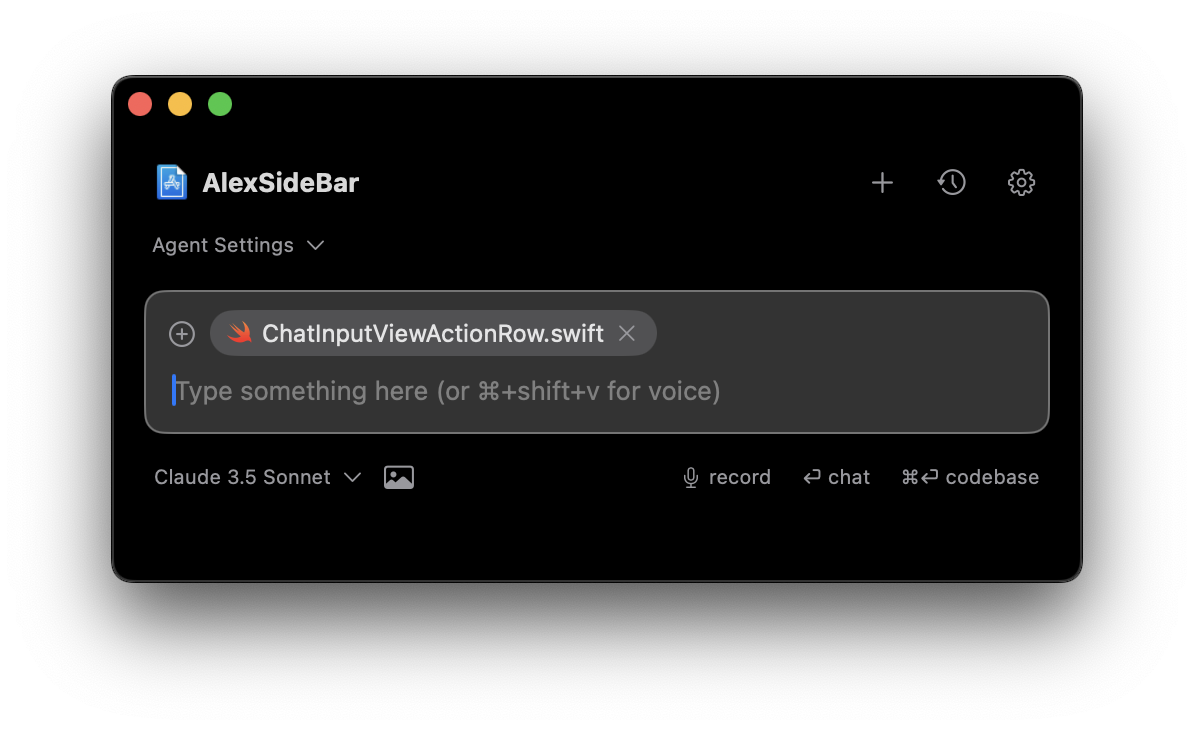
* Press **Command + Shift + V**
* Click the microphone icon
Voice Mode requires microphone permissions. You will be prompted to grant access when first enabling this feature.
Two ways to start:
* Press **Command + Shift + V**
* Click the microphone icon
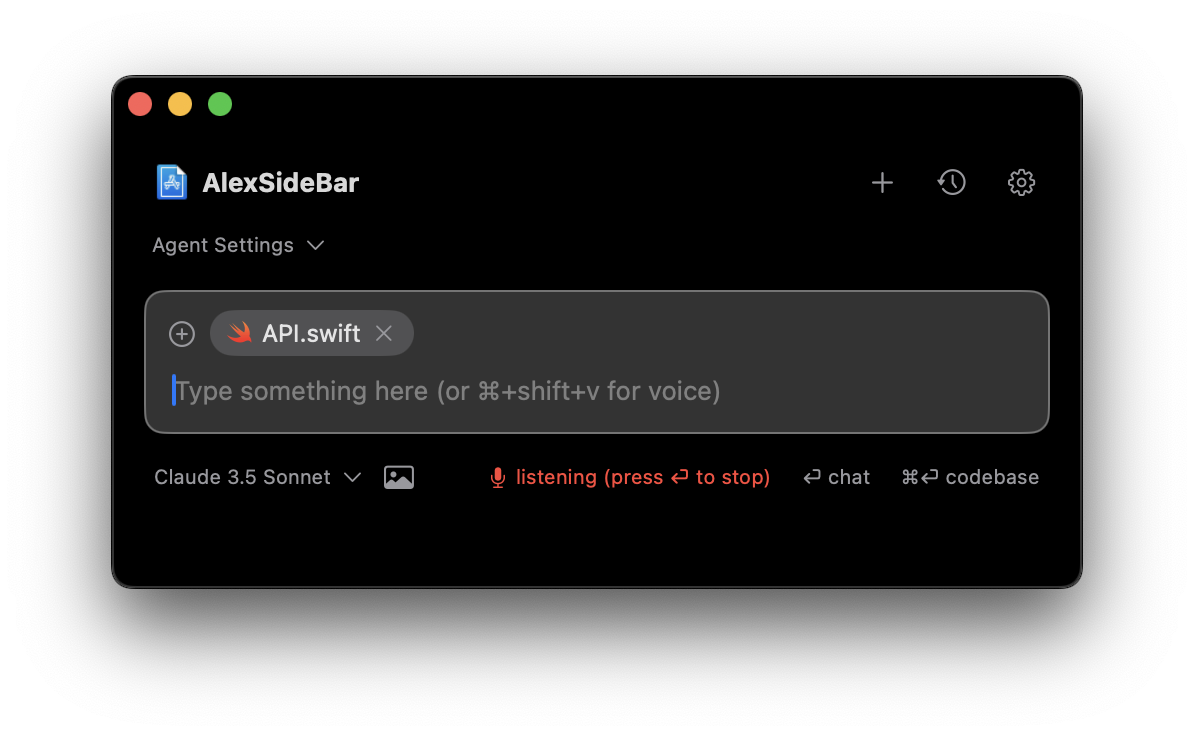 Speak clearly into your microphone.
Use any of these methods to stop:
* Press **Command + Shift + V** again
* Click the microphone icon
* Press **Return/Enter** key
* Press **Escape** key to cancel recording
Your speech will be automatically transcribed and inserted into the chat input box.
Speak clearly into your microphone.
Use any of these methods to stop:
* Press **Command + Shift + V** again
* Click the microphone icon
* Press **Return/Enter** key
* Press **Escape** key to cancel recording
Your speech will be automatically transcribed and inserted into the chat input box.
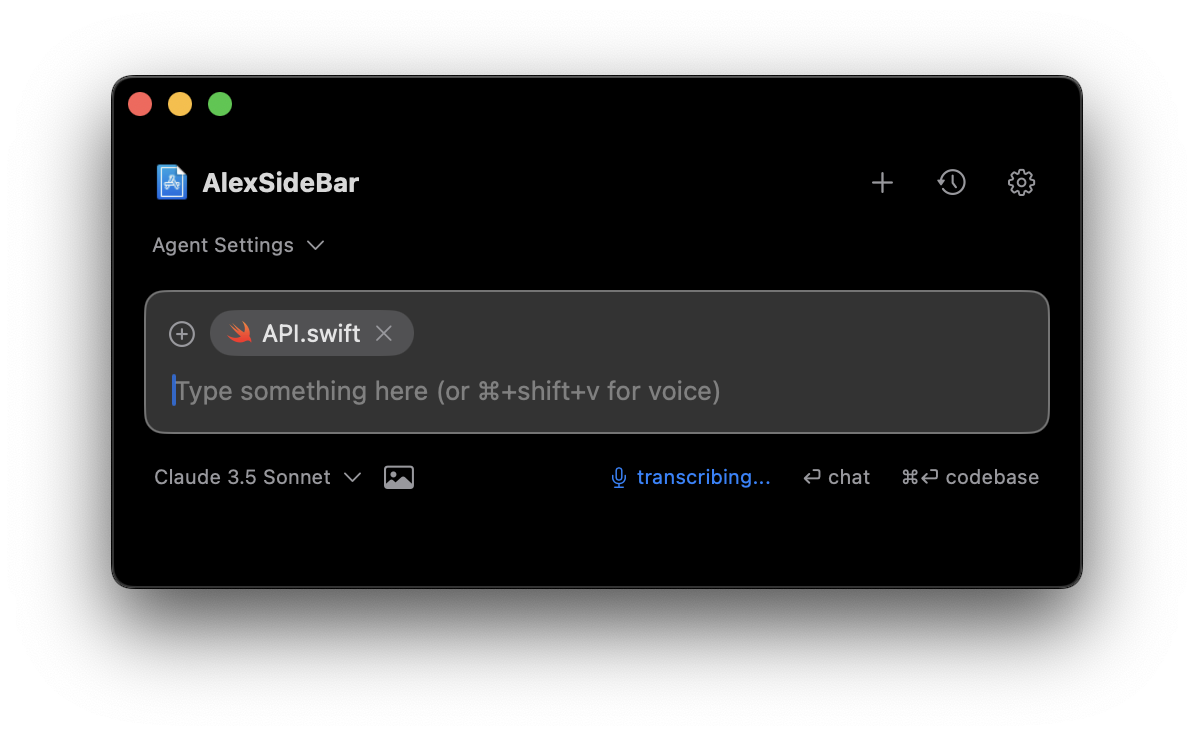 Use the Escape key if you want to cancel the recording without transcribing the audio.
## Auto Mode
Enable "Auto Mode" in settings to automatically send transcribed messages:
* Finish speaking and stop recording
* Press Return/Enter
* Message sends automatically and starts AI inference
Use the Escape key if you want to cancel the recording without transcribing the audio.
## Auto Mode
Enable "Auto Mode" in settings to automatically send transcribed messages:
* Finish speaking and stop recording
* Press Return/Enter
* Message sends automatically and starts AI inference
 ## Best Practices
* Speak at a natural pace
* Enunciate clearly
* Avoid background noise
* Use technical terms carefully
* Use voice for longer explanations
* Review transcription before sending
* Combine with code selection
## Accessibility Benefits
Voice Mode makes Alex more accessible and easier to use for everyone.
* When you are coding for long periods, **Voice Mode** lets you take breaks from typing while staying productive.
* For developers with mobility challenges or strain injuries, voice input provides a comfortable way to interact with Alex. You can dictate code explanations and questions instead.
* Having voice as an additional input option means you can choose what works best for you in different situations. Sometimes speaking is just more convenient than typing.
And when you need to explain complex concepts or walk through detailed logic, speaking it out loud often feels more natural and fluid than typing it all out.
# Overview
Source: https://alexcode.ai/docs/chat/overview
Learn how to use Alex Sidebar's chat for code assistance
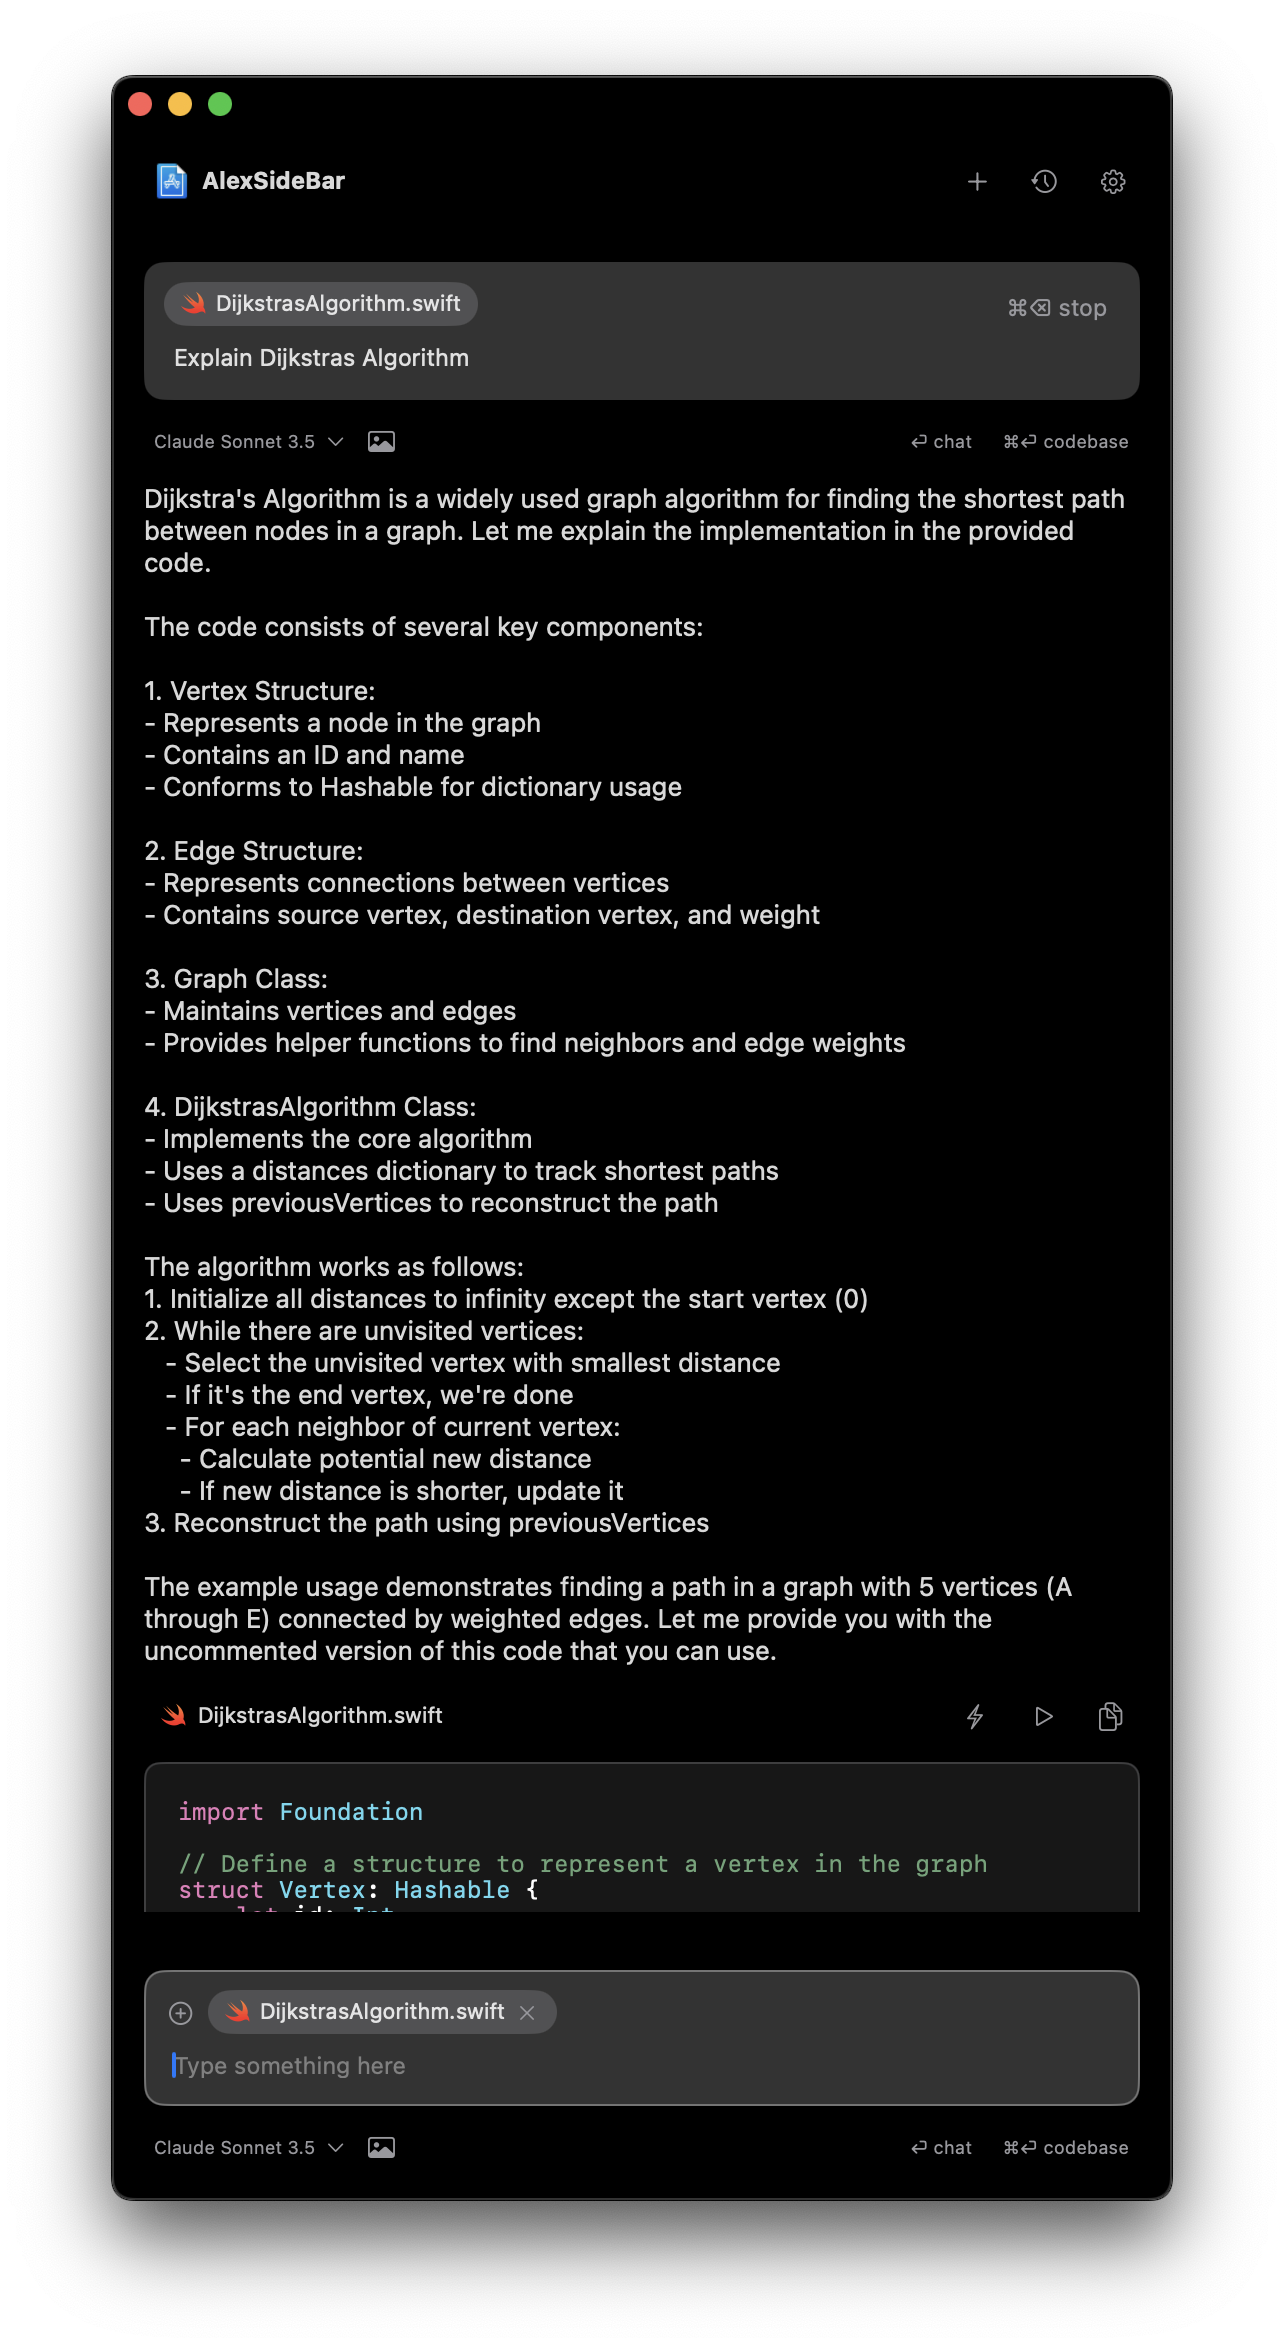
Alex Sidebar's chat feature enables code discussions and improvements in Xcode running on the side. By prompting your queries, you can assist your coding process and resolve issues more quickly.
## Quick Actions
Click this button in the main view to automatically build your project and fix all compilation errors in a continuous loop until success.
Select code in Xcode to start a **new chat**. The selected content will automatically be added as a reference.
Add selected code to your existing chat without opening a new window. Perfect for building context incrementally.
Start a chat with entire codebase as context. Useful for high-level questions
about your project.
Access documentation, add more files and more using the @ menu in your chat.
Copy-paste or drag images directly into chat for design analysis and code generation. Perfect for UI discussions and visual debugging.
## Copy Request Button
Perfect for using the most powerful models like o3 Pro or models with massive context windows like Gemini 2.5 Pro (1M+ tokens).
The Copy Request button lets you export your code context to use with external AI services:
Look for the copy icon at the bottom of any message in your chat
Clicking copies:
* All code context and file contents
* Your current query
* Formatted for easy pasting
Paste the copied content into:
* **ChatGPT o3-pro** - For the most powerful reasoning
* **Google AI Studio** - For Gemini 2.5 Pro with 1M+ token context
## Getting Started
In Xcode's editor window, highlight the code you want to discuss or improve.
Providing relevant code context helps the AI better understand your
question and provide more accurate responses.
Select code and press **Command + L** to start a chat.
Additional ways to start a chat:
* Click the chat (plus) icon in the top right of the sidebar
* Click the **"Build & Fix Errors"** button for automatic error resolution
* Use **Command + Enter** for a new chat with full codebase context
The more relevant context you provide, the more accurate and helpful the
responses will be.
## Context Management
* Chats are automatically saved
* Access previous chats from history
* Clear individual history
* Reference multiple files in one chat
* Generate changes for multiple files
## Common Use Cases
* Select complex functions or blocks
* Press **Command + L**
* Ask for step-by-step explanations
* Get detailed breakdowns of code behavior
* Highlight code that needs improvement
* Start a chat with **Command + L**
* Request refactoring suggestions
* Apply changes directly from chat
* Select problematic code sections
* Include error messages if available
* Ask for debugging assistance
* Get targeted solutions and fixes
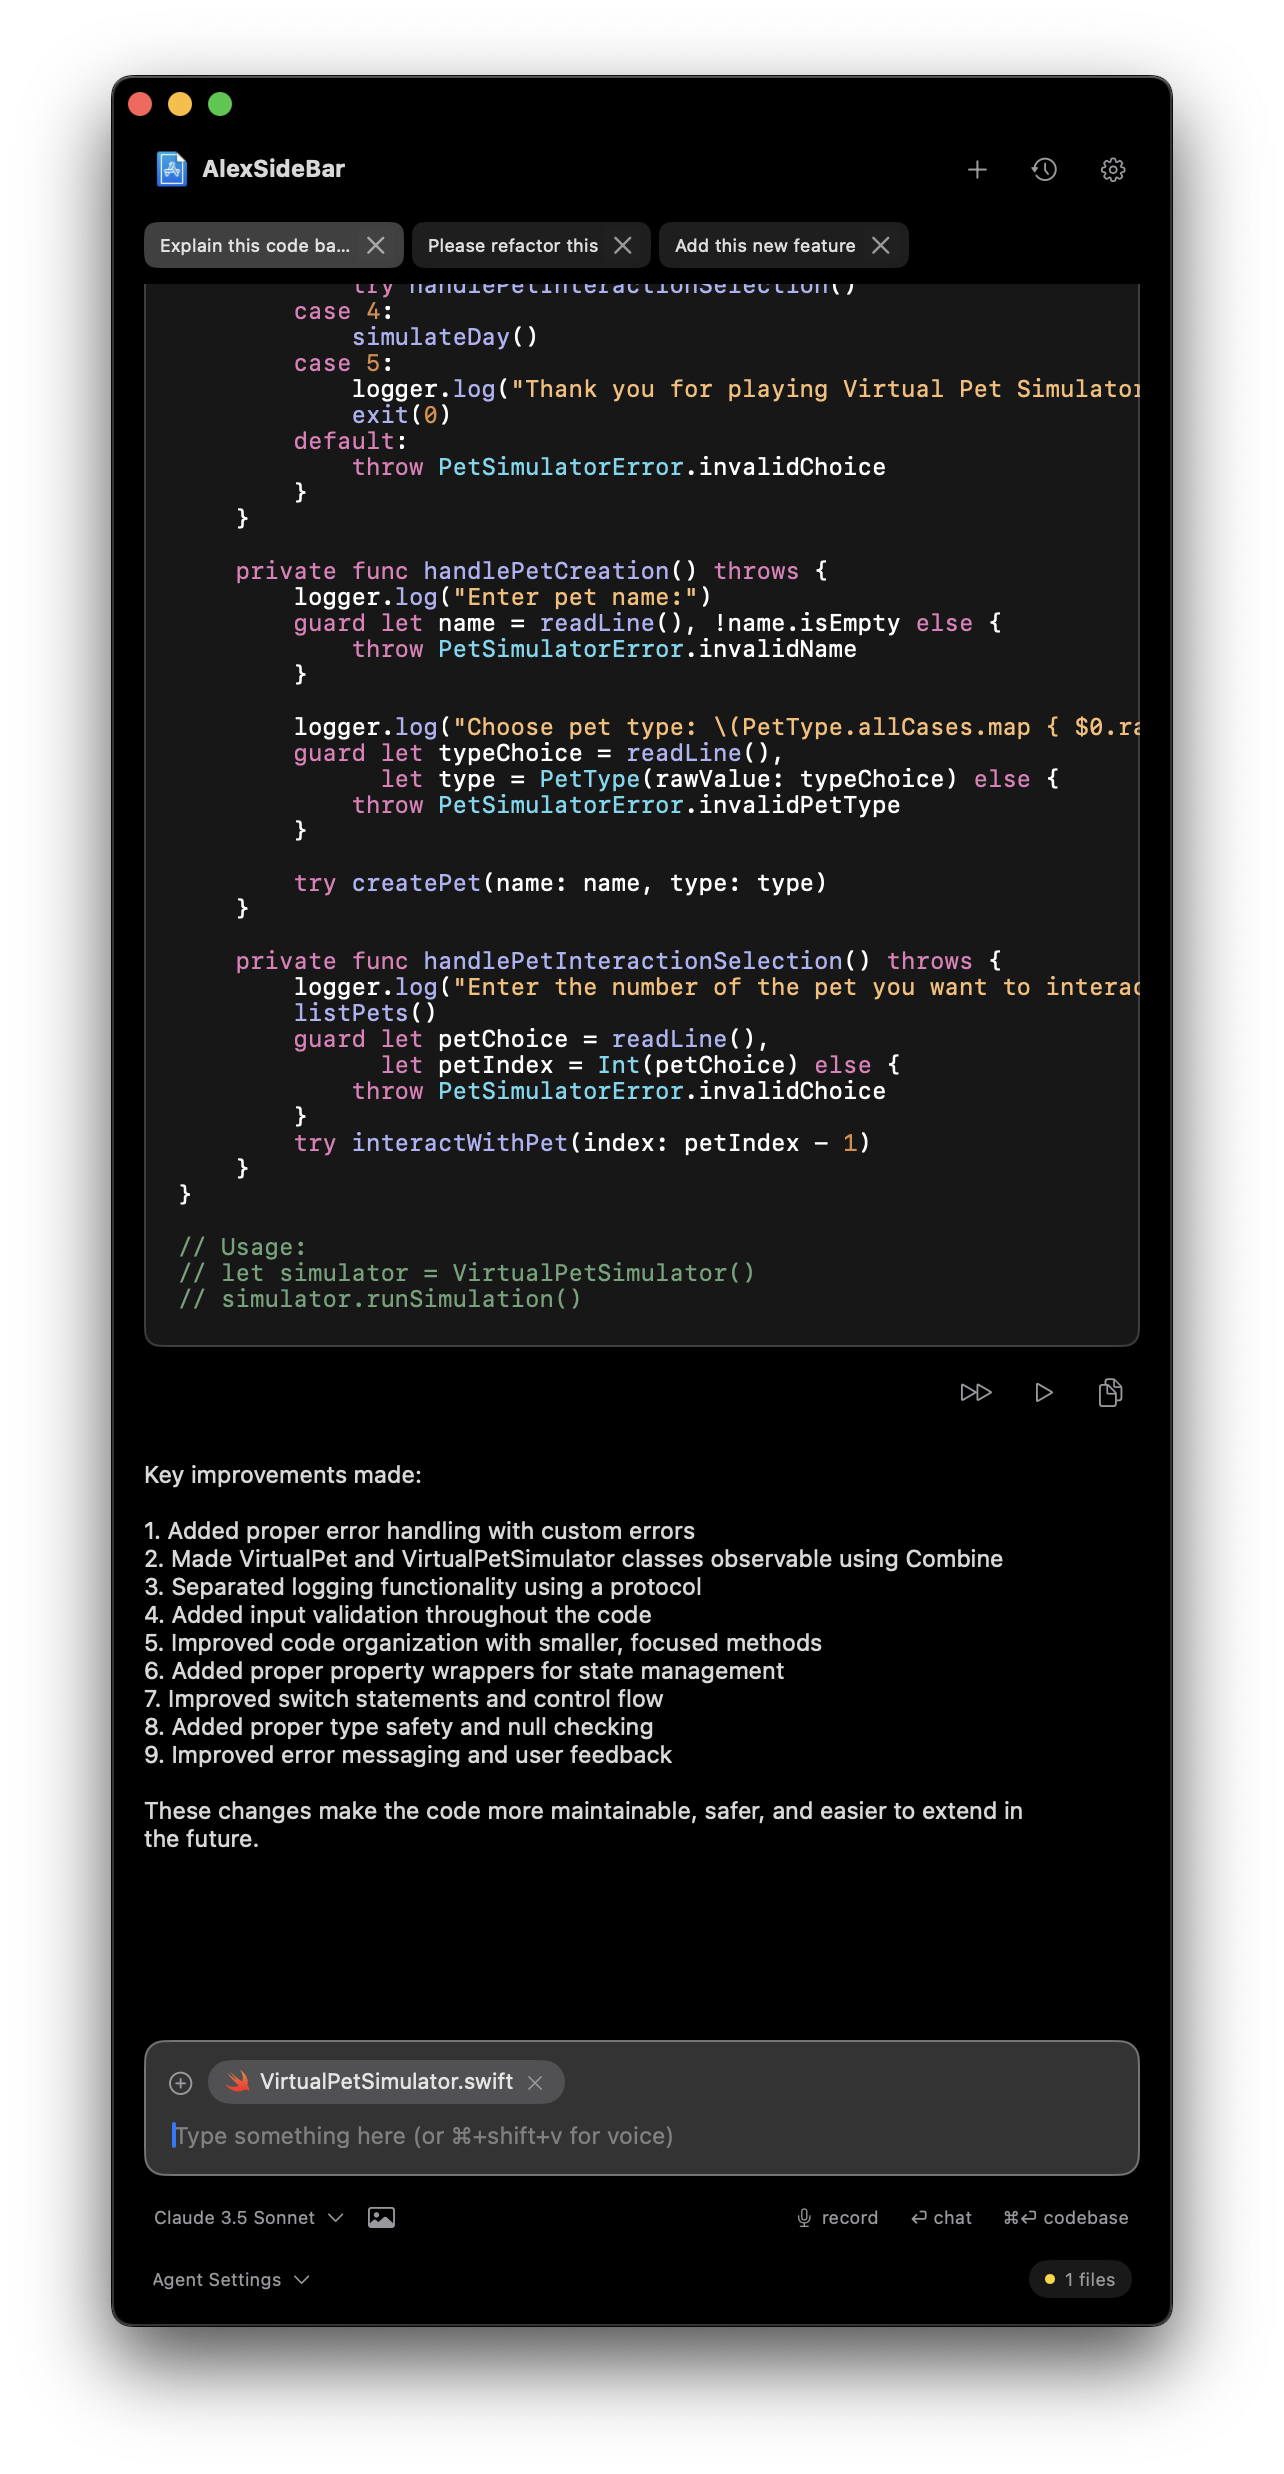
## Applying Changes
* Smart and fast code diff
* Handles both simple and complex changes
* Chunks mode enabled by default for better handling
* Quick Apply for instant changes without diff panel
* Fast-forward button (⏩) for instant application
* Perfect for all types of code modifications from quick fixes to refactoring
## Think First Mode
The "Think First" option combines DeepSeek R1's reasoning capabilities with Claude's responses for the best possible results. When enabled:
1. DeepSeek R1 first reasons about the problem using thinking tokens
2. This analysis is then used to guide Claude's response
3. Results in more thorough and accurate solutions
Think First mode can be toggled for individual messages using the "Think first" option under each message input.
## Best Practices
* Be specific about what you want
* Provide necessary context
* Use appropriate commands
* Break complex questions into smaller parts
* Keep context focused and relevant
* Remove unnecessary files
* Update context when switching tasks
* Clear context for new topics
Need more detailed guidance? Learn more about best practices in our [Best Practices guide](/best-practices).
## Web Search Integration
## Best Practices
* Speak at a natural pace
* Enunciate clearly
* Avoid background noise
* Use technical terms carefully
* Use voice for longer explanations
* Review transcription before sending
* Combine with code selection
## Accessibility Benefits
Voice Mode makes Alex more accessible and easier to use for everyone.
* When you are coding for long periods, **Voice Mode** lets you take breaks from typing while staying productive.
* For developers with mobility challenges or strain injuries, voice input provides a comfortable way to interact with Alex. You can dictate code explanations and questions instead.
* Having voice as an additional input option means you can choose what works best for you in different situations. Sometimes speaking is just more convenient than typing.
And when you need to explain complex concepts or walk through detailed logic, speaking it out loud often feels more natural and fluid than typing it all out.
# Overview
Source: https://alexcode.ai/docs/chat/overview
Learn how to use Alex Sidebar's chat for code assistance
Alex Sidebar's chat feature enables code discussions and improvements in Xcode running on the side. By prompting your queries, you can assist your coding process and resolve issues more quickly.
## Quick Actions
Click this button in the main view to automatically build your project and fix all compilation errors in a continuous loop until success.
Select code in Xcode to start a **new chat**. The selected content will automatically be added as a reference.
Add selected code to your existing chat without opening a new window. Perfect for building context incrementally.
Start a chat with entire codebase as context. Useful for high-level questions
about your project.
Access documentation, add more files and more using the @ menu in your chat.
Copy-paste or drag images directly into chat for design analysis and code generation. Perfect for UI discussions and visual debugging.
## Copy Request Button
Perfect for using the most powerful models like o3 Pro or models with massive context windows like Gemini 2.5 Pro (1M+ tokens).
The Copy Request button lets you export your code context to use with external AI services:
Look for the copy icon at the bottom of any message in your chat
Clicking copies:
* All code context and file contents
* Your current query
* Formatted for easy pasting
Paste the copied content into:
* **ChatGPT o3-pro** - For the most powerful reasoning
* **Google AI Studio** - For Gemini 2.5 Pro with 1M+ token context
## Getting Started
In Xcode's editor window, highlight the code you want to discuss or improve.
Providing relevant code context helps the AI better understand your
question and provide more accurate responses.
Select code and press **Command + L** to start a chat.
Additional ways to start a chat:
* Click the chat (plus) icon in the top right of the sidebar
* Click the **"Build & Fix Errors"** button for automatic error resolution
* Use **Command + Enter** for a new chat with full codebase context
The more relevant context you provide, the more accurate and helpful the
responses will be.
## Context Management
* Chats are automatically saved
* Access previous chats from history
* Clear individual history
* Reference multiple files in one chat
* Generate changes for multiple files
## Common Use Cases
* Select complex functions or blocks
* Press **Command + L**
* Ask for step-by-step explanations
* Get detailed breakdowns of code behavior
* Highlight code that needs improvement
* Start a chat with **Command + L**
* Request refactoring suggestions
* Apply changes directly from chat
* Select problematic code sections
* Include error messages if available
* Ask for debugging assistance
* Get targeted solutions and fixes
## Applying Changes
* Smart and fast code diff
* Handles both simple and complex changes
* Chunks mode enabled by default for better handling
* Quick Apply for instant changes without diff panel
* Fast-forward button (⏩) for instant application
* Perfect for all types of code modifications from quick fixes to refactoring
## Think First Mode
The "Think First" option combines DeepSeek R1's reasoning capabilities with Claude's responses for the best possible results. When enabled:
1. DeepSeek R1 first reasons about the problem using thinking tokens
2. This analysis is then used to guide Claude's response
3. Results in more thorough and accurate solutions
Think First mode can be toggled for individual messages using the "Think first" option under each message input.
## Best Practices
* Be specific about what you want
* Provide necessary context
* Use appropriate commands
* Break complex questions into smaller parts
* Keep context focused and relevant
* Remove unnecessary files
* Update context when switching tasks
* Clear context for new topics
Need more detailed guidance? Learn more about best practices in our [Best Practices guide](/best-practices).
## Web Search Integration
 The **Web** button in chat provides access to curated iOS development resources. When enabled:
* Automatically searches popular iOS development blogs
* Finds relevant GitHub repositories and discussions
* Retrieves up-to-date documentation and examples
### Using Web Search
1. Click the "Web" button in chat
2. Alex searches relevant iOS resources
3. Results are automatically added as context
4. Get responses based on the latest information
The web search feature ensures you get the most current solutions and best practices from the iOS development community.
# UI Customization
Source: https://alexcode.ai/docs/chat/ui/customization
Customize Alex Sidebar chat interface to match your preferences
## Code Section Expansion
Control how code sections are displayed in chat by default. This setting helps you manage the visibility of code blocks in your conversations.
The **Web** button in chat provides access to curated iOS development resources. When enabled:
* Automatically searches popular iOS development blogs
* Finds relevant GitHub repositories and discussions
* Retrieves up-to-date documentation and examples
### Using Web Search
1. Click the "Web" button in chat
2. Alex searches relevant iOS resources
3. Results are automatically added as context
4. Get responses based on the latest information
The web search feature ensures you get the most current solutions and best practices from the iOS development community.
# UI Customization
Source: https://alexcode.ai/docs/chat/ui/customization
Customize Alex Sidebar chat interface to match your preferences
## Code Section Expansion
Control how code sections are displayed in chat by default. This setting helps you manage the visibility of code blocks in your conversations.
 Code sections now expand by default for immediate visibility of complete code blocks.
Customize this behavior in Settings > Window Management to match your workflow preferences.
## Configure Code Expansion
You can configure the code expansion behavior in Settings > Window Management. This setting allows you to control whether code blocks automatically expand or remain collapsed by default.
Code sections now expand by default for immediate visibility of complete code blocks.
Customize this behavior in Settings > Window Management to match your workflow preferences.
## Configure Code Expansion
You can configure the code expansion behavior in Settings > Window Management. This setting allows you to control whether code blocks automatically expand or remain collapsed by default.
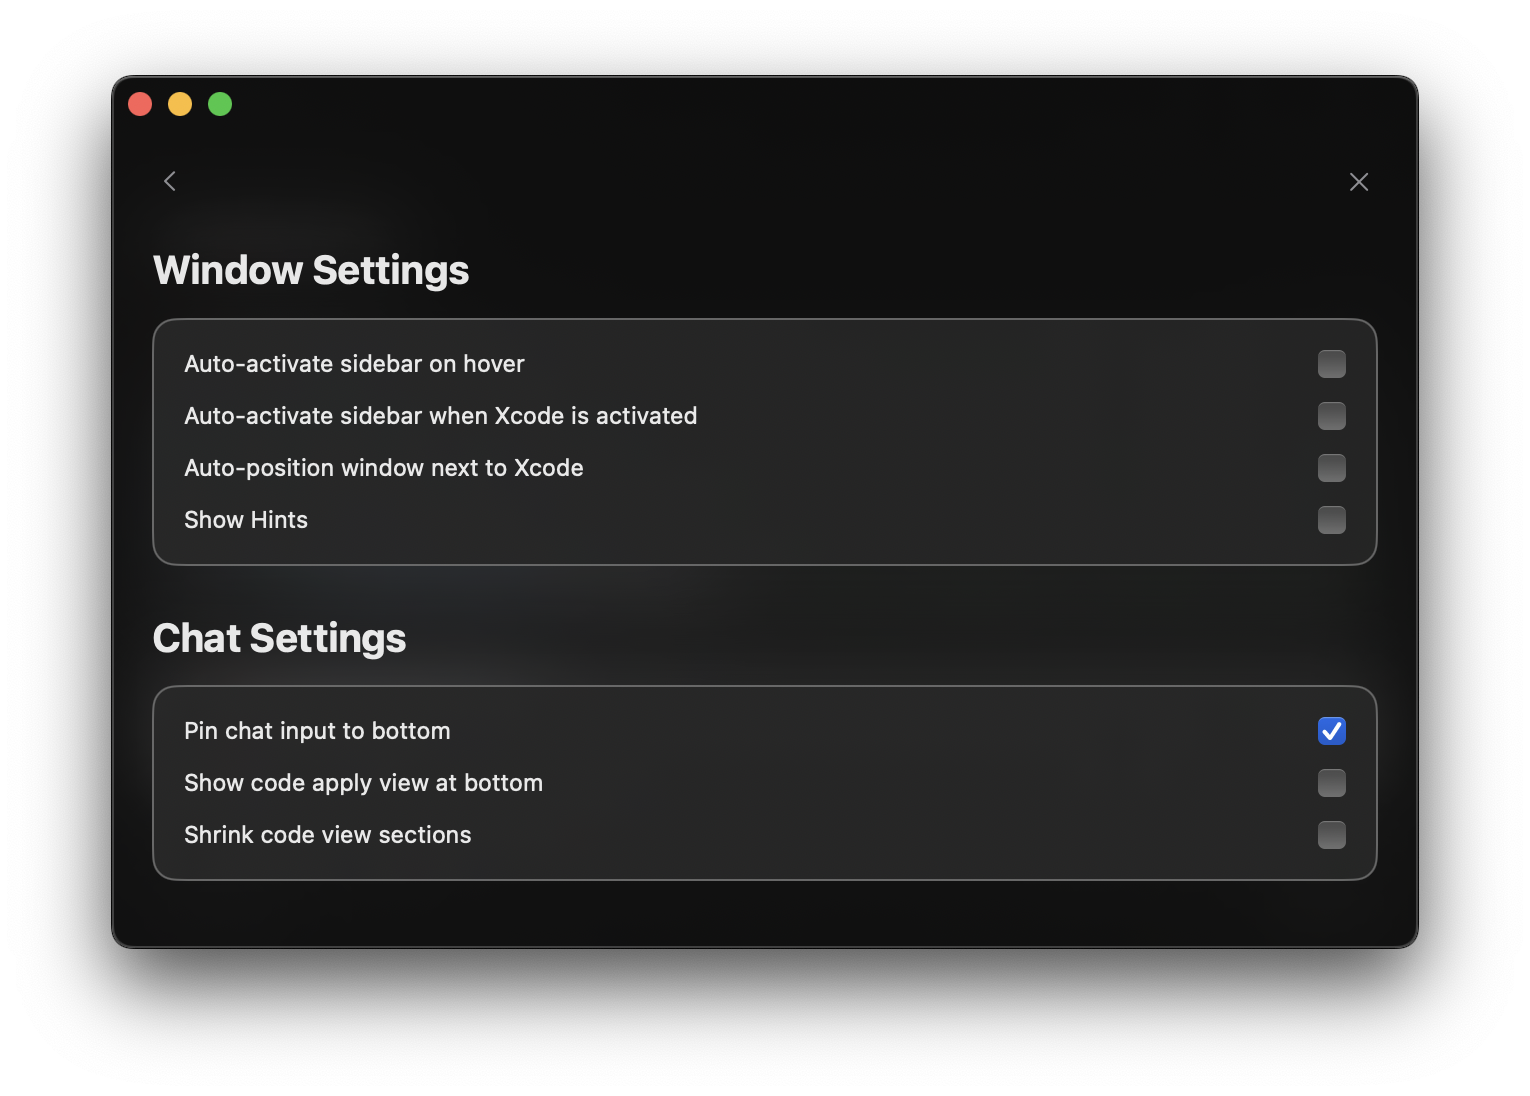
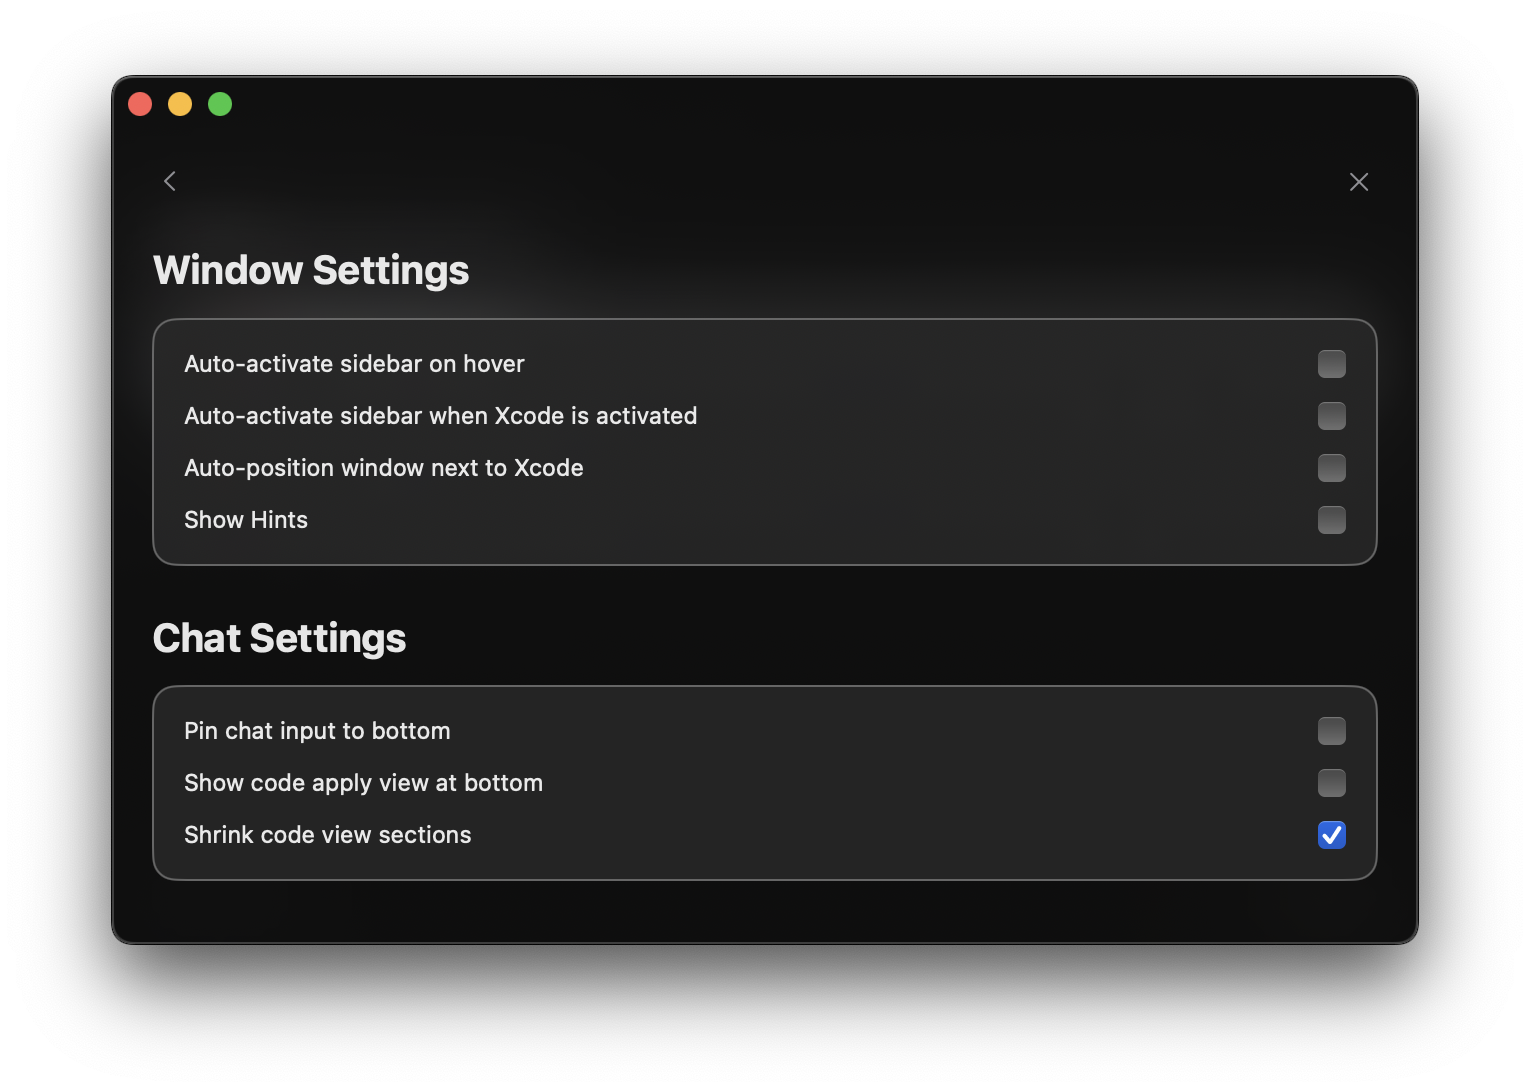 ## Pin Chat to Bottom
Keep the chat input field fixed at the bottom of the window for easy access and improved usability.
## Pin Chat to Bottom
Keep the chat input field fixed at the bottom of the window for easy access and improved usability.
 Keep the chat input field in view at all times for instant access.
Access the chat feature directly without searching or scrolling.
Interact with the chat interface for a natural conversation rhythm.
Optimize the display of long chat histories while keeping the input accessible.
Keep the chat input field in view at all times for instant access.
Access the chat feature directly without searching or scrolling.
Interact with the chat interface for a natural conversation rhythm.
Optimize the display of long chat histories while keeping the input accessible.
 ## Code Apply View Position
The code apply view position feature lets you keep the code changes interface at the bottom of the window, allowing you to quickly apply changes without needing to scroll up through the code changes.
## Code Apply View Position
The code apply view position feature lets you keep the code changes interface at the bottom of the window, allowing you to quickly apply changes without needing to scroll up through the code changes.
 Keep the code apply interface fixed at the bottom for easy access to changes.
Review and apply code changes without scrolling up through long conversations.
# Error & Warning Resolution
Source: https://alexcode.ai/docs/completions/error-fixes
Learn how to use Alex Sidebar to quickly resolve Xcode errors and warnings
## Quick Fix Integration
Alex Sidebar seamlessly integrates with Xcode's diagnostic system to help resolve errors and warnings efficiently.
Click any error or warning indicator in Xcode's gutter to get instant
AI-powered solutions.
Automatic context gathering and error analysis for targeted fixes.
## Using Quick Fix
Hover over the line containing the red (error) or yellow (warning) indicator in Xcode's, then click the indicator
Keep the code apply interface fixed at the bottom for easy access to changes.
Review and apply code changes without scrolling up through long conversations.
# Error & Warning Resolution
Source: https://alexcode.ai/docs/completions/error-fixes
Learn how to use Alex Sidebar to quickly resolve Xcode errors and warnings
## Quick Fix Integration
Alex Sidebar seamlessly integrates with Xcode's diagnostic system to help resolve errors and warnings efficiently.
Click any error or warning indicator in Xcode's gutter to get instant
AI-powered solutions.
Automatic context gathering and error analysis for targeted fixes.
## Using Quick Fix
Hover over the line containing the red (error) or yellow (warning) indicator in Xcode's, then click the indicator
 Alex Sidebar starts a new chat with the warning and error message and code context.
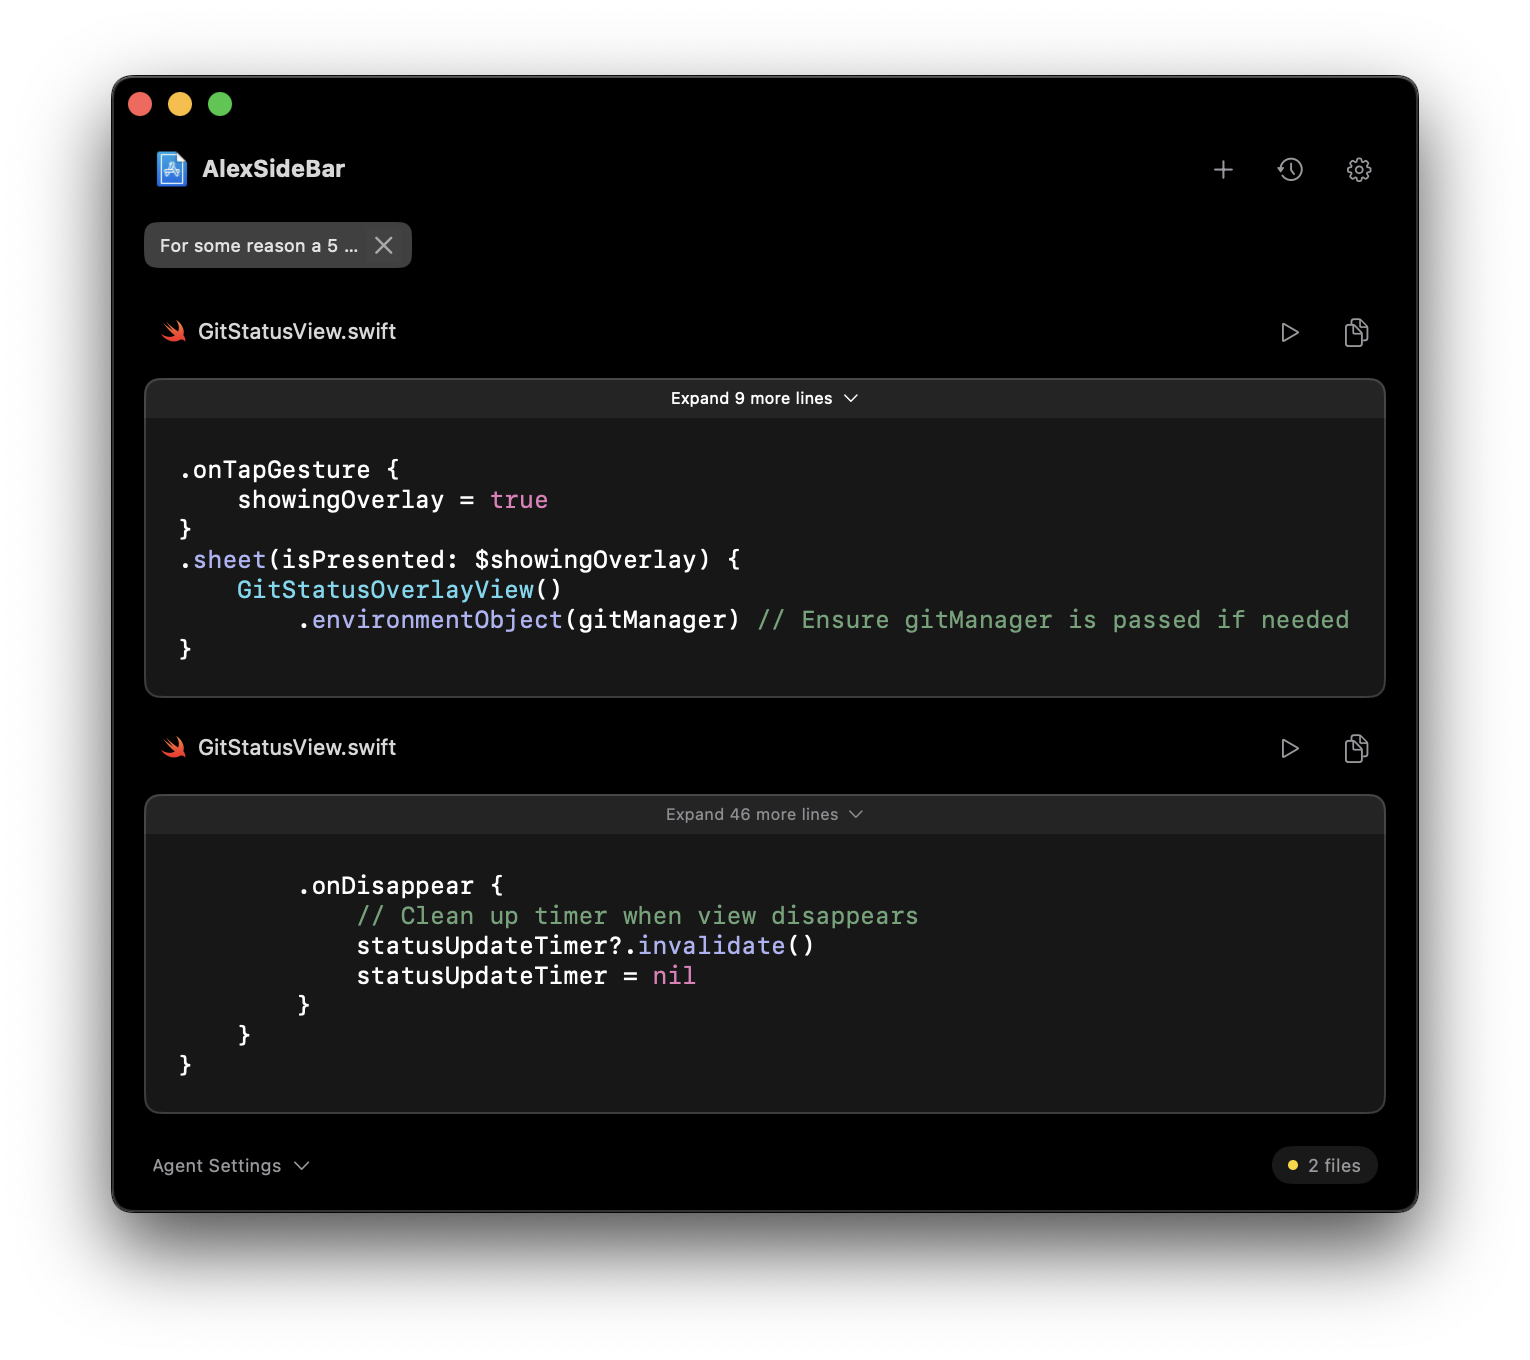
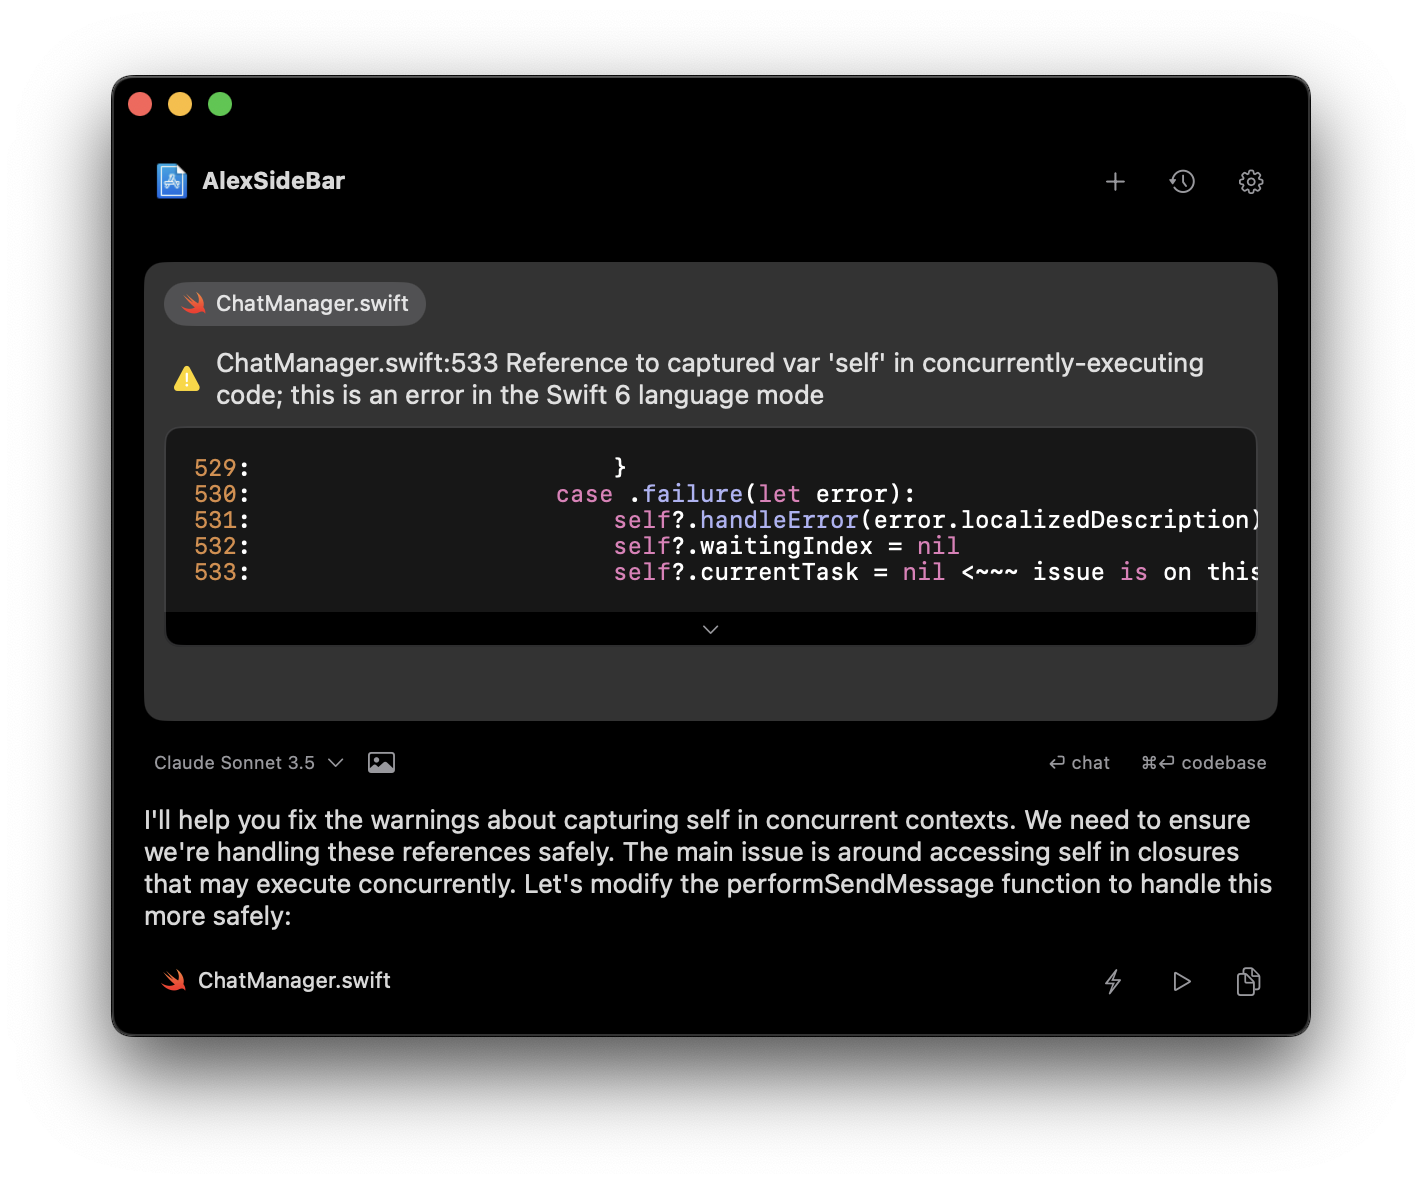 Click "Apply" to implement the suggested changes. The smart apply button will handle both simple fixes like missing imports and complex changes that require accurate diffing. For faster application, use Quick Apply (⏩) to instantly apply changes without the diff panel.
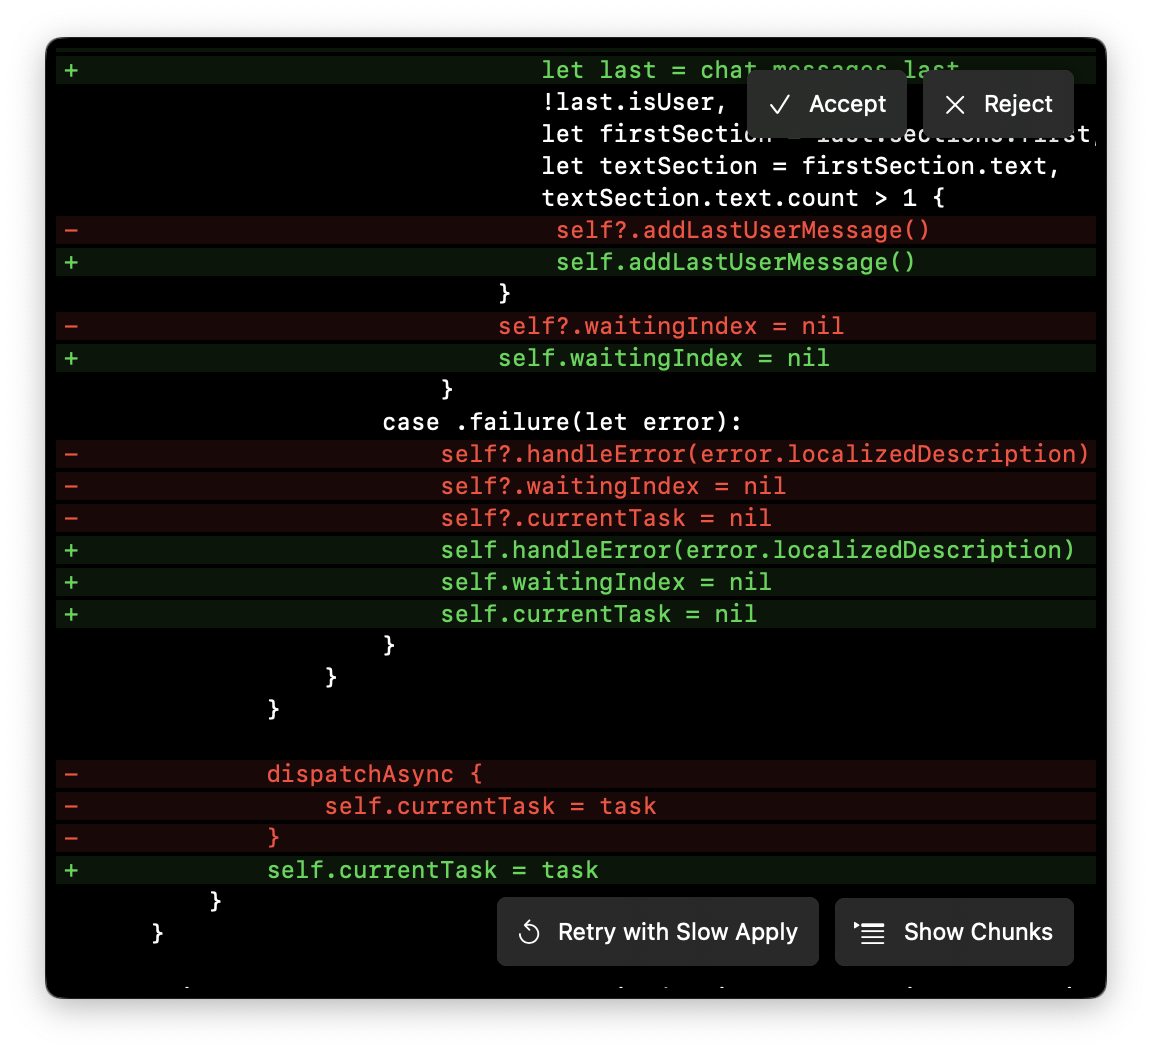 Always review the proposed changes before applying them to ensure they
match your codebase requirements
## Common Fixes
Handles common build-time issues:
* Missing imports
* Type mismatches
* Protocol conformance
* Initialization errors
* Access control issues
Addresses potential runtime problems:
* Memory management
* Thread safety
* Deprecated API usage
* Performance optimizations
* Best practice violations
Resolves preview-specific issues:
* Missing preview providers
* Environment requirements
* Device configuration
* Preview context setup
## Advanced Usage
For specialized error cases:
* Select the problematic code
* Use Command + L to start a chat
* Provide additional context
* Get customized solutions
When dealing with multiple related issues:
* Group similar errors using Command + Shift + L to add the context in the existing chat
* Apply fixes systematically
* Validate changes incrementally
Pro Tip: Use the chat interface for more complex error scenarios that might
require additional context or explanation.
# Inline Code Suggestions
Source: https://alexcode.ai/docs/completions/inline-suggestions
Learn how to use Alex Sidebar's code completion features
## Quick Code Generation
Alex Sidebar provides inline code suggestions and completions **directly in Xcode** to help you write code faster.
Trigger in-file suggestions to get AI-powered completions based on
your current code context.
Get real-time suggestions as you type. Press Tab to accept the highlighted
suggestion.
## Using Inline Completions
Always review the proposed changes before applying them to ensure they
match your codebase requirements
## Common Fixes
Handles common build-time issues:
* Missing imports
* Type mismatches
* Protocol conformance
* Initialization errors
* Access control issues
Addresses potential runtime problems:
* Memory management
* Thread safety
* Deprecated API usage
* Performance optimizations
* Best practice violations
Resolves preview-specific issues:
* Missing preview providers
* Environment requirements
* Device configuration
* Preview context setup
## Advanced Usage
For specialized error cases:
* Select the problematic code
* Use Command + L to start a chat
* Provide additional context
* Get customized solutions
When dealing with multiple related issues:
* Group similar errors using Command + Shift + L to add the context in the existing chat
* Apply fixes systematically
* Validate changes incrementally
Pro Tip: Use the chat interface for more complex error scenarios that might
require additional context or explanation.
# Inline Code Suggestions
Source: https://alexcode.ai/docs/completions/inline-suggestions
Learn how to use Alex Sidebar's code completion features
## Quick Code Generation
Alex Sidebar provides inline code suggestions and completions **directly in Xcode** to help you write code faster.
Trigger in-file suggestions to get AI-powered completions based on
your current code context.
Get real-time suggestions as you type. Press Tab to accept the highlighted
suggestion.
## Using Inline Completions
 Position your cursor where you want to generate code (or select existing code) in **Xcode** and press **Command + K**
K\*\*
The AI analyzes your current file context to provide relevant suggestions
Choose from available AI models for completion:
* Claude 3.5 Sonnet: Advanced model for complex completions
* GPT-4: Balanced performance and accuracy
* Gemini Flash 2.0: Fast, lightweight completions
You can add additional models through the Model Settings, including:
* Local models via Ollama integration
* Custom API-compatible models
* Other OpenAI-compatible endpoints
See the [Model Configuration](/configuration/model-configuration) section for detailed setup instructions.
Position your cursor where you want to generate code (or select existing code) in **Xcode** and press **Command + K**
K\*\*
The AI analyzes your current file context to provide relevant suggestions
Choose from available AI models for completion:
* Claude 3.5 Sonnet: Advanced model for complex completions
* GPT-4: Balanced performance and accuracy
* Gemini Flash 2.0: Fast, lightweight completions
You can add additional models through the Model Settings, including:
* Local models via Ollama integration
* Custom API-compatible models
* Other OpenAI-compatible endpoints
See the [Model Configuration](/configuration/model-configuration) section for detailed setup instructions.
 * Press Enter to accept the current suggestion
* Press Esc to dismiss suggestions
* Click retry button to generate new suggestions
* Press Enter to accept the current suggestion
* Press Esc to dismiss suggestions
* Click retry button to generate new suggestions
 ## Tab Completion
 Alex Sidebar provides high-performance autocomplete suggestions with just 300-350ms latency - faster than GitHub Copilot and Xcode's built-in completions.
* Press Tab to accept suggestion
* Suggestions appear mid-sentence as you type
* Context-aware code suggestions
* Variable and method completions
### Enabling Autocomplete
To configure autocomplete:
1. Open Settings
2. Go to Features & Keybindings
3. Find "Autocomplete Settings"
4. Configure the available options:
* **Enable Autocomplete**: Turn the feature on/off
* **Use Fast Autocomplete**: Switch to an optimized model that provides \~50% faster completions, ideal for rapid development
* **Inline completion**: Configure the ⌘ + K shortcut
The base autocomplete model has been optimized for better performance with large files (>600 lines).
## Best Practices
* Use Claude 3.5 Sonnet for complex logic
* Choose GPT-4 for balanced performance
* Select Gemini Flash 2.0 for quick completions
* Use Command + K for larger completions
* Try different models if results aren't ideal
* Use retry option for alternative suggestions
* Tab complete for quick suggestions
## SwiftUI Code Examples
Here are some practical examples of how Alex Sidebar's inline suggestions work with SwiftUI code:
Start typing a basic SwiftUI view and let inline suggestions help:
```swift
struct ContentView: View {
var body: some View {
// Type "VStack", wait for a bit and then press TAB
VStack(spacing: 16) {
Text("Hello, World!")
.font(.title)
.foregroundColor(.blue)
Button("Tap me") {
// Suggestions will offer action implementations
}
}
}
}
```
Get intelligent suggestions for SwiftUI property wrappers:
```swift
struct TodoView: View {
// Type "@St" and use Tab completion
@State private var taskTitle = ""
// Type "@Ob" for Observable properties
@ObservedObject var viewModel: TodoViewModel
var body: some View {
Form {
TextField("Task Title", text: $taskTitle)
// Suggestions will offer common modifiers
}
}
}
```
Get suggestions for custom view modifiers:
```swift
struct CardModifier: ViewModifier {
// Type "func" and let suggestions complete the method
func body(content: Content) -> some View {
content
.padding()
.background(Color.white)
.cornerRadius(10)
.shadow(radius: 5)
}
}
// Usage example with inline suggestions
Text("Card Content")
.modifier(CardModifier())
```
The examples above demonstrate common SwiftUI patterns where inline
suggestions are particularly helpful. As you type these patterns, Alex Sidebar
will suggest: - Property wrapper completions - View modifier chains - Common
SwiftUI view structures - Closure completions
While AI suggestions are powerful, always review generated code to ensure it
meets your requirements and follows your project's conventions.
# Tab Completions
Source: https://alexcode.ai/docs/completions/multiline-tab
Write code faster with intelligent, context-aware completions that span multiple lines
Tab completions in Alex Sidebar go beyond simple autocomplete. They understand your code's context and can suggest entire blocks and complete functions based on what you're writing.
To enable Multiline suggestions, which is currently an alpha feature, go to:
1. Settings
2. Features & Keybindings
3. Enable Multiline Suggestions
Because multline suggestions requires screen access, you will need to enable screen recording access to AlexSideBar in your system preferences.
Multiline tab (alpha) is available from version 3.3
## How Tab Works
As you type, Alex Sidebar analyzes your code and suggests completions that appear as completion text. Press **Tab** to accept the suggestion and watch as it intelligently fills in multiple lines at once.
To disable interferece with Xcode, please disable Apple's predictive code completion in Xcode → Settings → Text Editing → Editing → uncheck "Use code completion".
## Key Features
Understands your entire file and recent edits to provide relevant completions
Suggests complete code blocks, not just single lines
Considers other files in your project when making suggestions
Low-latency suggestions that keep up with your typing speed
## Using Tab Completions
### Basic Usage
Write your code normally. Alex Sidebar watches for opportunities to help.
Completion text appears showing what Alex suggests. This could be:
* Completing the current line
* Adding multiple lines to finish a function
* **Tab**: Accept the entire suggestion
* **Esc**: Dismiss the suggestion
* Keep typing to ignore and get new suggestions
### Advanced Features
#### Learning from Context
Tab uses your recent edits and previous tab acceptances to provide more relevant suggestions.
#### Contextual Understanding
Tab completions consider:
* Your recent edits and what you're working on
* The structure of your current function or class
* Import statements and available APIs
* Your coding style and naming conventions
* Xcode's build errors and warnings
Tab remembers your previous accepts across different files. When you accept a suggestion in one file, it learns from that pattern and applies similar suggestions in other files you work on.
## Configuration
### Enable/Disable Tab
Toggle Tab completions in Settings → Features & Keybindings → Enable Autocomplete under the "Editor Features" section.
Tab completions work best when codebase indexing is enabled. This helps Alex understand your project structure and provide more accurate suggestions.
You can also quickly enable/disable it in the system menubar when Alex is focused (Autocomplete section).
## Troubleshooting
### Suggestions not appearing?
* Check that Tab completions are enabled in settings
* Try manually triggering with Tab key
# Code & Context Shortcuts
Source: https://alexcode.ai/docs/configuration/code-context-shortcuts
Keyboard shortcuts for managing code interactions and chat context
These shortcuts can be customized by clicking on any default shortcut in the Settings panel.
* **Command + L**: Start a new chat with your selected code
* **Command + Shift + L**: Add selected code to your current chat
* **Command + N**: Create a fresh chat (without code)
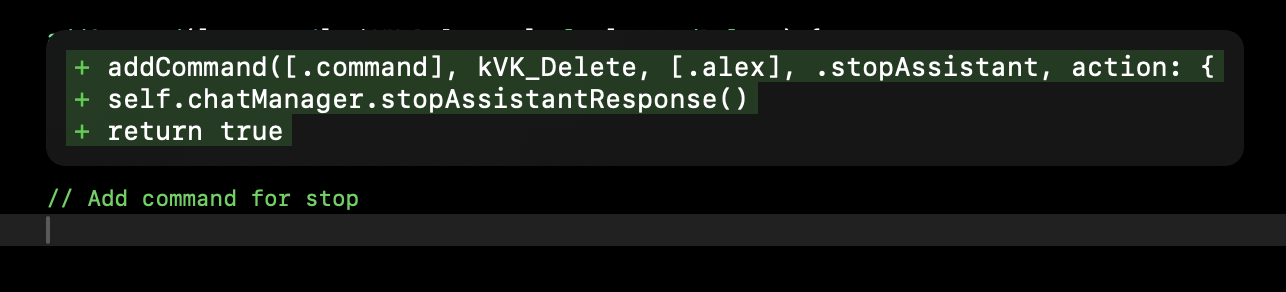
* **Command + Delete**: Stop the current generation
Just getting started? The **Command + L** shortcut is essential for starting AI chats about your code directly from Xcode.
# Codebase Indexing
Source: https://alexcode.ai/docs/configuration/codebase-indexing
Learn how to manage and optimize codebase indexing for better AI assistance
When you open a project in Alex Sidebar, it automatically analyzes and indexes your code files to better understand your codebase.
Think of this like creating a smart map of your code - Alex reads through each file and then can utilize this information to provide more accurate and relevant suggestions when going through your queries.
Alex Sidebar provides high-performance autocomplete suggestions with just 300-350ms latency - faster than GitHub Copilot and Xcode's built-in completions.
* Press Tab to accept suggestion
* Suggestions appear mid-sentence as you type
* Context-aware code suggestions
* Variable and method completions
### Enabling Autocomplete
To configure autocomplete:
1. Open Settings
2. Go to Features & Keybindings
3. Find "Autocomplete Settings"
4. Configure the available options:
* **Enable Autocomplete**: Turn the feature on/off
* **Use Fast Autocomplete**: Switch to an optimized model that provides \~50% faster completions, ideal for rapid development
* **Inline completion**: Configure the ⌘ + K shortcut
The base autocomplete model has been optimized for better performance with large files (>600 lines).
## Best Practices
* Use Claude 3.5 Sonnet for complex logic
* Choose GPT-4 for balanced performance
* Select Gemini Flash 2.0 for quick completions
* Use Command + K for larger completions
* Try different models if results aren't ideal
* Use retry option for alternative suggestions
* Tab complete for quick suggestions
## SwiftUI Code Examples
Here are some practical examples of how Alex Sidebar's inline suggestions work with SwiftUI code:
Start typing a basic SwiftUI view and let inline suggestions help:
```swift
struct ContentView: View {
var body: some View {
// Type "VStack", wait for a bit and then press TAB
VStack(spacing: 16) {
Text("Hello, World!")
.font(.title)
.foregroundColor(.blue)
Button("Tap me") {
// Suggestions will offer action implementations
}
}
}
}
```
Get intelligent suggestions for SwiftUI property wrappers:
```swift
struct TodoView: View {
// Type "@St" and use Tab completion
@State private var taskTitle = ""
// Type "@Ob" for Observable properties
@ObservedObject var viewModel: TodoViewModel
var body: some View {
Form {
TextField("Task Title", text: $taskTitle)
// Suggestions will offer common modifiers
}
}
}
```
Get suggestions for custom view modifiers:
```swift
struct CardModifier: ViewModifier {
// Type "func" and let suggestions complete the method
func body(content: Content) -> some View {
content
.padding()
.background(Color.white)
.cornerRadius(10)
.shadow(radius: 5)
}
}
// Usage example with inline suggestions
Text("Card Content")
.modifier(CardModifier())
```
The examples above demonstrate common SwiftUI patterns where inline
suggestions are particularly helpful. As you type these patterns, Alex Sidebar
will suggest: - Property wrapper completions - View modifier chains - Common
SwiftUI view structures - Closure completions
While AI suggestions are powerful, always review generated code to ensure it
meets your requirements and follows your project's conventions.
# Tab Completions
Source: https://alexcode.ai/docs/completions/multiline-tab
Write code faster with intelligent, context-aware completions that span multiple lines
Tab completions in Alex Sidebar go beyond simple autocomplete. They understand your code's context and can suggest entire blocks and complete functions based on what you're writing.
To enable Multiline suggestions, which is currently an alpha feature, go to:
1. Settings
2. Features & Keybindings
3. Enable Multiline Suggestions
Because multline suggestions requires screen access, you will need to enable screen recording access to AlexSideBar in your system preferences.
Multiline tab (alpha) is available from version 3.3
## How Tab Works
As you type, Alex Sidebar analyzes your code and suggests completions that appear as completion text. Press **Tab** to accept the suggestion and watch as it intelligently fills in multiple lines at once.
To disable interferece with Xcode, please disable Apple's predictive code completion in Xcode → Settings → Text Editing → Editing → uncheck "Use code completion".
## Key Features
Understands your entire file and recent edits to provide relevant completions
Suggests complete code blocks, not just single lines
Considers other files in your project when making suggestions
Low-latency suggestions that keep up with your typing speed
## Using Tab Completions
### Basic Usage
Write your code normally. Alex Sidebar watches for opportunities to help.
Completion text appears showing what Alex suggests. This could be:
* Completing the current line
* Adding multiple lines to finish a function
* **Tab**: Accept the entire suggestion
* **Esc**: Dismiss the suggestion
* Keep typing to ignore and get new suggestions
### Advanced Features
#### Learning from Context
Tab uses your recent edits and previous tab acceptances to provide more relevant suggestions.
#### Contextual Understanding
Tab completions consider:
* Your recent edits and what you're working on
* The structure of your current function or class
* Import statements and available APIs
* Your coding style and naming conventions
* Xcode's build errors and warnings
Tab remembers your previous accepts across different files. When you accept a suggestion in one file, it learns from that pattern and applies similar suggestions in other files you work on.
## Configuration
### Enable/Disable Tab
Toggle Tab completions in Settings → Features & Keybindings → Enable Autocomplete under the "Editor Features" section.
Tab completions work best when codebase indexing is enabled. This helps Alex understand your project structure and provide more accurate suggestions.
You can also quickly enable/disable it in the system menubar when Alex is focused (Autocomplete section).
## Troubleshooting
### Suggestions not appearing?
* Check that Tab completions are enabled in settings
* Try manually triggering with Tab key
# Code & Context Shortcuts
Source: https://alexcode.ai/docs/configuration/code-context-shortcuts
Keyboard shortcuts for managing code interactions and chat context

These shortcuts can be customized by clicking on any default shortcut in the Settings panel.
* **Command + L**: Start a new chat with your selected code
* **Command + Shift + L**: Add selected code to your current chat
* **Command + N**: Create a fresh chat (without code)
* **Command + Delete**: Stop the current generation
Just getting started? The **Command + L** shortcut is essential for starting AI chats about your code directly from Xcode.
# Codebase Indexing
Source: https://alexcode.ai/docs/configuration/codebase-indexing
Learn how to manage and optimize codebase indexing for better AI assistance
When you open a project in Alex Sidebar, it automatically analyzes and indexes your code files to better understand your codebase.
Think of this like creating a smart map of your code - Alex reads through each file and then can utilize this information to provide more accurate and relevant suggestions when going through your queries.
 ### What is Indexing?
Indexing is the process where Alex:
* Scans through all your code files
* Creates special embeddings for each file
* Stores these embeddings to quickly reference later
### Why is it Important?
This indexing helps Alex:
* Give you more accurate code suggestions
* Better understand the context when you ask questions
* Find relevant code examples from your own project
* Make smarter recommendations based on your actual codebase
## Code Maps
Building on top of basic indexing, Alex now automatically parses your Swift project and constructs a "Code Map" for the files you are chatting about. This means Alex has an understanding of how files interact with each other, resulting in better code generation.
When you start a chat, Alex:
* Analyzes file dependencies and imports
* Maps class and type relationships
* Understands protocol conformances
* Tracks function calls between files
This deeper understanding helps Alex:
* Generate more accurate code suggestions
* Provide better refactoring recommendations
* Maintain consistency across related files
* Respect your project's architecture
Code Maps are enabled by default for all chats, so you don't need to do anything extra to get these benefits!
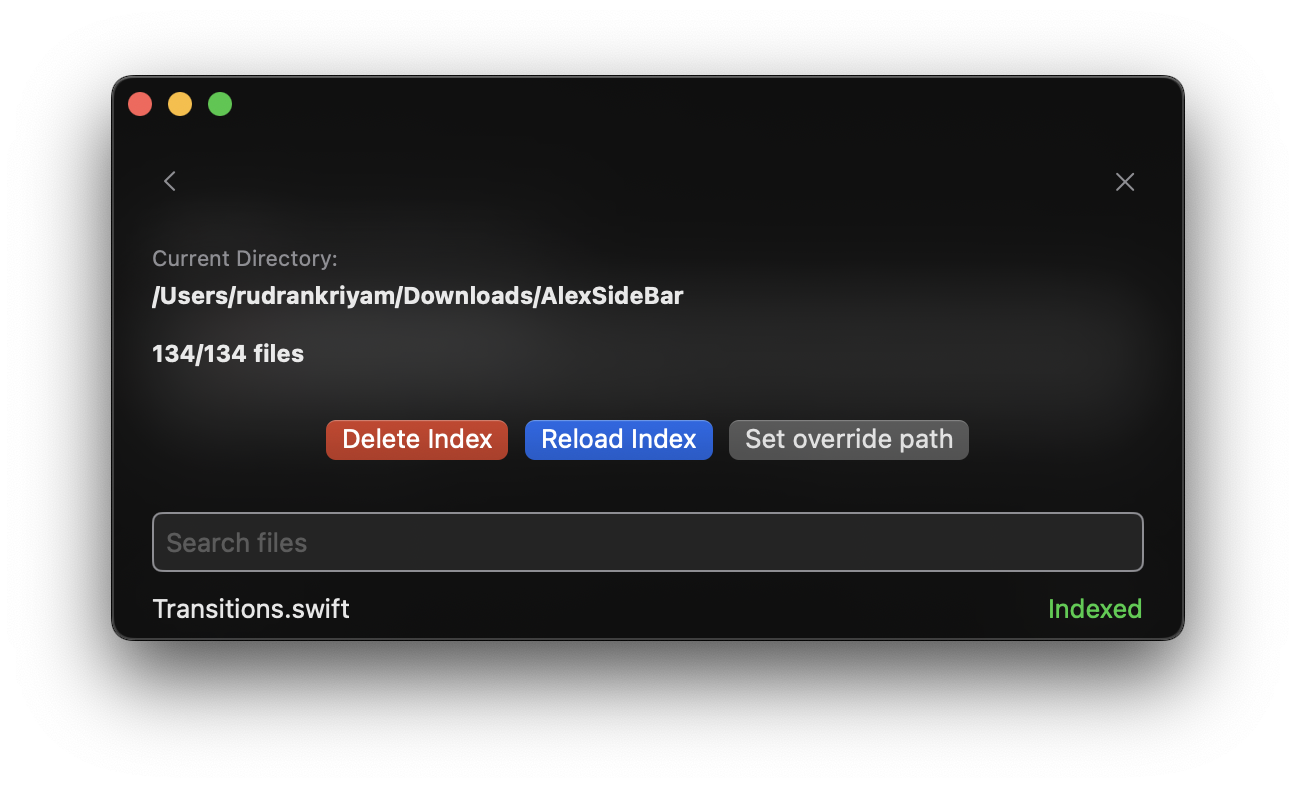
## Managing Indexes
Open the "Indexed Files" section in Settings to access the indexing UI.
Here you can:
* View all indexed files
* Check indexing status
* Manage existing indexes
* Add multiple folders for indexing
To index additional folders beyond your main Xcode project:
1. Under "Search Files", click the **"Additional Folders"** collapsible button
2. Click the **plus (+) button** to select a folder
3. Choose the folder you want to index (e.g., server repo, Android repo)
4. Click **"Reload Index"** to start indexing the new folder
5. If Alex has difficulties with recognizing the folder, hit delete index and reload it. Or try restarting the app.
This allows Alex to understand multiple codebases simultaneously, making it helpful when working with:
* Backend server repositories
* Android projects alongside iOS
* Shared libraries or dependencies
* Any other related code folders
The following operations are available:
* **Reload Index**: Initialize or refresh indexing for files
* **Delete Index**: Remove existing index data
* **Add folders**: Include additional directories for comprehensive indexing
## Automatic Synchronization
Your codebase index automatically updates when:
* Files are modified
* New files are added
* Files are deleted
* Git branches are switched
This ensures Alex Sidebar always has the most up-to-date information about your codebase!
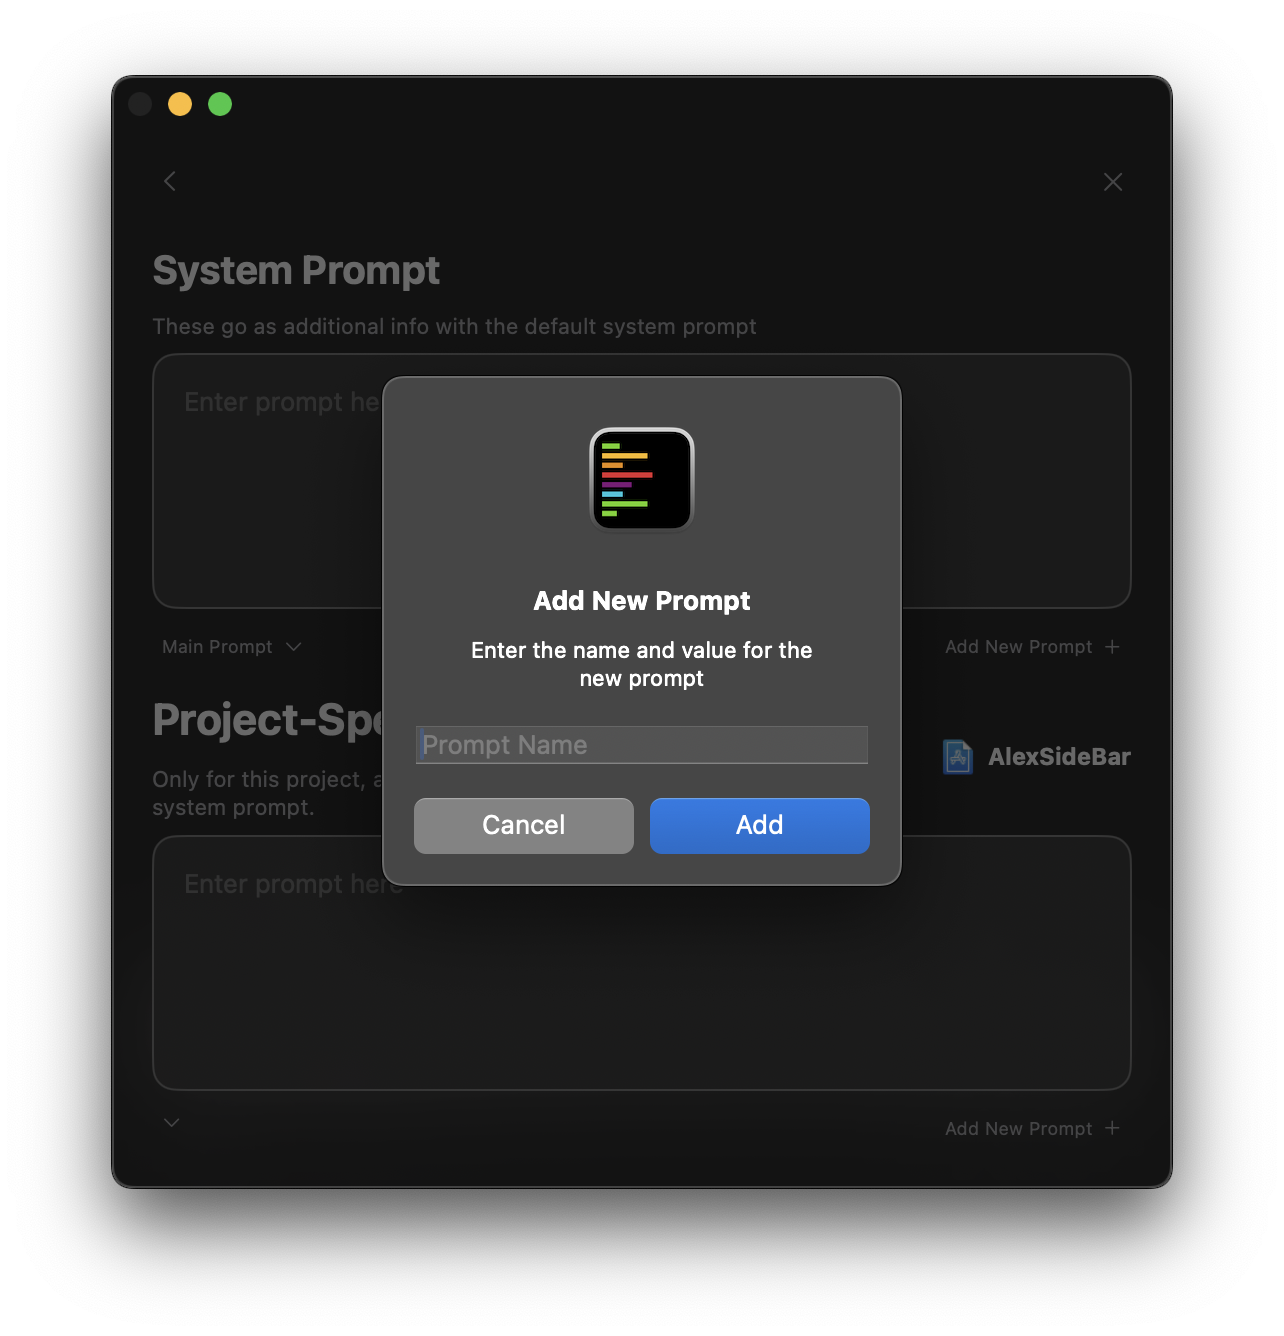
# Custom Prompts
Source: https://alexcode.ai/docs/configuration/custom-prompts
Make Alex work better for you with custom prompts
Use the two different kinds of prompts that work together to help you code:
Global prompts that apply across all projects. These define your general preferences and requirements.
Specific prompts that apply only to the current project, working in combination with system prompts.
## Prompt Configuration Interface
### What is Indexing?
Indexing is the process where Alex:
* Scans through all your code files
* Creates special embeddings for each file
* Stores these embeddings to quickly reference later
### Why is it Important?
This indexing helps Alex:
* Give you more accurate code suggestions
* Better understand the context when you ask questions
* Find relevant code examples from your own project
* Make smarter recommendations based on your actual codebase
## Code Maps
Building on top of basic indexing, Alex now automatically parses your Swift project and constructs a "Code Map" for the files you are chatting about. This means Alex has an understanding of how files interact with each other, resulting in better code generation.
When you start a chat, Alex:
* Analyzes file dependencies and imports
* Maps class and type relationships
* Understands protocol conformances
* Tracks function calls between files
This deeper understanding helps Alex:
* Generate more accurate code suggestions
* Provide better refactoring recommendations
* Maintain consistency across related files
* Respect your project's architecture
Code Maps are enabled by default for all chats, so you don't need to do anything extra to get these benefits!
## Managing Indexes
Open the "Indexed Files" section in Settings to access the indexing UI.
Here you can:
* View all indexed files
* Check indexing status
* Manage existing indexes
* Add multiple folders for indexing
To index additional folders beyond your main Xcode project:
1. Under "Search Files", click the **"Additional Folders"** collapsible button
2. Click the **plus (+) button** to select a folder
3. Choose the folder you want to index (e.g., server repo, Android repo)
4. Click **"Reload Index"** to start indexing the new folder
5. If Alex has difficulties with recognizing the folder, hit delete index and reload it. Or try restarting the app.
This allows Alex to understand multiple codebases simultaneously, making it helpful when working with:
* Backend server repositories
* Android projects alongside iOS
* Shared libraries or dependencies
* Any other related code folders
The following operations are available:
* **Reload Index**: Initialize or refresh indexing for files
* **Delete Index**: Remove existing index data
* **Add folders**: Include additional directories for comprehensive indexing
## Automatic Synchronization
Your codebase index automatically updates when:
* Files are modified
* New files are added
* Files are deleted
* Git branches are switched
This ensures Alex Sidebar always has the most up-to-date information about your codebase!
# Custom Prompts
Source: https://alexcode.ai/docs/configuration/custom-prompts
Make Alex work better for you with custom prompts
Use the two different kinds of prompts that work together to help you code:
Global prompts that apply across all projects. These define your general preferences and requirements.
Specific prompts that apply only to the current project, working in combination with system prompts.
## Prompt Configuration Interface
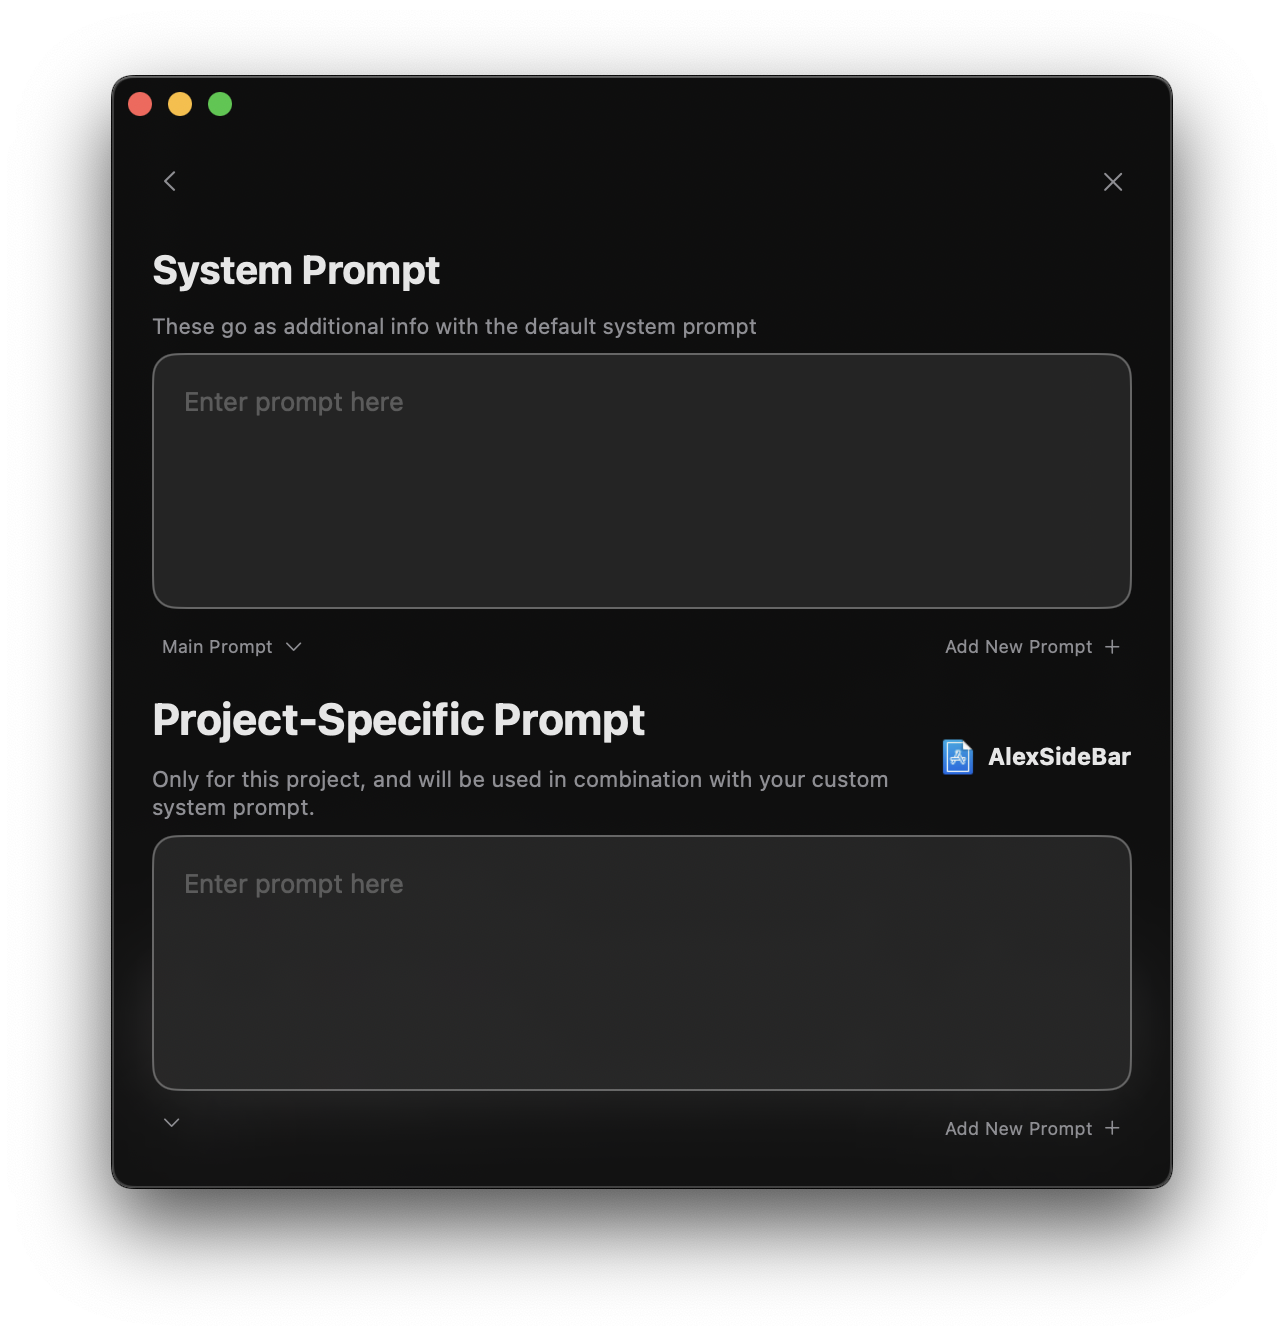 ### Key Components
1. **System Prompt Section**
* Text area for global prompt configuration
* Dropdown menu to select active prompt
* "Add New Prompt +" button for creating additional prompts
### Key Components
1. **System Prompt Section**
* Text area for global prompt configuration
* Dropdown menu to select active prompt
* "Add New Prompt +" button for creating additional prompts
 2. **Project-Specific Section**
* Dedicated prompt area for current project
* Project identifier display
* Automatic combination with system prompt
Changes to prompts take effect immediately and persist across sessions.
## SwiftUI Project Example
Here are some examples of how to configure prompts for a SwiftUI project to take inspiration from.
### System Prompt: SwiftUI Expert
```swift
You are a SwiftUI and iOS development expert. For all interactions:
**ARCHITECTURE:**
- Recommend MVVM pattern implementation
- Ensure proper view composition
- Follow SwiftUI best practices
- Consider performance implications
**CODE STYLE:**
- Use modern Swift syntax
- Implement proper property wrappers
- Follow Swift naming conventions
- Write clear documentation comments
**REQUIREMENTS:**
- Consider accessibility
- Follow Apple HIG
- Include SwiftUI previews
- Handle error cases
```
### Project Prompt: Custom App
```swift
Project: MLXFasting (Intermittent Fasting App)
**ARCHITECTURE:**
- Uses MVVM + Coordinator pattern
- CoreData for persistence
- Combine for data flow
- HealthKit integration
**CUSTOM COMPONENTS:**
- TimerView: Custom circular progress
- FastingCell: Reusable fasting period cell
- StatsView: Charts and statistics display
**DESIGN SYSTEM:**
- Colors defined in Theme.swift
- Typography in Typography.swift
- Custom modifiers in ViewModifiers.swift
**CODING GUIDELINES:**
- Use existing design system components
- Follow established patterns
- Consider offline-first approach
- Include HealthKit permissions
```
### API Integration
```swift
API Guidelines:
- Use URLSession with async/await
- Implement proper error handling
- Cache responses when appropriate
- Follow RESTful conventions
- Include request timeout handling
```
### Performance Focus
```swift
Performance Requirements:
- Implement lazy loading for lists
- Use proper image caching
- Optimize CoreData queries
- Profile memory usage
- Consider background task handling
```
## Best Practices
* One primary goal per prompt
* Clear, specific instructions
* Avoid redundant information
* Reference existing patterns
* Include architecture details
* Specify dependencies
* Update as project evolves
* Reflect new requirements
* Remove obsolete patterns
* Share effective prompts
* Standardize across team
* Document prompt purposes
Avoid including sensitive information like API keys, credentials, or internal business logic in your prompts.
# Git Integration
Source: https://alexcode.ai/docs/configuration/git-integration
Using AI-powered Git features in Alex Sidebar
Alex Sidebar provides Git integration to quickly manage your version control workflow with AI-powered commit message suggestions.
## AI-Powered Commit Messages
* Automatically generates contextual commit message suggestions
* Preview generated messages before committing
* One-click commit with suggested messages
## Quick Access
* Use **CMD+Shift+G** shortcut to open the Git status panel
* Select and manage multiple files at once
* View both staged and unstaged changes
2. **Project-Specific Section**
* Dedicated prompt area for current project
* Project identifier display
* Automatic combination with system prompt
Changes to prompts take effect immediately and persist across sessions.
## SwiftUI Project Example
Here are some examples of how to configure prompts for a SwiftUI project to take inspiration from.
### System Prompt: SwiftUI Expert
```swift
You are a SwiftUI and iOS development expert. For all interactions:
**ARCHITECTURE:**
- Recommend MVVM pattern implementation
- Ensure proper view composition
- Follow SwiftUI best practices
- Consider performance implications
**CODE STYLE:**
- Use modern Swift syntax
- Implement proper property wrappers
- Follow Swift naming conventions
- Write clear documentation comments
**REQUIREMENTS:**
- Consider accessibility
- Follow Apple HIG
- Include SwiftUI previews
- Handle error cases
```
### Project Prompt: Custom App
```swift
Project: MLXFasting (Intermittent Fasting App)
**ARCHITECTURE:**
- Uses MVVM + Coordinator pattern
- CoreData for persistence
- Combine for data flow
- HealthKit integration
**CUSTOM COMPONENTS:**
- TimerView: Custom circular progress
- FastingCell: Reusable fasting period cell
- StatsView: Charts and statistics display
**DESIGN SYSTEM:**
- Colors defined in Theme.swift
- Typography in Typography.swift
- Custom modifiers in ViewModifiers.swift
**CODING GUIDELINES:**
- Use existing design system components
- Follow established patterns
- Consider offline-first approach
- Include HealthKit permissions
```
### API Integration
```swift
API Guidelines:
- Use URLSession with async/await
- Implement proper error handling
- Cache responses when appropriate
- Follow RESTful conventions
- Include request timeout handling
```
### Performance Focus
```swift
Performance Requirements:
- Implement lazy loading for lists
- Use proper image caching
- Optimize CoreData queries
- Profile memory usage
- Consider background task handling
```
## Best Practices
* One primary goal per prompt
* Clear, specific instructions
* Avoid redundant information
* Reference existing patterns
* Include architecture details
* Specify dependencies
* Update as project evolves
* Reflect new requirements
* Remove obsolete patterns
* Share effective prompts
* Standardize across team
* Document prompt purposes
Avoid including sensitive information like API keys, credentials, or internal business logic in your prompts.
# Git Integration
Source: https://alexcode.ai/docs/configuration/git-integration
Using AI-powered Git features in Alex Sidebar
Alex Sidebar provides Git integration to quickly manage your version control workflow with AI-powered commit message suggestions.
## AI-Powered Commit Messages
* Automatically generates contextual commit message suggestions
* Preview generated messages before committing
* One-click commit with suggested messages
## Quick Access
* Use **CMD+Shift+G** shortcut to open the Git status panel
* Select and manage multiple files at once
* View both staged and unstaged changes
 The Git panel shows all your staged and unstaged changes, making it easy to review before committing.
## Using Git Integration
Press **CMD+Shift+G** to open the Git status panel.
* Use the checkboxes to select individual files
* Click "Select All" to include all changed files
* Click "Generate Commit Message" to get AI suggestions
* Review the preview of the suggested message
* Use "Copy Message" to copy to clipboard if needed
The Git panel shows all your staged and unstaged changes, making it easy to review before committing.
## Using Git Integration
Press **CMD+Shift+G** to open the Git status panel.
* Use the checkboxes to select individual files
* Click "Select All" to include all changed files
* Click "Generate Commit Message" to get AI suggestions
* Review the preview of the suggested message
* Use "Copy Message" to copy to clipboard if needed
 Click "Accept and Commit" to commit your changes with the selected message.
## Configuration
The Git integration works out of the box with your existing Git configuration. No additional setup is required.
Make sure your repository is properly initialized with Git before using these features.
# LiteLLM Proxy Setup
Source: https://alexcode.ai/docs/configuration/litellm-setup
Connect Alex Sidebar to Amazon Bedrock, Google Vertex AI, and other enterprise AI providers
LiteLLM proxy connects Alex Sidebar to Amazon Bedrock, Google Vertex AI, and other enterprise AI providers. Teams can use their existing cloud infrastructure without changing their security setup.
**For iOS Developers**: If your company already pays for AWS Bedrock or Google Cloud AI, this guide shows how to use those models in Xcode with Alex Sidebar instead of buying separate API keys.
## What is LiteLLM?
LiteLLM is an open-source proxy that translates between the OpenAI API format and 100+ different AI providers. Alex Sidebar can work with enterprise AI services that don't support the OpenAI API format.
LiteLLM is what Alex Sidebar uses internally for model connections, making it a well-tested solution for enterprise deployments. Current stable version: **v1.73.6-stable** (June 2025)
## Why Use LiteLLM?
If your company uses AWS Bedrock or Google Cloud AI, LiteLLM lets you access those models through Alex Sidebar
Your code stays within your company's cloud. No data goes to Alex Sidebar servers
See exactly how much each project costs. Set budgets and get alerts
Switch between Claude 4 on Bedrock, Gemini 2.5 on Vertex, or GPT-4 on Azure without changing code
## Quick Start
Choose your deployment method:
**Option 1: pip install (simplest)**
```bash
pip install 'litellm[proxy]'
litellm --model bedrock/claude-4-sonnet --port 4000
```
**Option 2: Docker (recommended for production)**
```bash
docker run -p 4000:4000 ghcr.io/berriai/litellm:v1.73.6-stable
```
Create a `config.yaml` file in your LiteLLM directory:
```yaml
model_list:
# Amazon Bedrock - Latest Claude 4 Models
- model_name: "claude-4-sonnet"
litellm_params:
model: "bedrock/anthropic.claude-4-sonnet-20250514-v1:0"
aws_region_name: "us-east-1"
# Google Vertex AI - Latest Gemini 2.5 Models
- model_name: "gemini-2.5-pro"
litellm_params:
model: "vertex_ai/gemini-2.5-pro"
vertex_project: "your-gcp-project"
vertex_location: "us-central1"
# OpenAI O-Series with Reasoning
- model_name: "o4-mini"
litellm_params:
model: "o4-mini-2025-04-16"
api_key: "your-openai-key"
- model_name: "o3-pro"
litellm_params:
model: "o3-pro-2025-06-10"
api_key: "your-openai-key"
# Start proxy with config
# litellm --config config.yaml --port 4000
```
In Alex Sidebar, add a custom model pointing to your LiteLLM proxy:
1. Open Settings → Models → Custom Models
2. Click "Add New Model"
3. Configure:
* **Model ID**: Your model name from config.yaml (e.g., `claude-4-sonnet`)
* **Base URL**: Your LiteLLM URL + `/v1` (e.g., `https://litellm.company.com/v1`)
* **API Key**: Your LiteLLM proxy key (if configured)
## Provider-Specific Setup
### Amazon Bedrock
1. Ensure your AWS credentials are configured on the LiteLLM server
2. Enable the models you need in the AWS Bedrock console
3. Add to your LiteLLM config:
```yaml
model_list:
# Latest Claude 4 Models
- model_name: "claude-4-opus"
litellm_params:
model: "bedrock/anthropic.claude-4-opus-20250514-v1:0"
aws_region_name: "us-east-1"
- model_name: "claude-4-sonnet"
litellm_params:
model: "bedrock/anthropic.claude-4-sonnet-20250514-v1:0"
aws_region_name: "us-east-1"
# Reasoning and Thinking Support
- model_name: "claude-4-sonnet-reasoning"
litellm_params:
model: "bedrock/anthropic.claude-4-sonnet-20250514-v1:0"
aws_region_name: "us-east-1"
thinking: true
# Latest Llama 4 Models
- model_name: "llama4-70b"
litellm_params:
model: "bedrock/meta.llama4-70b-instruct-v1:0"
aws_region_name: "us-east-1"
# DeepSeek R1 Models
- model_name: "deepseek-r1"
litellm_params:
model: "bedrock/deepseek.deepseek-r1-distill-llama-70b"
aws_region_name: "us-east-1"
```
LiteLLM supports multiple AWS authentication methods:
* IAM roles (recommended for EC2/ECS)
* Environment variables (`AWS_ACCESS_KEY_ID`, `AWS_SECRET_ACCESS_KEY`)
* AWS profiles
* Temporary credentials with STS
* Workload Identity Federation (for cross-cloud deployments)
### Google Vertex AI
1. Enable the Vertex AI API in your GCP project
2. Set up authentication (service account recommended)
3. Add to your LiteLLM config:
```yaml
model_list:
# Latest Gemini 2.5 Models
- model_name: "gemini-2.5-pro"
litellm_params:
model: "vertex_ai/gemini-2.5-pro"
vertex_project: "your-project-id"
vertex_location: "us-central1"
- model_name: "gemini-2.5-flash"
litellm_params:
model: "vertex_ai/gemini-2.5-flash"
vertex_project: "your-project-id"
vertex_location: "us-central1"
# Claude 4 on Vertex AI
- model_name: "claude-4-vertex"
litellm_params:
model: "vertex_ai/claude-4-opus"
vertex_project: "your-project-id"
vertex_location: "us-central1"
# Multimodal Image Generation
- model_name: "imagen-4"
litellm_params:
model: "vertex_ai/imagen-4"
vertex_project: "your-project-id"
vertex_location: "us-central1"
```
Set up authentication using one of these methods:
* Service account JSON file: `export GOOGLE_APPLICATION_CREDENTIALS=path/to/key.json`
* Workload Identity (for GKE)
* Default application credentials
* Authorized user credentials
### Azure OpenAI
Configure Azure OpenAI with latest models:
```yaml
model_list:
# Latest O-Series Models
- model_name: "o4-mini"
litellm_params:
model: "azure/o4-mini-2025-04-16"
api_base: "https://your-resource.openai.azure.com"
api_key: "your-azure-key"
api_version: "2025-01-01-preview"
- model_name: "o3-pro"
litellm_params:
model: "azure/o3-pro-2025-06-10"
api_base: "https://your-resource.openai.azure.com"
api_key: "your-azure-key"
api_version: "2025-01-01-preview"
# GPT-4 with Audio Preview
- model_name: "gpt-4o-audio"
litellm_params:
model: "azure/gpt-4o-audio-preview-2025-06-03"
api_base: "https://your-resource.openai.azure.com"
api_key: "your-azure-key"
api_version: "2025-01-01-preview"
```
Azure supports multiple authentication methods:
* API keys
* Azure AD tokens
* Managed Identity
* Certificate-based authentication
## Advanced Features
### Reasoning and Thinking Capabilities
Enable advanced reasoning for supported models:
```yaml
model_list:
- model_name: "claude-4-reasoning"
litellm_params:
model: "anthropic/claude-4-sonnet-20250514"
thinking: true
- model_name: "o3-pro-reasoning"
litellm_params:
model: "o3-pro-2025-06-10"
reasoning_effort: "high"
- model_name: "o4-mini-reasoning"
litellm_params:
model: "o4-mini-2025-04-16"
reasoning_effort: "medium"
```
### Multimodal Support
Configure models for text, image, audio, and video:
```yaml
model_list:
# Vision + Audio Models
- model_name: "gpt-4o-multimodal"
litellm_params:
model: "gpt-4o"
supports_vision: true
supports_audio: true
# Gemini with Enhanced Multimodal
- model_name: "gemini-2.5-multimodal"
litellm_params:
model: "vertex_ai/gemini-2.5-pro"
supports_vision: true
supports_pdf_input: true
supports_audio: true
```
### MCP Gateway Integration
Enable Model Context Protocol for enhanced tool use:
```yaml
general_settings:
enable_mcp_gateway: true
mcp_servers:
- server_name: "filesystem"
server_command: ["uvx", "mcp-server-filesystem", "/path/to/allowed/files"]
- server_name: "jira"
server_command: ["node", "/path/to/jira-mcp-server"]
auth_type: "api_key"
auth_value: "your-jira-api-key"
```
## Team Configuration
For team accounts, you can override all Alex Sidebar model endpoints:
1. Go to [Alex Sidebar Admin Portal](https://alexcodes.app/admin)
2. Navigate to Models tab
3. Add your LiteLLM proxy URL as Base URL for each model type
4. All team members automatically use your proxy
All AI requests from your team go through your infrastructure. You control the data and costs.
See the [Team Configuration Guide](/configuration/team-configuration) for detailed instructions on managing team models.
## Advanced Configuration
### Load Balancing with Fallbacks
Distribute requests across multiple model deployments with intelligent routing:
```yaml
model_list:
- model_name: "claude-4-primary"
litellm_params:
model: "bedrock/anthropic.claude-4-sonnet-20250514-v1:0"
aws_region_name: "us-east-1"
- model_name: "claude-4-fallback"
litellm_params:
model: "anthropic/claude-4-sonnet-20250514"
api_key: "fallback-key"
router_settings:
routing_strategy: "least-busy" # or "round-robin", "weighted-round-robin"
model_group_alias: "claude-4"
fallbacks: [{"claude-4-primary": ["claude-4-fallback"]}]
cooldown_time: 60 # seconds before retrying failed deployment
```
### Cost Tracking and Budget Management
Enable comprehensive cost tracking:
```yaml
general_settings:
master_key: "your-secret-key"
database_url: "postgresql://user:pass@localhost:5432/litellm"
# Budget controls
litellm_settings:
max_budget: 1000 # Monthly budget in USD
budget_duration: "monthly" # daily, weekly, monthly
success_callback: ["langfuse", "prometheus"]
track_cost_callback: true
# User-level budgets
user_api_key_config:
user1:
budget_duration: "monthly"
max_budget: 100
```
### Security and Rate Limiting
Secure your LiteLLM deployment with advanced controls:
```yaml
general_settings:
master_key: "sk-your-secret-key"
# Enhanced security
allowed_ips: ["10.0.0.0/8", "172.16.0.0/12"]
disable_spend_logs: false
guardrails: ["presidio_pii", "bedrock_guardrails"]
# Advanced rate limiting
max_parallel_requests: 1000
max_request_per_minute: 10000
rate_limiting_strategy: "sliding-window" # New accurate rate limiting
# SCIM integration for enterprise SSO
scim_settings:
enabled: true
scim_base_url: "https://your-litellm.com/scim/v2"
```
### Vector Store Integration
Connect to knowledge bases and vector stores:
```yaml
vector_stores:
- store_name: "company_docs"
store_type: "bedrock_knowledge_base"
knowledge_base_id: "your-kb-id"
aws_region: "us-east-1"
- store_name: "technical_docs"
store_type: "pinecone"
api_key: "your-pinecone-key"
environment: "your-environment"
# Auto-activate for specific models
model_list:
- model_name: "claude-4-with-kb"
litellm_params:
model: "bedrock/anthropic.claude-4-sonnet-20250514-v1:0"
vector_store: "company_docs"
```
## Monitoring & Observability
LiteLLM v1.73.6 provides enhanced monitoring capabilities:
### Performance Metrics
* **2x Higher RPS**: Enhanced aiohttp transport for improved performance
* **50ms Median Latency**: Optimized for high-throughput applications
* **Multi-instance Rate Limiting**: Accurate rate limiting across deployments
### Dashboard Features
```yaml
general_settings:
database_url: "postgresql://user:pass@localhost:5432/litellm"
ui_access_mode: "admin_only" # or "all"
# Enhanced logging
litellm_settings:
success_callback: ["langfuse", "prometheus", "datadog"]
failure_callback: ["slack", "pagerduty"]
# Session tracking
session_config:
enable_session_logs: true
session_retention_days: 30
```
### Real-time Monitoring
```yaml
# Prometheus metrics
prometheus_settings:
enabled: true
track_end_users: false # Opt-in to prevent large metric sets
# Health checks
health_check:
enabled: true
check_interval: 300 # seconds
models_to_check: ["claude-4-sonnet", "gemini-2.5-pro", "o4-mini-2025-04-16", "o3-pro-2025-06-10"]
```
## Troubleshooting
* Verify LiteLLM is running and accessible
* Check firewall rules and security groups
* Ensure you're using the correct URL format with `/v1` suffix
* For Docker: Check port mapping and container status
* **Bedrock**: Verify AWS credentials, IAM permissions, and model access
* **Vertex**: Check service account permissions and project settings
* **Azure**: Ensure API keys and resource endpoints are correct
* Verify master key matches if configured
* Check model name matches exactly in config.yaml
* Verify the model is enabled in your cloud provider console
* Update to latest model versions (e.g., claude-4 instead of claude-3)
* Check region/location settings and model availability
* Enable aiohttp transport: `USE_AIOHTTP_TRANSPORT=True`
* Implement load balancing across multiple deployments
* Adjust `max_parallel_requests` and rate limiting settings
* Consider regional deployment distribution
* Ensure database connection is properly configured
* Check that `track_cost_callback: true` is set
* Verify model pricing information is up to date
* Review spend logs retention settings
## Common Use Cases for iOS Teams
### Scenario 1: Company Uses AWS with Latest Models
Your company has AWS Bedrock with Claude 4 models. Instead of buying Anthropic API keys:
1. Deploy LiteLLM v1.73.6-stable on an EC2 instance
2. Configure it to use your Bedrock Claude 4 models with reasoning capabilities
3. Developers connect Alex Sidebar to your LiteLLM endpoint
4. All costs go to your AWS bill with detailed tracking
### Scenario 2: Multi-Cloud Model Testing
Test latest models across providers without changing code:
```yaml
model_list:
- model_name: "best-reasoning"
litellm_params:
model: "o3-pro-2025-06-10" # OpenAI's latest reasoning model
reasoning_effort: "high"
- model_name: "best-multimodal"
litellm_params:
model: "vertex_ai/gemini-2.5-pro" # Google's latest multimodal
- model_name: "best-coding"
litellm_params:
model: "bedrock/anthropic.claude-4-sonnet-20250514-v1:0" # Claude 4 for coding
```
### Scenario 3: Development vs Production with New Models
```yaml
# Dev environment - use efficient models
- model_name: "dev-model"
litellm_params:
model: "bedrock/anthropic.claude-3-haiku-20240307-v1:0"
max_tokens: 1000
# Staging - test new capabilities
- model_name: "staging-model"
litellm_params:
model: "vertex_ai/gemini-2.5-flash"
# Production - use most capable models
- model_name: "prod-model"
litellm_params:
model: "bedrock/anthropic.claude-4-opus-20250514-v1:0"
thinking: true
```
### Scenario 4: Enterprise Security and Compliance
```yaml
general_settings:
master_key: "sk-your-secure-key"
guardrails: ["presidio_pii", "bedrock_guardrails"]
# PII masking and content filtering
guardrail_settings:
presidio:
mask_entities: ["PERSON", "EMAIL", "PHONE_NUMBER"]
block_entities: ["MEDICAL_LICENSE"]
bedrock_guardrails:
guardrail_id: "your-guardrail-id"
guardrail_version: "1"
```
## Enterprise Features (LiteLLM v1.73.6+)
### SCIM Integration
Automatic user provisioning from your identity provider:
* Okta, Azure AD, OneLogin support
* Automatic team creation and user assignment
* Deprovisioning when users are removed
### Advanced Analytics
* Team and tag-based usage tracking
* Daily spend analysis by model and user
* Session grouping and analysis
* Audit logs for compliance
### Enhanced Security
* Vector store permissions by team/user
* MCP server access controls
* IP allowlisting and rate limiting
* End-to-end encryption options
## Next Steps
* Review [LiteLLM's official documentation](https://docs.litellm.ai) for detailed configuration options
* Check the [Proxy UI](http://localhost:4000/ui) to monitor costs and usage with the new dashboard
* Explore [Vector Store integration](https://docs.litellm.ai/docs/proxy/vector_stores) for RAG applications
* Join the [Alex Sidebar Discord](https://discord.gg/T5zxfReEnd) for help with enterprise setups
* Contact [team@alexcodes.app](mailto:team@alexcodes.app) for business support and enterprise features
LiteLLM v1.73.6-stable gives you control over your AI infrastructure with the latest models and enterprise-grade features, working seamlessly with all Alex Sidebar capabilities.
# Model Configuration
Source: https://alexcode.ai/docs/configuration/model-configuration
Configure and customize AI models in Alex Sidebar
Alex Sidebar supports multiple AI models to suit different development needs and preferences. This guide explains the available models and how to configure them.
## Model Selection
You can switch between models in two ways:
### Model Selector Menu
1. Click on the default model on the bottom left corner of the chat input view
2. Select the model you want to use from the dropdown menu
### Keyboard Shortcut
Press `Command` + `/` to quickly cycle through your enabled models during a chat session.
## API Key Configuration
You can add your API keys directly in the Model Settings screen. Simply click the settings icon on the top right corner of the sidebar and look for the API key input fields for each provider under the section "Model Settings".
Click "Accept and Commit" to commit your changes with the selected message.
## Configuration
The Git integration works out of the box with your existing Git configuration. No additional setup is required.
Make sure your repository is properly initialized with Git before using these features.
# LiteLLM Proxy Setup
Source: https://alexcode.ai/docs/configuration/litellm-setup
Connect Alex Sidebar to Amazon Bedrock, Google Vertex AI, and other enterprise AI providers
LiteLLM proxy connects Alex Sidebar to Amazon Bedrock, Google Vertex AI, and other enterprise AI providers. Teams can use their existing cloud infrastructure without changing their security setup.
**For iOS Developers**: If your company already pays for AWS Bedrock or Google Cloud AI, this guide shows how to use those models in Xcode with Alex Sidebar instead of buying separate API keys.
## What is LiteLLM?
LiteLLM is an open-source proxy that translates between the OpenAI API format and 100+ different AI providers. Alex Sidebar can work with enterprise AI services that don't support the OpenAI API format.
LiteLLM is what Alex Sidebar uses internally for model connections, making it a well-tested solution for enterprise deployments. Current stable version: **v1.73.6-stable** (June 2025)
## Why Use LiteLLM?
If your company uses AWS Bedrock or Google Cloud AI, LiteLLM lets you access those models through Alex Sidebar
Your code stays within your company's cloud. No data goes to Alex Sidebar servers
See exactly how much each project costs. Set budgets and get alerts
Switch between Claude 4 on Bedrock, Gemini 2.5 on Vertex, or GPT-4 on Azure without changing code
## Quick Start
Choose your deployment method:
**Option 1: pip install (simplest)**
```bash
pip install 'litellm[proxy]'
litellm --model bedrock/claude-4-sonnet --port 4000
```
**Option 2: Docker (recommended for production)**
```bash
docker run -p 4000:4000 ghcr.io/berriai/litellm:v1.73.6-stable
```
Create a `config.yaml` file in your LiteLLM directory:
```yaml
model_list:
# Amazon Bedrock - Latest Claude 4 Models
- model_name: "claude-4-sonnet"
litellm_params:
model: "bedrock/anthropic.claude-4-sonnet-20250514-v1:0"
aws_region_name: "us-east-1"
# Google Vertex AI - Latest Gemini 2.5 Models
- model_name: "gemini-2.5-pro"
litellm_params:
model: "vertex_ai/gemini-2.5-pro"
vertex_project: "your-gcp-project"
vertex_location: "us-central1"
# OpenAI O-Series with Reasoning
- model_name: "o4-mini"
litellm_params:
model: "o4-mini-2025-04-16"
api_key: "your-openai-key"
- model_name: "o3-pro"
litellm_params:
model: "o3-pro-2025-06-10"
api_key: "your-openai-key"
# Start proxy with config
# litellm --config config.yaml --port 4000
```
In Alex Sidebar, add a custom model pointing to your LiteLLM proxy:
1. Open Settings → Models → Custom Models
2. Click "Add New Model"
3. Configure:
* **Model ID**: Your model name from config.yaml (e.g., `claude-4-sonnet`)
* **Base URL**: Your LiteLLM URL + `/v1` (e.g., `https://litellm.company.com/v1`)
* **API Key**: Your LiteLLM proxy key (if configured)
## Provider-Specific Setup
### Amazon Bedrock
1. Ensure your AWS credentials are configured on the LiteLLM server
2. Enable the models you need in the AWS Bedrock console
3. Add to your LiteLLM config:
```yaml
model_list:
# Latest Claude 4 Models
- model_name: "claude-4-opus"
litellm_params:
model: "bedrock/anthropic.claude-4-opus-20250514-v1:0"
aws_region_name: "us-east-1"
- model_name: "claude-4-sonnet"
litellm_params:
model: "bedrock/anthropic.claude-4-sonnet-20250514-v1:0"
aws_region_name: "us-east-1"
# Reasoning and Thinking Support
- model_name: "claude-4-sonnet-reasoning"
litellm_params:
model: "bedrock/anthropic.claude-4-sonnet-20250514-v1:0"
aws_region_name: "us-east-1"
thinking: true
# Latest Llama 4 Models
- model_name: "llama4-70b"
litellm_params:
model: "bedrock/meta.llama4-70b-instruct-v1:0"
aws_region_name: "us-east-1"
# DeepSeek R1 Models
- model_name: "deepseek-r1"
litellm_params:
model: "bedrock/deepseek.deepseek-r1-distill-llama-70b"
aws_region_name: "us-east-1"
```
LiteLLM supports multiple AWS authentication methods:
* IAM roles (recommended for EC2/ECS)
* Environment variables (`AWS_ACCESS_KEY_ID`, `AWS_SECRET_ACCESS_KEY`)
* AWS profiles
* Temporary credentials with STS
* Workload Identity Federation (for cross-cloud deployments)
### Google Vertex AI
1. Enable the Vertex AI API in your GCP project
2. Set up authentication (service account recommended)
3. Add to your LiteLLM config:
```yaml
model_list:
# Latest Gemini 2.5 Models
- model_name: "gemini-2.5-pro"
litellm_params:
model: "vertex_ai/gemini-2.5-pro"
vertex_project: "your-project-id"
vertex_location: "us-central1"
- model_name: "gemini-2.5-flash"
litellm_params:
model: "vertex_ai/gemini-2.5-flash"
vertex_project: "your-project-id"
vertex_location: "us-central1"
# Claude 4 on Vertex AI
- model_name: "claude-4-vertex"
litellm_params:
model: "vertex_ai/claude-4-opus"
vertex_project: "your-project-id"
vertex_location: "us-central1"
# Multimodal Image Generation
- model_name: "imagen-4"
litellm_params:
model: "vertex_ai/imagen-4"
vertex_project: "your-project-id"
vertex_location: "us-central1"
```
Set up authentication using one of these methods:
* Service account JSON file: `export GOOGLE_APPLICATION_CREDENTIALS=path/to/key.json`
* Workload Identity (for GKE)
* Default application credentials
* Authorized user credentials
### Azure OpenAI
Configure Azure OpenAI with latest models:
```yaml
model_list:
# Latest O-Series Models
- model_name: "o4-mini"
litellm_params:
model: "azure/o4-mini-2025-04-16"
api_base: "https://your-resource.openai.azure.com"
api_key: "your-azure-key"
api_version: "2025-01-01-preview"
- model_name: "o3-pro"
litellm_params:
model: "azure/o3-pro-2025-06-10"
api_base: "https://your-resource.openai.azure.com"
api_key: "your-azure-key"
api_version: "2025-01-01-preview"
# GPT-4 with Audio Preview
- model_name: "gpt-4o-audio"
litellm_params:
model: "azure/gpt-4o-audio-preview-2025-06-03"
api_base: "https://your-resource.openai.azure.com"
api_key: "your-azure-key"
api_version: "2025-01-01-preview"
```
Azure supports multiple authentication methods:
* API keys
* Azure AD tokens
* Managed Identity
* Certificate-based authentication
## Advanced Features
### Reasoning and Thinking Capabilities
Enable advanced reasoning for supported models:
```yaml
model_list:
- model_name: "claude-4-reasoning"
litellm_params:
model: "anthropic/claude-4-sonnet-20250514"
thinking: true
- model_name: "o3-pro-reasoning"
litellm_params:
model: "o3-pro-2025-06-10"
reasoning_effort: "high"
- model_name: "o4-mini-reasoning"
litellm_params:
model: "o4-mini-2025-04-16"
reasoning_effort: "medium"
```
### Multimodal Support
Configure models for text, image, audio, and video:
```yaml
model_list:
# Vision + Audio Models
- model_name: "gpt-4o-multimodal"
litellm_params:
model: "gpt-4o"
supports_vision: true
supports_audio: true
# Gemini with Enhanced Multimodal
- model_name: "gemini-2.5-multimodal"
litellm_params:
model: "vertex_ai/gemini-2.5-pro"
supports_vision: true
supports_pdf_input: true
supports_audio: true
```
### MCP Gateway Integration
Enable Model Context Protocol for enhanced tool use:
```yaml
general_settings:
enable_mcp_gateway: true
mcp_servers:
- server_name: "filesystem"
server_command: ["uvx", "mcp-server-filesystem", "/path/to/allowed/files"]
- server_name: "jira"
server_command: ["node", "/path/to/jira-mcp-server"]
auth_type: "api_key"
auth_value: "your-jira-api-key"
```
## Team Configuration
For team accounts, you can override all Alex Sidebar model endpoints:
1. Go to [Alex Sidebar Admin Portal](https://alexcodes.app/admin)
2. Navigate to Models tab
3. Add your LiteLLM proxy URL as Base URL for each model type
4. All team members automatically use your proxy
All AI requests from your team go through your infrastructure. You control the data and costs.
See the [Team Configuration Guide](/configuration/team-configuration) for detailed instructions on managing team models.
## Advanced Configuration
### Load Balancing with Fallbacks
Distribute requests across multiple model deployments with intelligent routing:
```yaml
model_list:
- model_name: "claude-4-primary"
litellm_params:
model: "bedrock/anthropic.claude-4-sonnet-20250514-v1:0"
aws_region_name: "us-east-1"
- model_name: "claude-4-fallback"
litellm_params:
model: "anthropic/claude-4-sonnet-20250514"
api_key: "fallback-key"
router_settings:
routing_strategy: "least-busy" # or "round-robin", "weighted-round-robin"
model_group_alias: "claude-4"
fallbacks: [{"claude-4-primary": ["claude-4-fallback"]}]
cooldown_time: 60 # seconds before retrying failed deployment
```
### Cost Tracking and Budget Management
Enable comprehensive cost tracking:
```yaml
general_settings:
master_key: "your-secret-key"
database_url: "postgresql://user:pass@localhost:5432/litellm"
# Budget controls
litellm_settings:
max_budget: 1000 # Monthly budget in USD
budget_duration: "monthly" # daily, weekly, monthly
success_callback: ["langfuse", "prometheus"]
track_cost_callback: true
# User-level budgets
user_api_key_config:
user1:
budget_duration: "monthly"
max_budget: 100
```
### Security and Rate Limiting
Secure your LiteLLM deployment with advanced controls:
```yaml
general_settings:
master_key: "sk-your-secret-key"
# Enhanced security
allowed_ips: ["10.0.0.0/8", "172.16.0.0/12"]
disable_spend_logs: false
guardrails: ["presidio_pii", "bedrock_guardrails"]
# Advanced rate limiting
max_parallel_requests: 1000
max_request_per_minute: 10000
rate_limiting_strategy: "sliding-window" # New accurate rate limiting
# SCIM integration for enterprise SSO
scim_settings:
enabled: true
scim_base_url: "https://your-litellm.com/scim/v2"
```
### Vector Store Integration
Connect to knowledge bases and vector stores:
```yaml
vector_stores:
- store_name: "company_docs"
store_type: "bedrock_knowledge_base"
knowledge_base_id: "your-kb-id"
aws_region: "us-east-1"
- store_name: "technical_docs"
store_type: "pinecone"
api_key: "your-pinecone-key"
environment: "your-environment"
# Auto-activate for specific models
model_list:
- model_name: "claude-4-with-kb"
litellm_params:
model: "bedrock/anthropic.claude-4-sonnet-20250514-v1:0"
vector_store: "company_docs"
```
## Monitoring & Observability
LiteLLM v1.73.6 provides enhanced monitoring capabilities:
### Performance Metrics
* **2x Higher RPS**: Enhanced aiohttp transport for improved performance
* **50ms Median Latency**: Optimized for high-throughput applications
* **Multi-instance Rate Limiting**: Accurate rate limiting across deployments
### Dashboard Features
```yaml
general_settings:
database_url: "postgresql://user:pass@localhost:5432/litellm"
ui_access_mode: "admin_only" # or "all"
# Enhanced logging
litellm_settings:
success_callback: ["langfuse", "prometheus", "datadog"]
failure_callback: ["slack", "pagerduty"]
# Session tracking
session_config:
enable_session_logs: true
session_retention_days: 30
```
### Real-time Monitoring
```yaml
# Prometheus metrics
prometheus_settings:
enabled: true
track_end_users: false # Opt-in to prevent large metric sets
# Health checks
health_check:
enabled: true
check_interval: 300 # seconds
models_to_check: ["claude-4-sonnet", "gemini-2.5-pro", "o4-mini-2025-04-16", "o3-pro-2025-06-10"]
```
## Troubleshooting
* Verify LiteLLM is running and accessible
* Check firewall rules and security groups
* Ensure you're using the correct URL format with `/v1` suffix
* For Docker: Check port mapping and container status
* **Bedrock**: Verify AWS credentials, IAM permissions, and model access
* **Vertex**: Check service account permissions and project settings
* **Azure**: Ensure API keys and resource endpoints are correct
* Verify master key matches if configured
* Check model name matches exactly in config.yaml
* Verify the model is enabled in your cloud provider console
* Update to latest model versions (e.g., claude-4 instead of claude-3)
* Check region/location settings and model availability
* Enable aiohttp transport: `USE_AIOHTTP_TRANSPORT=True`
* Implement load balancing across multiple deployments
* Adjust `max_parallel_requests` and rate limiting settings
* Consider regional deployment distribution
* Ensure database connection is properly configured
* Check that `track_cost_callback: true` is set
* Verify model pricing information is up to date
* Review spend logs retention settings
## Common Use Cases for iOS Teams
### Scenario 1: Company Uses AWS with Latest Models
Your company has AWS Bedrock with Claude 4 models. Instead of buying Anthropic API keys:
1. Deploy LiteLLM v1.73.6-stable on an EC2 instance
2. Configure it to use your Bedrock Claude 4 models with reasoning capabilities
3. Developers connect Alex Sidebar to your LiteLLM endpoint
4. All costs go to your AWS bill with detailed tracking
### Scenario 2: Multi-Cloud Model Testing
Test latest models across providers without changing code:
```yaml
model_list:
- model_name: "best-reasoning"
litellm_params:
model: "o3-pro-2025-06-10" # OpenAI's latest reasoning model
reasoning_effort: "high"
- model_name: "best-multimodal"
litellm_params:
model: "vertex_ai/gemini-2.5-pro" # Google's latest multimodal
- model_name: "best-coding"
litellm_params:
model: "bedrock/anthropic.claude-4-sonnet-20250514-v1:0" # Claude 4 for coding
```
### Scenario 3: Development vs Production with New Models
```yaml
# Dev environment - use efficient models
- model_name: "dev-model"
litellm_params:
model: "bedrock/anthropic.claude-3-haiku-20240307-v1:0"
max_tokens: 1000
# Staging - test new capabilities
- model_name: "staging-model"
litellm_params:
model: "vertex_ai/gemini-2.5-flash"
# Production - use most capable models
- model_name: "prod-model"
litellm_params:
model: "bedrock/anthropic.claude-4-opus-20250514-v1:0"
thinking: true
```
### Scenario 4: Enterprise Security and Compliance
```yaml
general_settings:
master_key: "sk-your-secure-key"
guardrails: ["presidio_pii", "bedrock_guardrails"]
# PII masking and content filtering
guardrail_settings:
presidio:
mask_entities: ["PERSON", "EMAIL", "PHONE_NUMBER"]
block_entities: ["MEDICAL_LICENSE"]
bedrock_guardrails:
guardrail_id: "your-guardrail-id"
guardrail_version: "1"
```
## Enterprise Features (LiteLLM v1.73.6+)
### SCIM Integration
Automatic user provisioning from your identity provider:
* Okta, Azure AD, OneLogin support
* Automatic team creation and user assignment
* Deprovisioning when users are removed
### Advanced Analytics
* Team and tag-based usage tracking
* Daily spend analysis by model and user
* Session grouping and analysis
* Audit logs for compliance
### Enhanced Security
* Vector store permissions by team/user
* MCP server access controls
* IP allowlisting and rate limiting
* End-to-end encryption options
## Next Steps
* Review [LiteLLM's official documentation](https://docs.litellm.ai) for detailed configuration options
* Check the [Proxy UI](http://localhost:4000/ui) to monitor costs and usage with the new dashboard
* Explore [Vector Store integration](https://docs.litellm.ai/docs/proxy/vector_stores) for RAG applications
* Join the [Alex Sidebar Discord](https://discord.gg/T5zxfReEnd) for help with enterprise setups
* Contact [team@alexcodes.app](mailto:team@alexcodes.app) for business support and enterprise features
LiteLLM v1.73.6-stable gives you control over your AI infrastructure with the latest models and enterprise-grade features, working seamlessly with all Alex Sidebar capabilities.
# Model Configuration
Source: https://alexcode.ai/docs/configuration/model-configuration
Configure and customize AI models in Alex Sidebar
Alex Sidebar supports multiple AI models to suit different development needs and preferences. This guide explains the available models and how to configure them.
## Model Selection
You can switch between models in two ways:
### Model Selector Menu
1. Click on the default model on the bottom left corner of the chat input view
2. Select the model you want to use from the dropdown menu
### Keyboard Shortcut
Press `Command` + `/` to quickly cycle through your enabled models during a chat session.
## API Key Configuration
You can add your API keys directly in the Model Settings screen. Simply click the settings icon on the top right corner of the sidebar and look for the API key input fields for each provider under the section "Model Settings".
 To use GPT-4 or OpenAI models:
1. Get an API key from [OpenAI's platform](https://platform.openai.com)
2. Find the "OpenAI Key" field
3. Enter your API key in the input box
To use Claude models: 1. Obtain an API key from [Anthropic's
console](https://console.anthropic.com) 3. Find the "Anthropic Key" field 4.
Enter your API key in the input box
Additional model providers like Perplexity and VoyageAI can also be configured:
1. Obtain the appropriate API key from the provider's website
2. Find the corresponding key field in settings
3. Enter your API key
Your API keys are stored securely and only used to authenticate with the
respective AI providers. You can update or remove them at any time from the
settings screen.
## Custom Model Setup
To use GPT-4 or OpenAI models:
1. Get an API key from [OpenAI's platform](https://platform.openai.com)
2. Find the "OpenAI Key" field
3. Enter your API key in the input box
To use Claude models: 1. Obtain an API key from [Anthropic's
console](https://console.anthropic.com) 3. Find the "Anthropic Key" field 4.
Enter your API key in the input box
Additional model providers like Perplexity and VoyageAI can also be configured:
1. Obtain the appropriate API key from the provider's website
2. Find the corresponding key field in settings
3. Enter your API key
Your API keys are stored securely and only used to authenticate with the
respective AI providers. You can update or remove them at any time from the
settings screen.
## Custom Model Setup
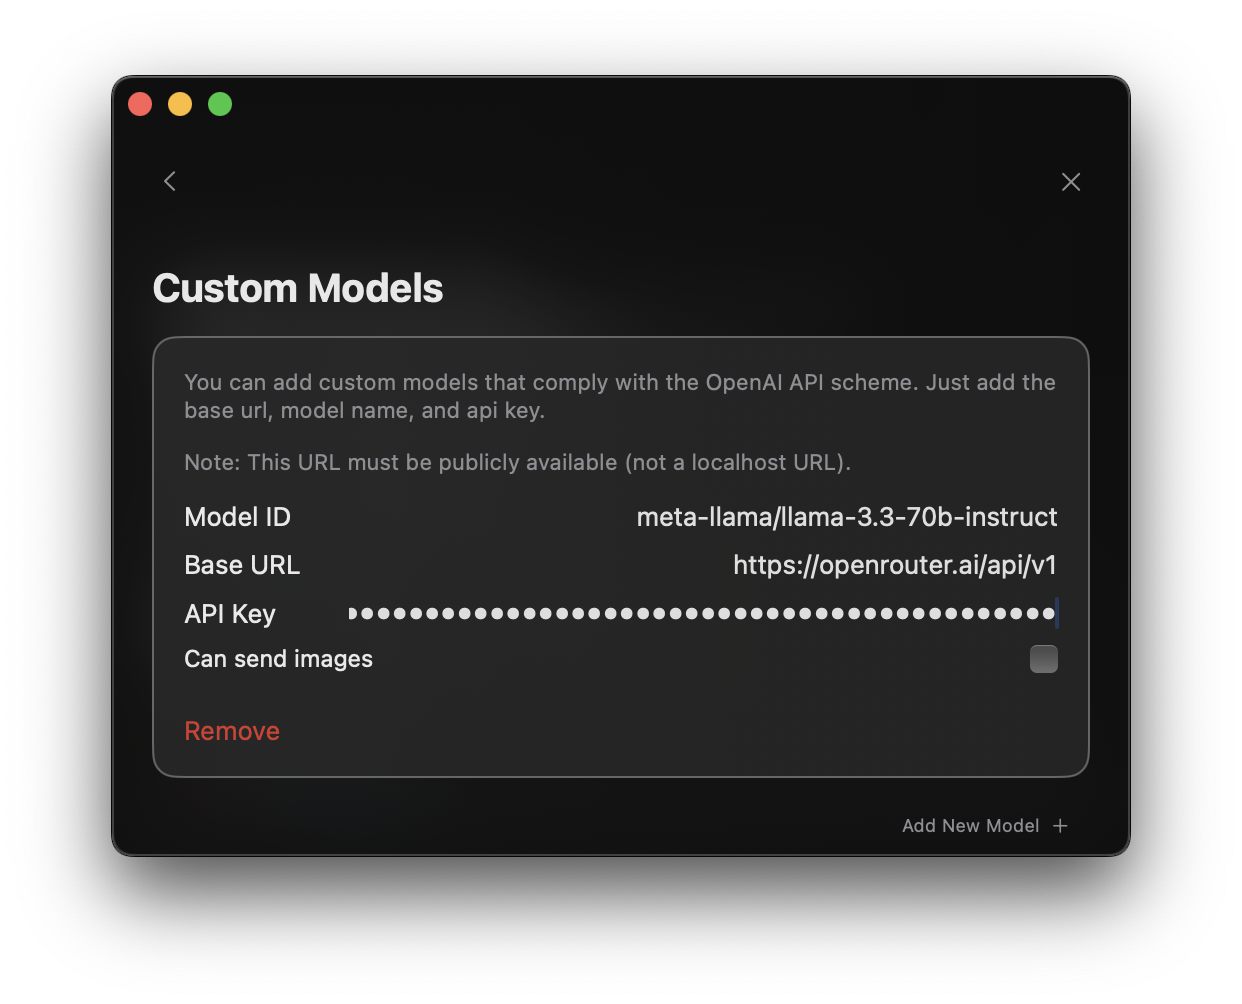 You can add custom models that comply with the OpenAI API scheme. Follow these steps to configure a custom model:
1. Navigate to "Settings" by selecting the gear icon on the top right corner of the sidebar
2. Select "Models" and you will find the section on "Custom Models" section
3. Click the "Add New Model" button to create a new custom model configuration
1. Enter the Model ID (e.g., `qwen2.5-coder-32b-instruct`, `deepseek-chat`)
2. Provide the Base URL for your model's API endpoint
3. Add your API Key for authentication
4. (Optional) Specify if the model supports image inputs
To run the DeepSeek V3 model:
* Model ID: `deepseek-chat`
* Base URL: `https://api.deepseek.com/v1`
* Enter your DeepSeek API Key in the provided field
Go back to the chat screen by clicking on the close icon on the top right
corner of the sidebar and you will see the custom model in the model
selection options.
## Running Local Models
Alex Sidebar supports running local AI models through Ollama, providing a free and privacy-focused alternative to cloud-based models. Here is an example of how to set up a local powerful model like Qwen2.5-Coder:
1. Install Ollama to manage and serve the local model
```bash
# Pull the Qwen2.5-Coder model
ollama pull qwen2.5-coder:32b
# Start the Ollama server
ollama serve
```
Add a custom model with these settings:
* Model ID: `qwen2.5-coder:32b`
* Base URL: Your ollama URL + `/v1` (e.g., `http://localhost:1234/v1`)
Local models may run slower than cloud-based alternatives, especially on less
powerful hardware. Consider your performance requirements when choosing
between local and cloud models.
## Best Practices
• Use Claude 3.5 Sonnet or GPT-4 for complex architectural decisions\
• Claude 3.5 Haiku or GPT-4 Mini for quick code completions
• Start new chats for long conversations to maintain accuracy\
• Match model capabilities to task complexity
## Troubleshooting
If you encounter issues with model responses:
1. Check your API key configuration
2. Verify your internet connection
3. Ensure you're within the model's context limit
4. Try switching to a different model
5. Restart Alex Sidebar if issues persist
Need help? Join our [Discord community](https://discord.gg/T5zxfReEnd) for
support and tips from other developers.
# Navigation & Search Shortcuts
Source: https://alexcode.ai/docs/configuration/navigation-shortcuts
Keyboard shortcuts for navigating and searching within Alex
* **Command + K**: Get inline completions
* **Command + /**: Open model selector
* **Escape**: Close any open panel
Pro tip: The **Escape** key is your universal "close" button - it will close any
open panel, whether it is a suggestion, search, or completion window.
# Team Configuration
Source: https://alexcode.ai/docs/configuration/team-configuration
Manage team members and configure custom models for your organization
Set up AI models and manage your team through the Alex Sidebar Admin Portal at [https://www.alexcodes.app/admin](https://www.alexcodes.app/admin).
You'll need to be on a team subscription and have admin access to use these features.
## Access Team Settings
1. Go to [Alex Sidebar Admin Portal](https://www.alexcodes.app/admin)
2. Sign in with your admin account
3. Navigate to your team dashboard
## Team Management
### Managing Team Members
You can add custom models that comply with the OpenAI API scheme. Follow these steps to configure a custom model:
1. Navigate to "Settings" by selecting the gear icon on the top right corner of the sidebar
2. Select "Models" and you will find the section on "Custom Models" section
3. Click the "Add New Model" button to create a new custom model configuration
1. Enter the Model ID (e.g., `qwen2.5-coder-32b-instruct`, `deepseek-chat`)
2. Provide the Base URL for your model's API endpoint
3. Add your API Key for authentication
4. (Optional) Specify if the model supports image inputs
To run the DeepSeek V3 model:
* Model ID: `deepseek-chat`
* Base URL: `https://api.deepseek.com/v1`
* Enter your DeepSeek API Key in the provided field
Go back to the chat screen by clicking on the close icon on the top right
corner of the sidebar and you will see the custom model in the model
selection options.
## Running Local Models
Alex Sidebar supports running local AI models through Ollama, providing a free and privacy-focused alternative to cloud-based models. Here is an example of how to set up a local powerful model like Qwen2.5-Coder:
1. Install Ollama to manage and serve the local model
```bash
# Pull the Qwen2.5-Coder model
ollama pull qwen2.5-coder:32b
# Start the Ollama server
ollama serve
```
Add a custom model with these settings:
* Model ID: `qwen2.5-coder:32b`
* Base URL: Your ollama URL + `/v1` (e.g., `http://localhost:1234/v1`)
Local models may run slower than cloud-based alternatives, especially on less
powerful hardware. Consider your performance requirements when choosing
between local and cloud models.
## Best Practices
• Use Claude 3.5 Sonnet or GPT-4 for complex architectural decisions\
• Claude 3.5 Haiku or GPT-4 Mini for quick code completions
• Start new chats for long conversations to maintain accuracy\
• Match model capabilities to task complexity
## Troubleshooting
If you encounter issues with model responses:
1. Check your API key configuration
2. Verify your internet connection
3. Ensure you're within the model's context limit
4. Try switching to a different model
5. Restart Alex Sidebar if issues persist
Need help? Join our [Discord community](https://discord.gg/T5zxfReEnd) for
support and tips from other developers.
# Navigation & Search Shortcuts
Source: https://alexcode.ai/docs/configuration/navigation-shortcuts
Keyboard shortcuts for navigating and searching within Alex
* **Command + K**: Get inline completions
* **Command + /**: Open model selector
* **Escape**: Close any open panel
Pro tip: The **Escape** key is your universal "close" button - it will close any
open panel, whether it is a suggestion, search, or completion window.
# Team Configuration
Source: https://alexcode.ai/docs/configuration/team-configuration
Manage team members and configure custom models for your organization
Set up AI models and manage your team through the Alex Sidebar Admin Portal at [https://www.alexcodes.app/admin](https://www.alexcodes.app/admin).
You'll need to be on a team subscription and have admin access to use these features.
## Access Team Settings
1. Go to [Alex Sidebar Admin Portal](https://www.alexcodes.app/admin)
2. Sign in with your admin account
3. Navigate to your team dashboard
## Team Management
### Managing Team Members
 From the **Members** tab, you can:
See all team members with their roles (Admin/Member)
1. Enter the email address
2. Select their role (Member or Admin)
3. Click "Send Invitation"
Click "Remove" next to any member to revoke their access
Team members automatically inherit all model configurations set by admins. Individual API keys are not needed when using team models.
## Models Configuration
From the **Members** tab, you can:
See all team members with their roles (Admin/Member)
1. Enter the email address
2. Select their role (Member or Admin)
3. Click "Send Invitation"
Click "Remove" next to any member to revoke their access
Team members automatically inherit all model configurations set by admins. Individual API keys are not needed when using team models.
## Models Configuration
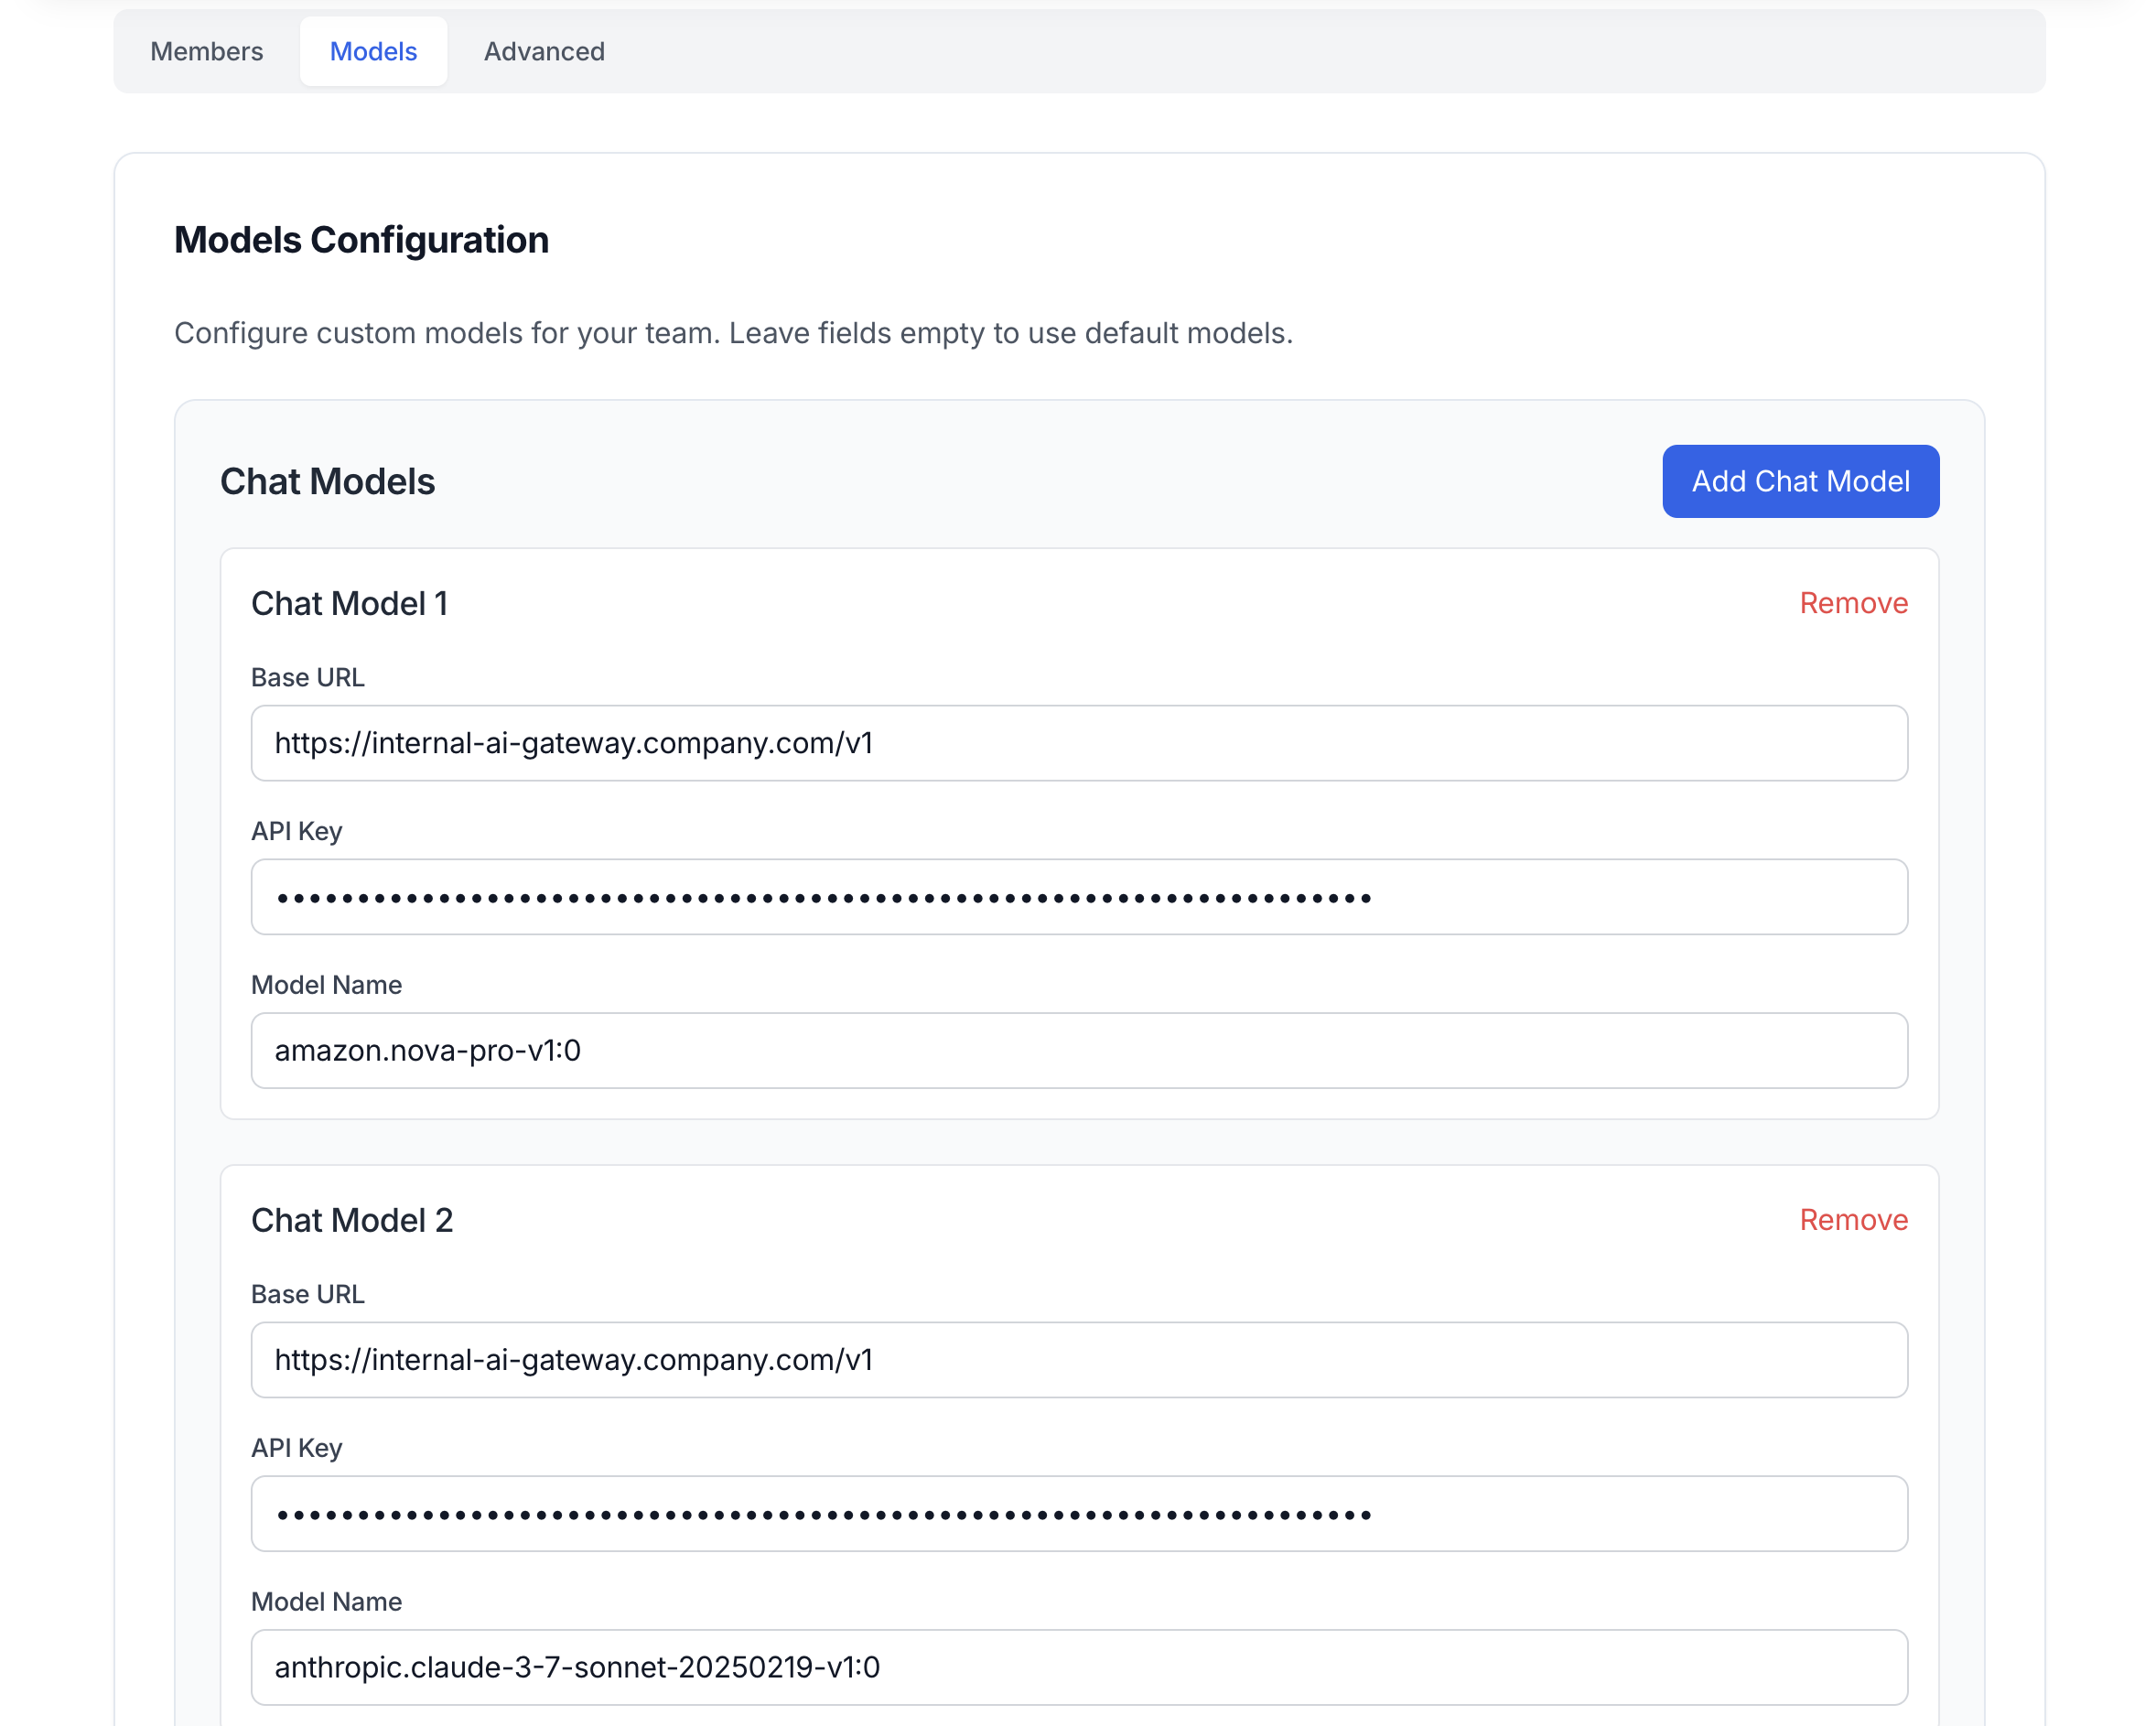 The **Models** tab lets you configure custom endpoints for all AI features in Alex Sidebar. Leave fields empty to use default models.
Remember to click the "Save Changes" button at the bottom right after configuring your models. Changes won't take effect until saved.
### Available Model Types
Other fields are optional. Alex Sidebar will use the default if you leave them empty.
1. **Chat Models** - These are the large language models for code generation and conversation in Alex Sidebar. Examples are Claude Sonnet 4, Gemini 2.5 Pro and OpenAI o3 model.
2. **Autocomplete Model** - Tab completion while you type. Fast models like Codestral work best here.
3. **Thinking Model** - Models like Gemini 2.5 Pro takes more time to reason on the given prompt and context to come to an answer.
4. **Voice Model** - Handles voice-to-text if you use voice input.
5. **Embedding Model** - Powers codebase search and indexing.
6. **Code-Apply Model** - Specialized for applying code edits.
7. **Web Model** - Used when searching the web.
8. **Image Model** - Analyzes screenshots and generates diagrams. Needs vision capabilities like GPT-4V or Claude.
9. **Summarizer Model** - Condenses long content.
The **Models** tab lets you configure custom endpoints for all AI features in Alex Sidebar. Leave fields empty to use default models.
Remember to click the "Save Changes" button at the bottom right after configuring your models. Changes won't take effect until saved.
### Available Model Types
Other fields are optional. Alex Sidebar will use the default if you leave them empty.
1. **Chat Models** - These are the large language models for code generation and conversation in Alex Sidebar. Examples are Claude Sonnet 4, Gemini 2.5 Pro and OpenAI o3 model.
2. **Autocomplete Model** - Tab completion while you type. Fast models like Codestral work best here.
3. **Thinking Model** - Models like Gemini 2.5 Pro takes more time to reason on the given prompt and context to come to an answer.
4. **Voice Model** - Handles voice-to-text if you use voice input.
5. **Embedding Model** - Powers codebase search and indexing.
6. **Code-Apply Model** - Specialized for applying code edits.
7. **Web Model** - Used when searching the web.
8. **Image Model** - Analyzes screenshots and generates diagrams. Needs vision capabilities like GPT-4V or Claude.
9. **Summarizer Model** - Condenses long content.
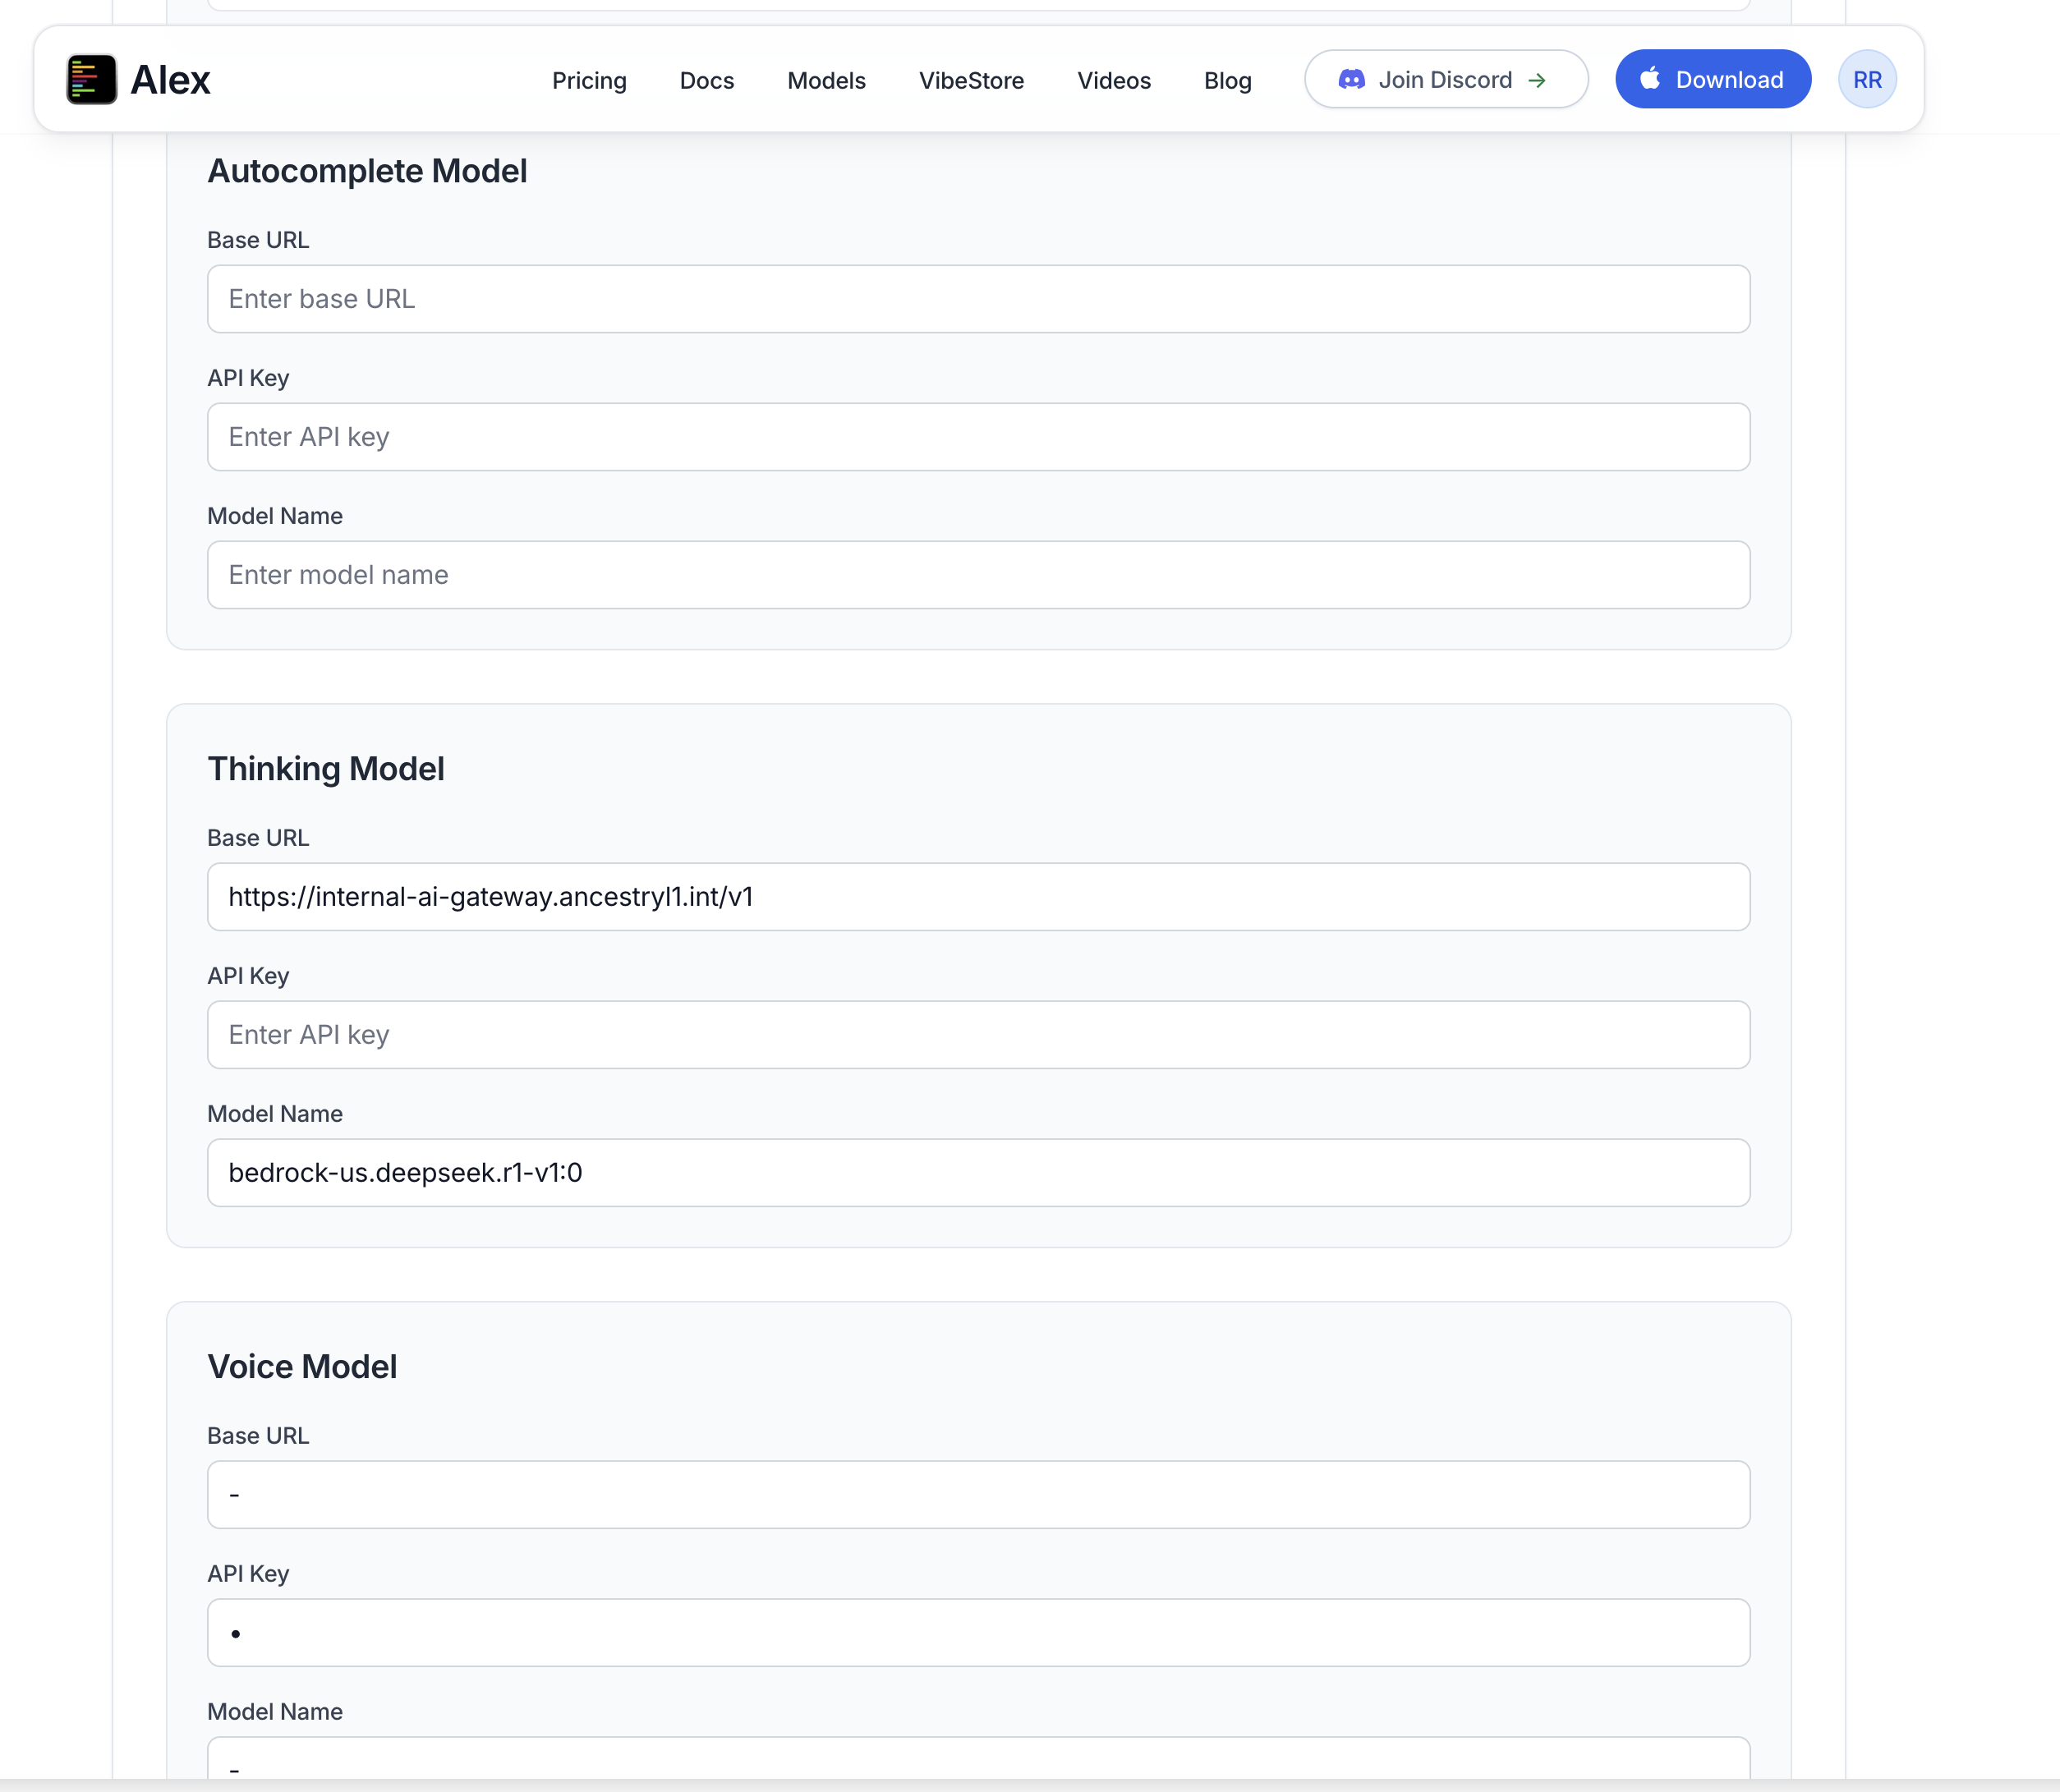 ### Adding Custom Models
For each model type, configure:
Enter your model endpoint URL (e.g., `https://internal-ai-gateway.company.com/v1`)
Enter the authentication key for your endpoint
Enter the exact model identifier (e.g., `amazon.nova-pro-v1.0`)
### Example Configurations
```yaml
Base URL: https://your-litellm-proxy.com/v1
API Key: your-litellm-key
Model Name: amazon.nova-pro-v1.0
```
```yaml
Base URL: https://your-resource.openai.azure.com/v1
API Key: your-azure-key
Model Name: gpt-4-deployment-name
```
```yaml
Base URL: https://internal-llm.company.com/v1
API Key: internal-api-key
Model Name: llama-3-70b
```
### Multiple Chat Models
You can add multiple chat models for different use cases:
Add different models (Claude, GPT-4, Gemini) and let developers choose based on their needs
Configure separate models for development, staging, and production environments
### Using Team Models in Alex Sidebar
After configuring and saving your team models, they automatically appear in Alex Sidebar for all team members.
### Adding Custom Models
For each model type, configure:
Enter your model endpoint URL (e.g., `https://internal-ai-gateway.company.com/v1`)
Enter the authentication key for your endpoint
Enter the exact model identifier (e.g., `amazon.nova-pro-v1.0`)
### Example Configurations
```yaml
Base URL: https://your-litellm-proxy.com/v1
API Key: your-litellm-key
Model Name: amazon.nova-pro-v1.0
```
```yaml
Base URL: https://your-resource.openai.azure.com/v1
API Key: your-azure-key
Model Name: gpt-4-deployment-name
```
```yaml
Base URL: https://internal-llm.company.com/v1
API Key: internal-api-key
Model Name: llama-3-70b
```
### Multiple Chat Models
You can add multiple chat models for different use cases:
Add different models (Claude, GPT-4, Gemini) and let developers choose based on their needs
Configure separate models for development, staging, and production environments
### Using Team Models in Alex Sidebar
After configuring and saving your team models, they automatically appear in Alex Sidebar for all team members.
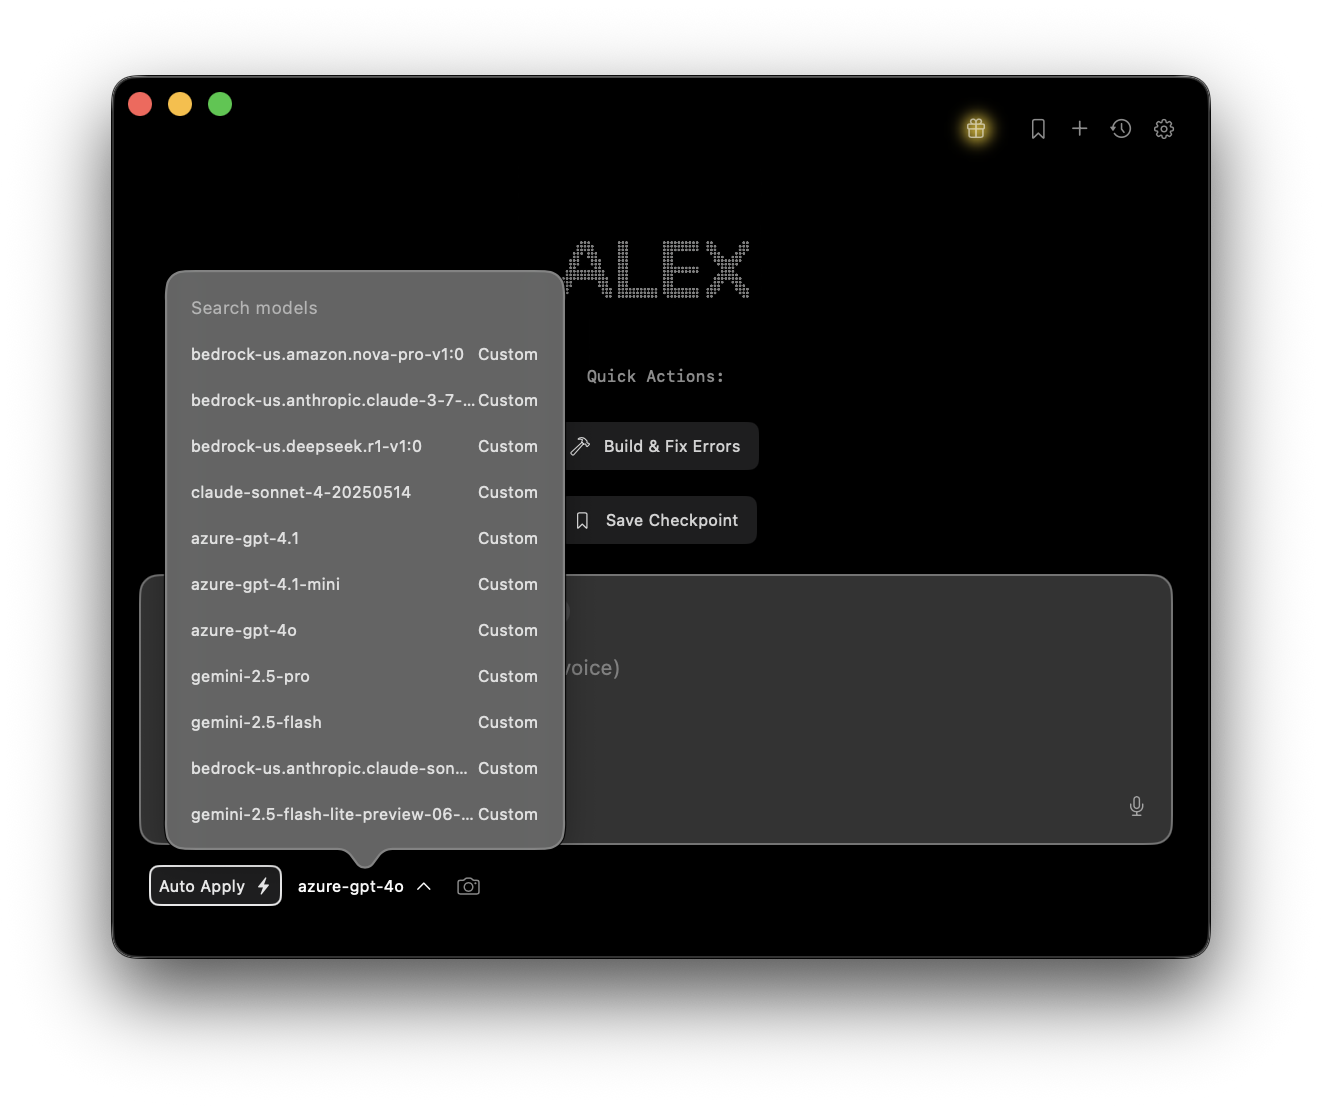 Team members can:
* Select from configured models using the model selector (bottom left of chat)
* See custom model names exactly as configured by admins
Changes to team models apply immediately to all members. Users may need to restart Alex Sidebar to see new models.
## Advanced Settings
Team members can:
* Select from configured models using the model selector (bottom left of chat)
* See custom model names exactly as configured by admins
Changes to team models apply immediately to all members. Users may need to restart Alex Sidebar to see new models.
## Advanced Settings
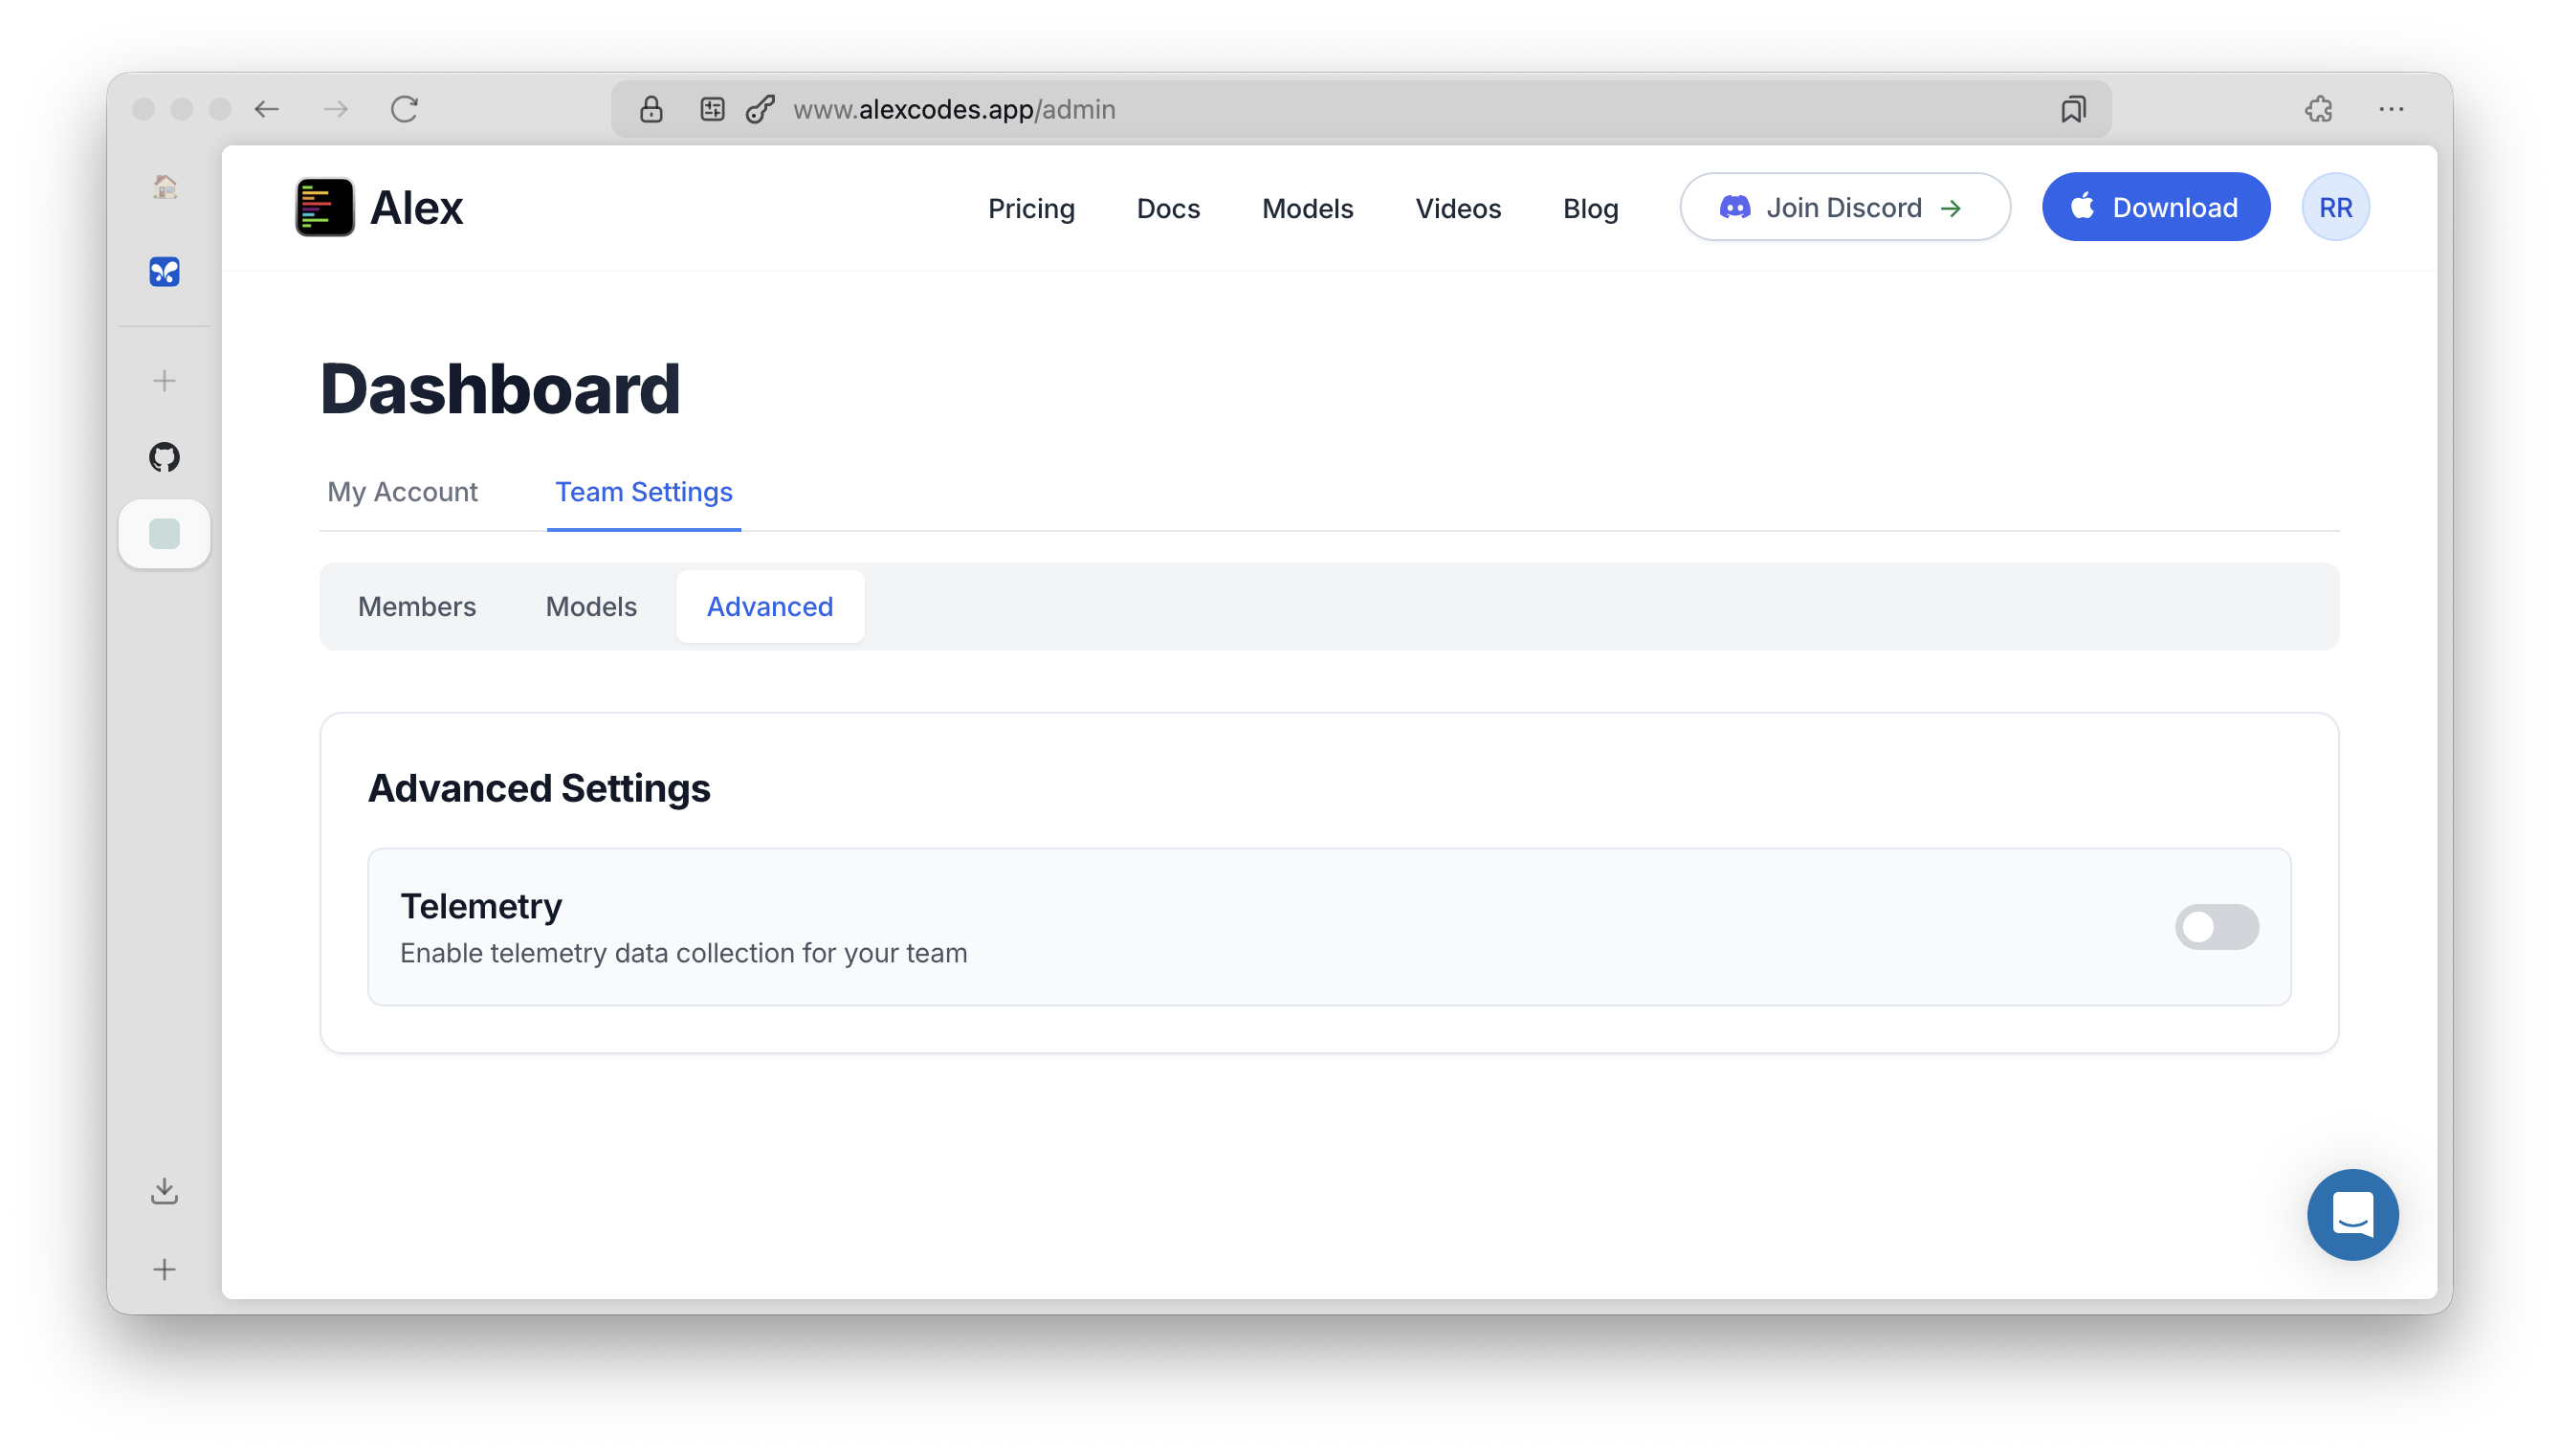 The **Advanced** tab contains telemetry settings:
### Telemetry
Toggle "Enable telemetry data collection for your team" to control:
* Analytics data collection
* Crash logs and error reporting
* Usage statistics
When disabled, no telemetry data is sent from any team member's Alex Sidebar.
## Best Practices
Configure chat models first as they're used most frequently
Name models clearly (e.g., `dev-claude`, `prod-gpt4`) so developers know which to use
Verify each model works correctly before adding team members
Create internal documentation explaining when to use each model
## Cost Management
When using team models:
* All API costs are billed to your organization's accounts
* Individual developers don't need personal API keys
* Monitor usage through your cloud provider's dashboard
* Set up billing alerts to track spending
## Troubleshooting
* Ensure you clicked "Save Changes" after configuring models
* Check members have synced their Alex Sidebar app
* Verify the model endpoints are accessible from user networks
* Verify API keys are correct and active
* Check Base URL includes `/v1` suffix for OpenAI-compatible endpoints
* Ensure API keys have necessary permissions
* Verify you have admin role in the team
* Check you're using the correct email address
* Contact [team@alexcodes.app](mailto:team@alexcodes.app) if you need admin access
## Integration with LiteLLM
For teams using LiteLLM proxy:
1. Deploy LiteLLM with your enterprise models
2. Add your LiteLLM endpoint as Base URL
3. All team members automatically use your proxy
4. No individual cloud accounts needed
See the [LiteLLM Setup Guide](/configuration/litellm-setup) for detailed instructions.
# Cheatsheet
Source: https://alexcode.ai/docs/get-started/cheatsheet
A guide to Alex Sidebar's features, shortcuts, and best practices
## Essential Keyboard Shortcuts
| Shortcut | Action | Description |
| --------- | ------------------- | ------------------------------------------- |
| ⌘ + L | New Chat with code | Start a new AI chat with your selected code |
| ⌘ + N | New empty chat | Create a fresh chat without code context |
| ⌘ + ⇧ + L | Add to current chat | Append selected code to current chat |
| ⌘ + K | Inline completions | Get quick inline code suggestions |
| ⌘ + / | Open model selector | Toggle between different AI models |
| ⌘ + ⌫ | Stop generation | Immediately stop the current AI response |
| ⌘ + ⇧ + G | Git panel | Open the Git status panel |
| ⌘ + ⇧ + V | Voice mode | Toggle voice recording on/off |
| esc | Close panel | Universal close button for any open panel |
## AI Models & Their Strengths
| Model | Best For |
| ----------------- | ------------------------------------------------ |
| Claude Sonnet 4 | State of the Art - Best overall for coding tasks |
| Claude 3.5 Sonnet | Large codebases and complex tasks |
| Gemini 2.5 Pro | Excellent quality (but longer response times) |
| Gemini 2.5 Flash | Fast responses for quick tasks |
| OpenAI o3 | Best thinking model for complex reasoning |
| OpenAI o4 Mini | Lightweight model for simple tasks |
| OpenAI GPT 4.1 | General coding and chat tasks |
| DeepSeek R1 | Advanced coding assistance |
| DeepSeek V3 | Latest DeepSeek model |
These model recommendations are opinionated and based on general use cases. You should experiment with different models to find which ones work best for your specific needs and coding style. Each developer may have different preferences based on their workflow and the types of problems they are solving.
## Best Practices
1. **Code Context**
* Select relevant code before starting chat
* Include imports and related types
* Provide clear and **specific** questions
2. **Model Selection**
* Switch models if not getting desired results
## Common Use Cases & Workflows
### Code Review
1. Select code → ⌘ + L
2. Ask for review
3. Add context with ⌘ + ⇧ + L if needed
4. Use ▶️ to apply suggestions
### Quick Fixes
1. Place cursor where you want to fix
2. ⌘ + K for suggestions
3. Use **esc** to dismiss if needed
### Warnings and Errors
1. Click error/warning indicator in Xcode's editor near line number
2. Review AI-suggested fixes
3. Click ▶️ to implement changes, or use Quick Apply (⏩) for instant application
4. For complex cases:
* Select problematic code and copy error/warning
* Use ⌘ + L for detailed help
* Add context as needed
Common fixes include:
* Build errors (imports, types)
* Deprecated API usage
## Configuration Tips
* Customize shortcuts in Settings
* Set up system and custom prompts for repeated tasks
## Common Pitfalls to Avoid
* Do not provide too little context
* Do not stick with one model if struggling
# Data Usage
Source: https://alexcode.ai/docs/get-started/data-usage
Understanding how Alex Sidebar handles and protects your data
Alex Sidebar is designed with privacy and security in mind. We maintain strict data handling practices to protect your code and personal information.
## Core Principles
* No code storage or collection
* Opt-out of all third-party training data
* Minimal analytics collection (feature usage and diagnostics only)
* Local storage prioritization
## Infrastructure
### API Processing
All LLM interactions are processed through our secure infrastructure:
1. API endpoint: [https://api.alexcodes.app](https://api.alexcodes.app)
2. Server location: United States (Render hosting)
3. Processing workflow:
* Context collection from user selection
* Prompt construction with provided context
* Secure routing to model providers
* Response delivery without data persistence
### Future Data Practices
We maintain a strict opt-out-by-default policy for all users. Any future data collection initiatives will:
* Require explicit user consent
* Be clearly communicated
* Include granular opt-in controls
* Maintain existing user preferences
## Data Storage
### Code Embeddings
Alex Sidebar implements local embedding storage for search functionality:
1. **Generation Process**
* Automatic embedding of Xcode project code
* Processing through VoyageAI's embedding service
* Explicit opt-out from provider data collection
2. **Storage Location**
* Local SQLite database
* Path: Application Support/com.DanielEdrisian.AlexSideBar
* No cloud storage or sync
### Chat History
Chat data management follows local-first principles:
* Storage in Application Support directory
* No server-side persistence
* User-controlled retention
## AI Provider Integration
### Chat Models
Current providers:
* OpenAI
* Anthropic
* Perplexity
All integrations configured with:
* Training data opt-out enabled
* No persistent storage
* Request-only data transmission
### Code Application Models
Implementation providers:
* Groq
* Cerebras
* Fireworks AI
* Google (Gemini)
Security measures:
* Training opt-out enforced
* Temporary request processing
* No provider-side data retention
## Monitoring Systems
### Analytics Implementation
Posthog integration limited to:
* Feature activation events
* Command usage frequency
* No content or context collection
* Anonymous usage patterns
### Error Tracking System
Sentry implementation captures:
* Application crash reports
* Error stack traces
* Performance metrics
* Frame rate analysis
* UI responsiveness
* Basic system information
* OS version
* Device identifiers
* IP addressing
## Authentication System
Firebase implementation handles:
* User authentication
* O1-Preview credit management
* Basic account state
For comprehensive details on our data handling practices, refer to our official documentation:
* [Terms of Service](https://alexcodes.app/terms)
* [Privacy Policy](https://alexcodes.app/privacy)
# Frequently Asked Questions
Source: https://alexcode.ai/docs/get-started/faq
Here are some FAQs.
### 1. What models should I use?
Check out our model guide here: [Link](https://www.alexcodes.app/docs/get-started/which-models-should-i-use)
### 3. Can I use Alex completely free?
New subscribers on the free plan get 50 chat credits / month to try out the product, and a 7-day trial on the Pro subscription.
### 4. Can I use codebase embeddings for free?
Yes! Our codebase embeddings model is provided for free to all users. You don't need to bring an API key for it.
### 5. Can I use Alex with local models?
Yes! You can add your local models (e.g. Ollama or LM Studio) in `Settings > Models & API Keys`.
Make sure you add the v1, for example: `http://127.0.0.1:11434/v1`
You don't need to put an API key, unless you've enabled it yourself.
### 6. Alex is not letting me login to a new device because I've reached my 2 device limit. What can I do?
Login to our portal: [https://alexcodes.app/admin](https://alexcodes.app/admin)
Find the "Devices" section, and remove the serial number associated with the older device you no longer want on your account.
Just remember that there is always limit of 2 devices per account.
### 7. Our company has an AI proxy that isn't available publicly. How can I use it?
Our team plans allow you to override all our model endpoints.
To get started:
1. Go to your portal: [https://alexcodes.app/admin](https://alexcodes.app/admin)
2. Click on "Create New Team" and give it a name
3. Go to the "Models" tab
4. Add any chat models you'd like to use.
> Note: The chat model needs to follow the OpenAI scheme.
You can also override the Autocomplete, Embeddings, Voice, Thinking, Web Search, and Code Apply models.
By doing this, you completely bypass our server.
### 8. How do I set my VAT ID?
1. Go to your billing portal ([https://alexcodes.app/admin](https://alexcodes.app/admin) > Manage Subscription)
2. Scroll down to "Billing Information"
3. Click "Update Information"
4. Scroll down to "Tax ID", and set your VAT
5. Click Save
### 9. Can I disable Telemetry (Analytics + Crash Logs)?
Yes, but only on team accounts.
Once you create your team account on the portal (see above), click on the "Advanced" tab, and disable telemetry.
Your team users will all stop collecting telemetry. Make sure to login through Alex + restart the app to apply the changes.
### 10. Can I disable auto-compiling?
Yes. You can control what tools are provided to Alex by going to `Settings > Tools` and disabling the tools you don't want.
You can then manually click the "Build and Fix Errors" button in the chat view whenever you like.
### 11. How do I stop Alex from automatically changing my files?
Next to the model selector, there's a toggle that either shows "Manual" or "Auto Apply".
Make sure it shows "Manual", and Alex won't automatically apply changes.
### 12. I'm getting a "Rate limit Exceeded" error, or a "Maximum Tokens exceeded" error
You're hitting API rate limits from your provider. Default limits for new accounts are often too low for real usage.
See our comprehensive [Rate Limits Guide](/support/rate-limits) for:
* How to check your current limits
* Steps to increase limits for each provider
* Quick fixes when you're rate limited
* Common scenarios and solutions
> Note: If you don't want to deal with rate limits, use Alex Sidebar's Pro or Unlimited plans. We handle all the API management for you.
### 13. I would like to cancel my subscription. How can I do that?
Open the App, then Go to settings (top right button), then click Billing, and click "Manage / Cancel Subscription". If you've canceled already or your payment has failed, the button will not appear.
### 14. I clicked "Start Free Trial" and it immediately upgraded me.
This is a known issue when you have previously had a trial of that product. We'll update it soon to prevent this.
### 15. Do you use our data for training?
We don't collect your chat requests for training unless you've opted into training mode during onboarding. If you'd like to disable it, go to `Settings > Privacy`.
We collect Crash Logs & Analytics (via Sentry and PostHog) which you cannot disable -- unless you are on a team plan (see #9.)
### 16. Why is my simulator opening after Alex compiles my app?
Alex tries to compile your app and run it if successfull. Then, it may attempt to click around the UI to confirm its changes were correct.
If you'd like to disable these actions, go to `Settings > Tools` and uncheck the Simulator actions, as well as the "Run App" and "Compile" actions.
### 17. What happened to Gemini 2.5 Pro Exp (Free Gemini)
The Gemini team has discontinued their free model. It's no longer supported.
### 18. Alex is stuck on "Waiting for model..." but nothing is happening
Please update to version 3.1.11 to fix this issue. (Same for if git commit generation is stuck.)
### 19. How does image pricing work?
Generating any image will cost 2 chat messages. Each additional image (on top of the first) will cost an additional chat message (e.g. if alex generates 2 images, that would be 3 chat messages).
This is because OpenAI's image generation API costs \$0.04 per image.
### 20. Can I use image generation with my own API Key?
Yes! It requires an OpenAI key. Here's a guide: [https://alexcodes.app/docs/keys/adding-openai-api-key](https://alexcodes.app/docs/keys/adding-openai-api-key)
### 21. Why does Alex tell me I have like 300 messages remaining, but the chat says I've used 140k of 150k tokens used?
> TLDR; The context bar is only useful for knowing when to start a new chat. It's not used for our billing.
Long answer:
The Context Bar (tokens) is entirely different than the message system. It shows how much of the context limit you've used up in the chat.
AI systems work based on "Context". Every time we send a message, we have to construct the whole chat into one large request to send to the AI.
Naturally, this becomes very expensive. e.g. if you used Claude Sonnet 4 with 200k tokens (or approximately 1 million characters of text), you would need to spend \$0.60 *every time you send a message*. This includes any time the agent takes an action.
This is why we limit the amount of context is sent to the chat model. And when we limit it, that means only a certain length of conversation can be passed in.
What determines how much context is used?
The total text inside the chat. This includes:
* The system prompt we provide
* Each file you attach (this can take up a lot of context!)
* Each message you've sent in the chat (including images)
* Each response the AI has given to you, including any of the code it has written
This can add up quickly, so it's important to keep tabs on your context bar.
Also: Generally, as you use up more tokens, AI systems get more "confused". It's like if you passed a whole book to some and asked them to find a single word! This is why limiting context, keeping chats short, and passing only required files, helps actually *improve* your results.
Now, back to the point of confusion: The amount of tokens you use has no effect on the # of Alex messages you've consumed from a billing perspective. We simplify things by counting each request to the AI model as 1 "message". Some messages could be cheaper, some more expensive, but we average it so that you spend less time counting tokens and prices.
### 22. What are the pricing plans?
Please see our dedicated [Pricing Plans](/get-started/pricing) page for current pricing information and plan details.
# Installation and Authentication
Source: https://alexcode.ai/docs/get-started/getting-started
Installation and configuration guide for Alex Sidebar
Alex Sidebar extends Xcode with powerful AI capabilities. This guide covers installation and initial setup.
## Installation
Download AlexSideBar.dmg from the [official releases page](https://github.com/DanielEdrisian/AlexSideBar-Public/releases/download/prod/AlexSideBar.dmg).
Open the downloaded DMG file and drag Alex Sidebar to your Applications folder.
The **Advanced** tab contains telemetry settings:
### Telemetry
Toggle "Enable telemetry data collection for your team" to control:
* Analytics data collection
* Crash logs and error reporting
* Usage statistics
When disabled, no telemetry data is sent from any team member's Alex Sidebar.
## Best Practices
Configure chat models first as they're used most frequently
Name models clearly (e.g., `dev-claude`, `prod-gpt4`) so developers know which to use
Verify each model works correctly before adding team members
Create internal documentation explaining when to use each model
## Cost Management
When using team models:
* All API costs are billed to your organization's accounts
* Individual developers don't need personal API keys
* Monitor usage through your cloud provider's dashboard
* Set up billing alerts to track spending
## Troubleshooting
* Ensure you clicked "Save Changes" after configuring models
* Check members have synced their Alex Sidebar app
* Verify the model endpoints are accessible from user networks
* Verify API keys are correct and active
* Check Base URL includes `/v1` suffix for OpenAI-compatible endpoints
* Ensure API keys have necessary permissions
* Verify you have admin role in the team
* Check you're using the correct email address
* Contact [team@alexcodes.app](mailto:team@alexcodes.app) if you need admin access
## Integration with LiteLLM
For teams using LiteLLM proxy:
1. Deploy LiteLLM with your enterprise models
2. Add your LiteLLM endpoint as Base URL
3. All team members automatically use your proxy
4. No individual cloud accounts needed
See the [LiteLLM Setup Guide](/configuration/litellm-setup) for detailed instructions.
# Cheatsheet
Source: https://alexcode.ai/docs/get-started/cheatsheet
A guide to Alex Sidebar's features, shortcuts, and best practices
## Essential Keyboard Shortcuts
| Shortcut | Action | Description |
| --------- | ------------------- | ------------------------------------------- |
| ⌘ + L | New Chat with code | Start a new AI chat with your selected code |
| ⌘ + N | New empty chat | Create a fresh chat without code context |
| ⌘ + ⇧ + L | Add to current chat | Append selected code to current chat |
| ⌘ + K | Inline completions | Get quick inline code suggestions |
| ⌘ + / | Open model selector | Toggle between different AI models |
| ⌘ + ⌫ | Stop generation | Immediately stop the current AI response |
| ⌘ + ⇧ + G | Git panel | Open the Git status panel |
| ⌘ + ⇧ + V | Voice mode | Toggle voice recording on/off |
| esc | Close panel | Universal close button for any open panel |
## AI Models & Their Strengths
| Model | Best For |
| ----------------- | ------------------------------------------------ |
| Claude Sonnet 4 | State of the Art - Best overall for coding tasks |
| Claude 3.5 Sonnet | Large codebases and complex tasks |
| Gemini 2.5 Pro | Excellent quality (but longer response times) |
| Gemini 2.5 Flash | Fast responses for quick tasks |
| OpenAI o3 | Best thinking model for complex reasoning |
| OpenAI o4 Mini | Lightweight model for simple tasks |
| OpenAI GPT 4.1 | General coding and chat tasks |
| DeepSeek R1 | Advanced coding assistance |
| DeepSeek V3 | Latest DeepSeek model |
These model recommendations are opinionated and based on general use cases. You should experiment with different models to find which ones work best for your specific needs and coding style. Each developer may have different preferences based on their workflow and the types of problems they are solving.
## Best Practices
1. **Code Context**
* Select relevant code before starting chat
* Include imports and related types
* Provide clear and **specific** questions
2. **Model Selection**
* Switch models if not getting desired results
## Common Use Cases & Workflows
### Code Review
1. Select code → ⌘ + L
2. Ask for review
3. Add context with ⌘ + ⇧ + L if needed
4. Use ▶️ to apply suggestions
### Quick Fixes
1. Place cursor where you want to fix
2. ⌘ + K for suggestions
3. Use **esc** to dismiss if needed
### Warnings and Errors
1. Click error/warning indicator in Xcode's editor near line number
2. Review AI-suggested fixes
3. Click ▶️ to implement changes, or use Quick Apply (⏩) for instant application
4. For complex cases:
* Select problematic code and copy error/warning
* Use ⌘ + L for detailed help
* Add context as needed
Common fixes include:
* Build errors (imports, types)
* Deprecated API usage
## Configuration Tips
* Customize shortcuts in Settings
* Set up system and custom prompts for repeated tasks
## Common Pitfalls to Avoid
* Do not provide too little context
* Do not stick with one model if struggling
# Data Usage
Source: https://alexcode.ai/docs/get-started/data-usage
Understanding how Alex Sidebar handles and protects your data
Alex Sidebar is designed with privacy and security in mind. We maintain strict data handling practices to protect your code and personal information.
## Core Principles
* No code storage or collection
* Opt-out of all third-party training data
* Minimal analytics collection (feature usage and diagnostics only)
* Local storage prioritization
## Infrastructure
### API Processing
All LLM interactions are processed through our secure infrastructure:
1. API endpoint: [https://api.alexcodes.app](https://api.alexcodes.app)
2. Server location: United States (Render hosting)
3. Processing workflow:
* Context collection from user selection
* Prompt construction with provided context
* Secure routing to model providers
* Response delivery without data persistence
### Future Data Practices
We maintain a strict opt-out-by-default policy for all users. Any future data collection initiatives will:
* Require explicit user consent
* Be clearly communicated
* Include granular opt-in controls
* Maintain existing user preferences
## Data Storage
### Code Embeddings
Alex Sidebar implements local embedding storage for search functionality:
1. **Generation Process**
* Automatic embedding of Xcode project code
* Processing through VoyageAI's embedding service
* Explicit opt-out from provider data collection
2. **Storage Location**
* Local SQLite database
* Path: Application Support/com.DanielEdrisian.AlexSideBar
* No cloud storage or sync
### Chat History
Chat data management follows local-first principles:
* Storage in Application Support directory
* No server-side persistence
* User-controlled retention
## AI Provider Integration
### Chat Models
Current providers:
* OpenAI
* Anthropic
* Perplexity
All integrations configured with:
* Training data opt-out enabled
* No persistent storage
* Request-only data transmission
### Code Application Models
Implementation providers:
* Groq
* Cerebras
* Fireworks AI
* Google (Gemini)
Security measures:
* Training opt-out enforced
* Temporary request processing
* No provider-side data retention
## Monitoring Systems
### Analytics Implementation
Posthog integration limited to:
* Feature activation events
* Command usage frequency
* No content or context collection
* Anonymous usage patterns
### Error Tracking System
Sentry implementation captures:
* Application crash reports
* Error stack traces
* Performance metrics
* Frame rate analysis
* UI responsiveness
* Basic system information
* OS version
* Device identifiers
* IP addressing
## Authentication System
Firebase implementation handles:
* User authentication
* O1-Preview credit management
* Basic account state
For comprehensive details on our data handling practices, refer to our official documentation:
* [Terms of Service](https://alexcodes.app/terms)
* [Privacy Policy](https://alexcodes.app/privacy)
# Frequently Asked Questions
Source: https://alexcode.ai/docs/get-started/faq
Here are some FAQs.
### 1. What models should I use?
Check out our model guide here: [Link](https://www.alexcodes.app/docs/get-started/which-models-should-i-use)
### 3. Can I use Alex completely free?
New subscribers on the free plan get 50 chat credits / month to try out the product, and a 7-day trial on the Pro subscription.
### 4. Can I use codebase embeddings for free?
Yes! Our codebase embeddings model is provided for free to all users. You don't need to bring an API key for it.
### 5. Can I use Alex with local models?
Yes! You can add your local models (e.g. Ollama or LM Studio) in `Settings > Models & API Keys`.
Make sure you add the v1, for example: `http://127.0.0.1:11434/v1`
You don't need to put an API key, unless you've enabled it yourself.
### 6. Alex is not letting me login to a new device because I've reached my 2 device limit. What can I do?
Login to our portal: [https://alexcodes.app/admin](https://alexcodes.app/admin)
Find the "Devices" section, and remove the serial number associated with the older device you no longer want on your account.
Just remember that there is always limit of 2 devices per account.
### 7. Our company has an AI proxy that isn't available publicly. How can I use it?
Our team plans allow you to override all our model endpoints.
To get started:
1. Go to your portal: [https://alexcodes.app/admin](https://alexcodes.app/admin)
2. Click on "Create New Team" and give it a name
3. Go to the "Models" tab
4. Add any chat models you'd like to use.
> Note: The chat model needs to follow the OpenAI scheme.
You can also override the Autocomplete, Embeddings, Voice, Thinking, Web Search, and Code Apply models.
By doing this, you completely bypass our server.
### 8. How do I set my VAT ID?
1. Go to your billing portal ([https://alexcodes.app/admin](https://alexcodes.app/admin) > Manage Subscription)
2. Scroll down to "Billing Information"
3. Click "Update Information"
4. Scroll down to "Tax ID", and set your VAT
5. Click Save
### 9. Can I disable Telemetry (Analytics + Crash Logs)?
Yes, but only on team accounts.
Once you create your team account on the portal (see above), click on the "Advanced" tab, and disable telemetry.
Your team users will all stop collecting telemetry. Make sure to login through Alex + restart the app to apply the changes.
### 10. Can I disable auto-compiling?
Yes. You can control what tools are provided to Alex by going to `Settings > Tools` and disabling the tools you don't want.
You can then manually click the "Build and Fix Errors" button in the chat view whenever you like.
### 11. How do I stop Alex from automatically changing my files?
Next to the model selector, there's a toggle that either shows "Manual" or "Auto Apply".
Make sure it shows "Manual", and Alex won't automatically apply changes.
### 12. I'm getting a "Rate limit Exceeded" error, or a "Maximum Tokens exceeded" error
You're hitting API rate limits from your provider. Default limits for new accounts are often too low for real usage.
See our comprehensive [Rate Limits Guide](/support/rate-limits) for:
* How to check your current limits
* Steps to increase limits for each provider
* Quick fixes when you're rate limited
* Common scenarios and solutions
> Note: If you don't want to deal with rate limits, use Alex Sidebar's Pro or Unlimited plans. We handle all the API management for you.
### 13. I would like to cancel my subscription. How can I do that?
Open the App, then Go to settings (top right button), then click Billing, and click "Manage / Cancel Subscription". If you've canceled already or your payment has failed, the button will not appear.
### 14. I clicked "Start Free Trial" and it immediately upgraded me.
This is a known issue when you have previously had a trial of that product. We'll update it soon to prevent this.
### 15. Do you use our data for training?
We don't collect your chat requests for training unless you've opted into training mode during onboarding. If you'd like to disable it, go to `Settings > Privacy`.
We collect Crash Logs & Analytics (via Sentry and PostHog) which you cannot disable -- unless you are on a team plan (see #9.)
### 16. Why is my simulator opening after Alex compiles my app?
Alex tries to compile your app and run it if successfull. Then, it may attempt to click around the UI to confirm its changes were correct.
If you'd like to disable these actions, go to `Settings > Tools` and uncheck the Simulator actions, as well as the "Run App" and "Compile" actions.
### 17. What happened to Gemini 2.5 Pro Exp (Free Gemini)
The Gemini team has discontinued their free model. It's no longer supported.
### 18. Alex is stuck on "Waiting for model..." but nothing is happening
Please update to version 3.1.11 to fix this issue. (Same for if git commit generation is stuck.)
### 19. How does image pricing work?
Generating any image will cost 2 chat messages. Each additional image (on top of the first) will cost an additional chat message (e.g. if alex generates 2 images, that would be 3 chat messages).
This is because OpenAI's image generation API costs \$0.04 per image.
### 20. Can I use image generation with my own API Key?
Yes! It requires an OpenAI key. Here's a guide: [https://alexcodes.app/docs/keys/adding-openai-api-key](https://alexcodes.app/docs/keys/adding-openai-api-key)
### 21. Why does Alex tell me I have like 300 messages remaining, but the chat says I've used 140k of 150k tokens used?
> TLDR; The context bar is only useful for knowing when to start a new chat. It's not used for our billing.
Long answer:
The Context Bar (tokens) is entirely different than the message system. It shows how much of the context limit you've used up in the chat.
AI systems work based on "Context". Every time we send a message, we have to construct the whole chat into one large request to send to the AI.
Naturally, this becomes very expensive. e.g. if you used Claude Sonnet 4 with 200k tokens (or approximately 1 million characters of text), you would need to spend \$0.60 *every time you send a message*. This includes any time the agent takes an action.
This is why we limit the amount of context is sent to the chat model. And when we limit it, that means only a certain length of conversation can be passed in.
What determines how much context is used?
The total text inside the chat. This includes:
* The system prompt we provide
* Each file you attach (this can take up a lot of context!)
* Each message you've sent in the chat (including images)
* Each response the AI has given to you, including any of the code it has written
This can add up quickly, so it's important to keep tabs on your context bar.
Also: Generally, as you use up more tokens, AI systems get more "confused". It's like if you passed a whole book to some and asked them to find a single word! This is why limiting context, keeping chats short, and passing only required files, helps actually *improve* your results.
Now, back to the point of confusion: The amount of tokens you use has no effect on the # of Alex messages you've consumed from a billing perspective. We simplify things by counting each request to the AI model as 1 "message". Some messages could be cheaper, some more expensive, but we average it so that you spend less time counting tokens and prices.
### 22. What are the pricing plans?
Please see our dedicated [Pricing Plans](/get-started/pricing) page for current pricing information and plan details.
# Installation and Authentication
Source: https://alexcode.ai/docs/get-started/getting-started
Installation and configuration guide for Alex Sidebar
Alex Sidebar extends Xcode with powerful AI capabilities. This guide covers installation and initial setup.
## Installation
Download AlexSideBar.dmg from the [official releases page](https://github.com/DanielEdrisian/AlexSideBar-Public/releases/download/prod/AlexSideBar.dmg).
Open the downloaded DMG file and drag Alex Sidebar to your Applications folder.
 Open Alex Sidebar from Applications. The Xcode integration will initialize automatically.
You may see a popup indicating that "AlexSideBar" is an app downloaded from the Internet. It is safe to proceed. Click "Open" to continue.
Open Alex Sidebar from Applications. The Xcode integration will initialize automatically.
You may see a popup indicating that "AlexSideBar" is an app downloaded from the Internet. It is safe to proceed. Click "Open" to continue.
 After launching, Alex Sidebar will request accessibility permissions. These permissions are required to:
* Make changes to files
* Handle Apple events
* Integrate with Xcode effectively
Click "Open System Settings" when prompted, then enable Alex Sidebar in the Accessibility permissions list.
After launching, Alex Sidebar will request accessibility permissions. These permissions are required to:
* Make changes to files
* Handle Apple events
* Integrate with Xcode effectively
Click "Open System Settings" when prompted, then enable Alex Sidebar in the Accessibility permissions list.
 ## Folder Access Permissions
When you first use Alex Sidebar, you will need to grant access to folders where your projects are stored. This permission helps to analyze your project files and provide relevant context to the AI assistant when working with code across different files and folders.
When opening a project, Alex Sidebar will request permission to access the folder where your Xcode project/workspace is located. This typically includes:
* Desktop
* Downloads
* Documents folders
Click "Allow" when the system permission dialog appears to grant access.
If you need to update permissions later:
1. Open System Settings
2. Navigate to Privacy & Security → Files and Folders
3. Find "Alex Sidebar" in the list
4. Enable access for required folders
## Folder Access Permissions
When you first use Alex Sidebar, you will need to grant access to folders where your projects are stored. This permission helps to analyze your project files and provide relevant context to the AI assistant when working with code across different files and folders.
When opening a project, Alex Sidebar will request permission to access the folder where your Xcode project/workspace is located. This typically includes:
* Desktop
* Downloads
* Documents folders
Click "Allow" when the system permission dialog appears to grant access.
If you need to update permissions later:
1. Open System Settings
2. Navigate to Privacy & Security → Files and Folders
3. Find "Alex Sidebar" in the list
4. Enable access for required folders
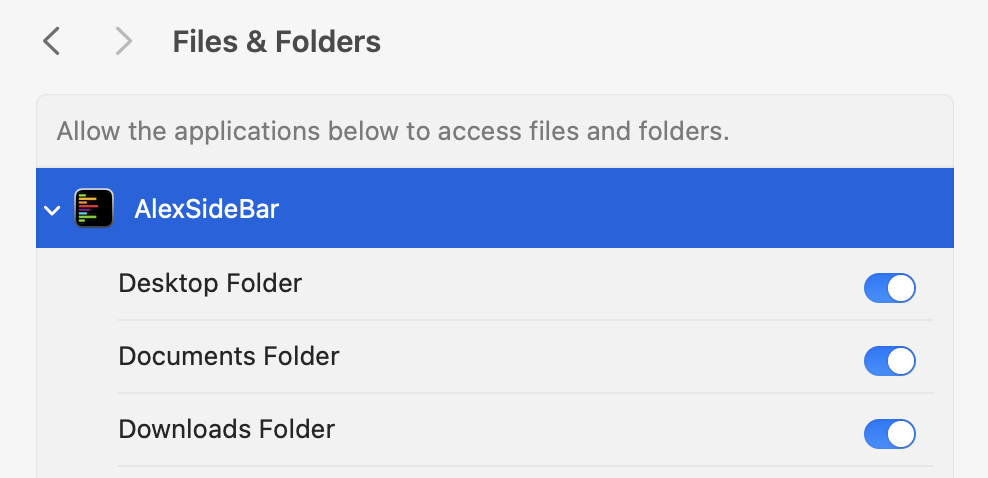
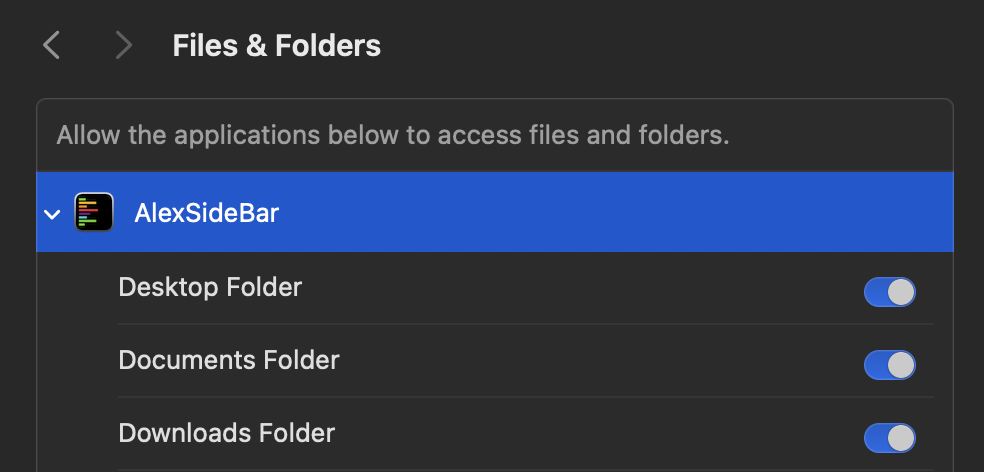 ## Sign Up & Authentication
After launching Alex Sidebar, you'll be presented with sign up options:
* Enter your email and password
* Click "Sign Up", or
* Use "Sign up with Google" for faster authentication
## Sign Up & Authentication
After launching Alex Sidebar, you'll be presented with sign up options:
* Enter your email and password
* Click "Sign Up", or
* Use "Sign up with Google" for faster authentication
 If you choose Google sign-in, you'll see a system prompt to authorize the connection:
 Click "Continue" to allow Alex Sidebar to authenticate with your Google account.
# Introduction
Source: https://alexcode.ai/docs/get-started/introduction
AI Assisted Coding for Xcode
Welcome to **Alex Sidebar**, your AI companion for Xcode development. This documentation will help you understand and make the most of Alex's features to assist your Apple Platform development workflow!
## Essentials
Get up and running in under 2 minutes
Create your account and get started
## Core Features
Select any code in Xcode and instantly start a chat about it. Get immediate AI assistance for code understanding and solutions.
Transform designs into code. Simply drag any image into the sidebar and let
Alex generate the corresponding code for you.
Generate in-file suggestions instantly. Get smart code completions and improvements without breaking your flow.
## Advanced Features
Apply suggested code changes with a single click. Use Quick Apply (⏩) for instant changes without diff panel.
One-click automatic build and error resolution. Alex continuously builds, detects errors, applies fixes, and rebuilds until your project compiles successfully.
## Support and Community
Multiple channels for assistance
Solutions to common issues
How to report bugs effectively
Submit and track feature ideas
# Pricing Plans
Source: https://alexcode.ai/docs/get-started/pricing
Choose the plan that works best for your development workflow
Alex Sidebar offers different plans based on how much you use the chat features. The Pro plan includes a 7-day free trial so you can test everything out before committing.
All users (including free) get access to GitHub and Linear integrations.
## Pro Plan - \$30/month
Our most popular plan for active developers.
* 600 Chat Credits per month
* Unlimited Code Applies
* Unlimited Git Commit Generation
* Unlimited Tab-to-Complete
* Unlimited Voice Inputs
* Unlimited Codebase Embeddings
* Top-up available: \$12.50 for 250 extra credits
* 7-day free trial
## Unlimited Plan - \$200/month
For power users who don't want to think about credits.
* Unlimited Chat Credits
* All Pro features included
* No rate limits
* 1 device limit
* 7-day free trial
## How Chat Credits Work
Each interaction with Alex uses chat credits:
* Sending a message: 1 credit
* Agent follow-up actions: 1 credit per action (for example, if the agent performs 3 actions autonomously, that's 3 credits)
* Image generation: 2 credits for the first image, 1 credit for each additional image
### Credit Rollover Policy
* Monthly credits do not roll over to the next month
* Purchased top-up credits roll over to the next month
## Grandfather Clauses
We take care of our existing subscribers:
* Premium subscribers (old plan) are grandfathered—you keep your plan until you choose to switch or cancel
* Mini plan subscribers are also grandfathered
## Frequently Asked Questions
### Can I change plans?
Yes, you can upgrade or downgrade at any time. Changes take effect at the next billing cycle.
### What payment methods do you accept?
We accept all major credit cards through Stripe.
### Do you offer team or enterprise pricing?
Yes! Contact [team@alexcodes.app](mailto:team@alexcodes.app) for team and enterprise pricing options.
### What happens when I run out of credits?
You can purchase top-ups at \$12.50 for 250 credits, or upgrade to the Unlimited plan.
# Which models should I use?
Source: https://alexcode.ai/docs/get-started/which-models-should-i-use
A guide to picking models
Models have different levels of quality and speed. Here's a list of our recommendations:
### Best Models (in General)
**Claude Sonnet 4** - This is currently the best overall model for coding tasks.
**Gemini 2.5 Pro** - Excellent quality but may have longer response times due to reasoning.
If one isn't giving you good results, try the other. Sometimes one model is good at a thing that the other model is bad at.
> Note: Claude Sonnet 4 is a very eager model, and tries to run lots of actions.
### Best Thinking Model
**OpenAI o3** - Takes time to think through problems but delivers often perfect results.
o3 does not have access to tools in Alex, in order to keep the output quality high. So make sure to pass all the files it needs into its context first.
### All Available Models
Here's the ranking of all models available in Alex:
1. Claude Sonnet 4
2. Gemini 2.5 Pro
3. Claude 3.5 Sonnet
4. Gemini 2.5 Flash
5. OpenAI o3
6. OpenAI o4 Mini (06.19)
7. OpenAI GPT 4.1
8. DeepSeek R1
9. DeepSeek V3 (03.24)
These are just our rankings, based on our experience with general iOS/Swift development. For general SWE rankings, see Aider's Leaderboard: [https://aider.chat/docs/leaderboards/](https://aider.chat/docs/leaderboards/)
### Local Models
If you'd like to use local models, here's our ranking:
1. Qwen2.5 Coder 32B (Best, but slowest to run)
2. Qwen2.5 Coder 14B
3. Gemma3 27b QAT
4. Gemma3 12b QAT
We generally don't recommend running local models, due to their poor performance compared to hosted models.
# Adding your API Key for Claude (Anthropic)
Source: https://alexcode.ai/docs/keys/adding-claude-anthropic-api-key
Learn how to get your API Key
To use Claude's models (such as Claude 3.5 Sonnet and Claude 3.7 Sonnet) in Xcode with Alex Sidebar without paying a subscription for Alex, you'll need an Anthropic API key.
Here's how to get one:
1. Visit [Anthropic's Console](https://console.anthropic.com/)
2. Create an account or sign in if you already have one
3. Once logged in, navigate to the API Keys section in your account settings
4. Click "Create New API Key"
5. Give your key a name (e.g., "Alex Sidebar") and create it
6. Copy the API key - make sure to save it somewhere secure as you won't be able to see it again
7. In Alex Sidebar:
* Open Settings (⚙️)
* Select "Models" at the bottom of the page
* Paste your Anthropic API key in the Anthropic text field
Keep your API key secure and never share it publicly. If you suspect your key has been compromised, you should immediately rotate it in the Anthropic Console.
## Usage & Billing
* Anthropic bills based on the number of tokens used
* You can monitor your usage in the Anthropic Console
* Set up billing alerts to avoid unexpected charges
* New accounts typically come with some free credits to get started
For more information about Claude's pricing and usage, visit [Anthropic's pricing page](https://www.anthropic.com/pricing).
Enabling Anthropic does not give you access to all of Alex's features. To enable codebase indexing, follow the [VoyageAI API Key Instructions](/get-started/adding-voyage-ai-api-key), and to enable Thinking mode, follow the [FireworksAI API Key Instructions](/get-started/adding-fireworks-ai-api-key).
For other models like GPT 4o and the o-series (o1, o3, o4-mini), follow the [OpenAI API Key Instructions](/get-started/adding-openai-api-key).
# Adding your API Key for Fireworks AI
Source: https://alexcode.ai/docs/keys/adding-fireworks-ai-api-key
Learn how to get your API Key
To use Fireworks AI's models (Thinking mode, DeepSeek R1, and DeepSeek V3 New) in Xcode with Alex Sidebar without paying a subscription for Alex, you'll need a Fireworks AI API key.
Here's how to get one:
1. Visit [Fireworks AI's Console](https://fireworks.ai)
2. Create an account or sign in if you already have one
3. Once logged in, navigate to the [API Keys page](https://fireworks.ai/account/api-keys) in your account settings
4. Click "Create API Key"
5. Give your key a name (e.g., "Alex Sidebar") and create it
6. Copy the API key - make sure to save it somewhere secure as you won't be able to see it again
7. In Alex Sidebar:
* Open Settings (⚙️)
* Select "Models" at the bottom of the page
* Paste your Fireworks AI API key in the Fireworks AI text field
Keep your API key secure and never share it publicly. If you suspect your key has been compromised, you should immediately rotate it in the Fireworks AI Console.
## Usage & Billing
* Fireworks AI bills based on the number of tokens used
* You can monitor your usage in the Fireworks AI Console
* Set up billing alerts to avoid unexpected charges
* New accounts typically come with some free credits to get started
For more information about Fireworks AI's pricing and usage, visit [Fireworks AI's pricing page](https://fireworks.ai/pricing).
Enabling Fireworks AI does not give you access to all of Alex's features. To enable codebase indexing, follow the [VoyageAI API Key Instructions](/get-started/adding-voyage-ai-api-key), and to enable Claude models, follow the [Anthropic API Key Instructions](/get-started/adding-claude-anthropic-ai-api-key).
For other models like GPT 4o and the o-series (o1, o3, o4-mini), follow the [OpenAI API Key Instructions](/get-started/adding-openai-api-key).
# Adding your API Key for Gemini (Google)
Source: https://alexcode.ai/docs/keys/adding-gemini-api-key
Learn how to get your API Key
To use Gemini's models (Gemini 2.5 Pro, Gemini 2.0 Flash) in Xcode with Alex Sidebar without paying a subscription for Alex, you'll need a Google AI Studio API key.
Here's how to get one:
1. Visit [Google Cloud Console](https://aistudio.google.com)
2. Create an account or sign in if you already have one
3. Go to the (API Keys page)([https://aistudio.google.com/apikey](https://aistudio.google.com/apikey))
4. Click "Create API Key" and select a project to enable it for
5. Copy the API key - make sure to save it somewhere secure
6. In Alex Sidebar:
* Open Settings (⚙️)
* Select "Models" at the bottom of the page
* Paste your AI Studio API key in the Gemini text field
Keep your API key secure and never share it publicly. If you suspect your key has been compromised, you should immediately rotate it in the Google Cloud Console.
## Usage & Billing
* Google Cloud bills based on the number of tokens used
* You can monitor your usage in the Google Cloud Console
* Set up billing alerts to avoid unexpected charges
* New accounts typically come with some free credits to get started
For more information about Gemini's pricing and usage, visit [Google Cloud's pricing page](https://cloud.google.com/vertex-ai/pricing#gemini).
Enabling Gemini does not give you access to all of Alex's features. To enable codebase indexing, follow the [VoyageAI API Key Instructions](/get-started/adding-voyage-ai-api-key), and to enable Thinking mode, follow the [FireworksAI API Key Instructions](/get-started/adding-fireworks-ai-api-key).
For other models like GPT 4o and the o-series (o1, o3, o4-mini), follow the [OpenAI API Key Instructions](/get-started/adding-openai-ai-api-key). For Anthropic's models (Claude 3.5 Sonnet, Claude 3.7 Sonnet) follow the [Anthropic API Key Instructions](/get-started/adding-claude-anthropic-ai-api-key).
# Adding your API Key for OpenAI
Source: https://alexcode.ai/docs/keys/adding-openai-api-key
Learn how to get your API Key
To use OpenAI's models (such as GPT 4.1, o3, and o4 Mini) in Xcode with Alex Sidebar without paying a subscription for Alex, you'll need an OpenAI API key.
Here's how to get one:
1. Visit [OpenAI's Platform](https://platform.openai.com/)
2. Create an account or sign in if you already have one
3. Once logged in, navigate to the API Keys section in your account settings
4. Click "Create New API Key"
5. Give your key a name (e.g., "Alex Sidebar"), select a project (or default project) and create it
6. Copy the API key - make sure to save it somewhere secure as you won't be able to see it again
7. In Alex Sidebar:
* Open Settings (⚙️)
* Select "Models" at the bottom of the page
* Paste your OpenAI API key in the OpenAI text field
Keep your API key secure and never share it publicly. If you suspect your key has been compromised, you should immediately rotate it in the OpenAI Platform.
## Usage & Billing
* OpenAI bills based on the number of tokens used
* You can monitor your usage in the OpenAI Platform
* Set up billing alerts to avoid unexpected charges
* New accounts typically come with some free credits to get started
For more information about OpenAI's pricing and usage, visit [OpenAI's pricing page](https://openai.com/pricing).
Enabling OpenAI does not give you access to all of Alex's features. To enable codebase indexing, follow the [VoyageAI API Key Instructions](/get-started/adding-voyage-ai-api-key), and to enable Thinking mode, follow the [FireworksAI API Key Instructions](/get-started/adding-fireworks-ai-api-key).
For Claude models like Claude Opus 4 and Sonnet 4, follow the [Anthropic API Key Instructions](/get-started/adding-claude-anthropic-ai-api-key).
# Adding your API Key for OpenRouter
Source: https://alexcode.ai/docs/keys/adding-openrouter-api-key
Learn how to get your API Key
To use OpenRouter, a great way to add AI models and control spend, you'll need an OpenRouter API key.
Here's how to get one:
1. Visit [OpenRouter's API Key Settings](https://openrouter.ai/settings/keys)
2. Create an account or sign in if you already have one
3. Click "Create API Key"
4. Give your key a name (e.g., "Alex Sidebar") and optionally set a credit spend limit
5. Copy the API key - make sure to save it somewhere secure as you won't be able to see it again
6. In Alex Sidebar:
* Open Settings (⚙️)
* Select "Models and API Keys" under the "Tools & Features" section
* Paste your OpenRouter API key in the OpenRouter key text field under the OpenRouter Models
Keep your API key secure and never share it publicly. If you suspect your key has been compromised, you should immediately rotate it in your OpenRouter settings.
## Usage & Billing
* OpenRouter is a unified API for all the major LLMs on the market, along with several minor ones. It allows users to aggregate their billing in one place and make use of several nice features such as analytics and fallbacks.
* OpenRouter is **not** an AI model. It is a platform in which you can connect to various models with various pricing and various limitations.
You should familiarize yourself with their platform and [documentation](https://openrouter.ai/docs) before proceeding, if you haven't already.
# Adding your API Key for Voyage AI
Source: https://alexcode.ai/docs/keys/adding-voyage-ai-api-key
Learn how to get your API Key
To use codebase indexing in Xcode, we use Voyage AI's code embedding models.
To use Voyage AI in Alex Sidebar without paying a subscription for Alex, you'll need a Voyage AI API key.
Here's how to get one:
1. Visit [Voyage AI's Console](https://voyageai.com/)
2. Create an account or sign in if you already have one
3. Once logged in, navigate to the [API Keys page](https://dashboard.voyageai.com/api-keys)
4. Click "Create New Secret Key"
5. Give your key a name (e.g., "Alex Sidebar") and create it
6. Copy the API key - make sure to save it somewhere secure as you won't be able to see it again
7. In Alex Sidebar:
* Open Settings (⚙️)
* Select "Models" at the bottom of the page
* Paste your Voyage AI API key in the Voyage AI text field
Keep your API key secure and never share it publicly. If you suspect your key has been compromised, you should immediately rotate it in the Voyage AI Console.
## Usage & Billing
* Voyage AI bills based on the number of tokens used
* You can monitor your usage in the Voyage AI Console
* Set up billing alerts to avoid unexpected charges
* New accounts typically come with some free credits to get started
For more information about Voyage AI's pricing and usage, visit [Voyage AI's pricing page](https://docs.voyageai.com/docs/pricing).
Enabling Voyage AI does not give you access to all of Alex's features. For other models like Claude Sonnet or GPT 4o, follow the [Anthropic API Key Instructions](/get-started/adding-claude-anthropic-ai-api-key) and [OpenAI API Key Instructions](/get-started/adding-openai-api-key) respectively. To enable Thinking mode, follow the [FireworksAI API Key Instructions](/get-started/adding-fireworks-ai-api-key).
# WWDC 2025 Modes
Source: https://alexcode.ai/docs/new-additions/wwdc-2025
Use the latest WWDC 2025 features and commands in Alex Sidebar
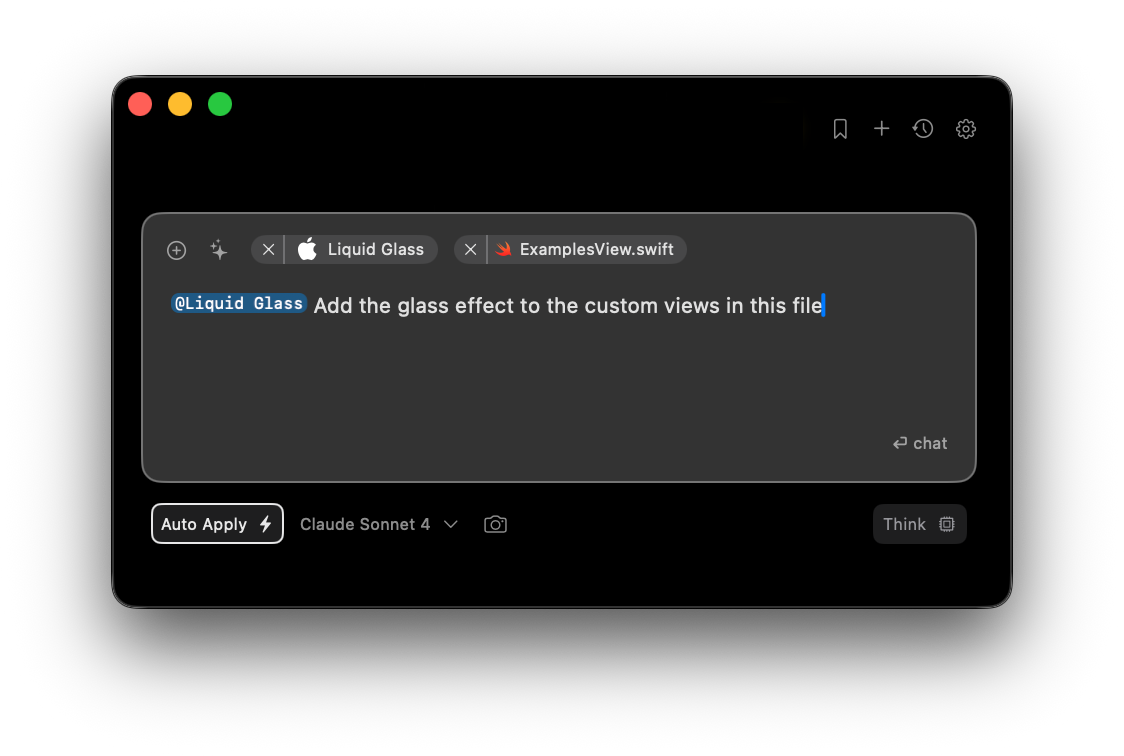
Alex Sidebar now supports the contexts for the features announced at WWDC 2025, including the Liquid Glass design system, and the latest APIs. This guide shows you how to use these new features in your apps.
### Key Announcements
A new design system with translucent, adaptive interfaces
Access Apple Intelligence's language model on-device with just a few lines of code
Faster and better speech recognition with improved accuracy
Faster list loading and updates on macOS
## Commands in Alex Sidebar
There are new commands to help you implement the new design and work with the latest APIs. Use these command tags to access specific capabilities:
### @WWDC25 Mode
Access the latest Apple documentation related to WWDC 2025 by prefixing your requests with `@WWDC25`. For example, to get the context for the latest documentation for the SpeechAnalyzer API, you can use the following command:
```
@WWDC25 Implement the new SpeechAnalyzer API for real-time transcription
```
This mode gives Alex the context of:
* All iOS 26, macOS 26, and visionOS 26 APIs
* Liquid Glass design implementation
* New SwiftUI features like Rich Text Editor and 3D Charts
* Performance optimizations and best practices
**Example Uses:**
```
@WWDC25 Create a 3D chart in the given view with the new Charts API
@WWDC25 Implement the new WebKit APIs for in-app browsers
```
### @Foundation Models Command
Use Apple's language model directly in your apps. Here is an example of how to use the `@Foundation Models` command:
```
@FoundationModel Create a suggestion system using the new Foundation Models API for generating name recommendations
```
**Example Implementation:**
```swift
import FoundationModels
// Access Apple's on-device foundation model with just a few lines
let session = try await LanguageModelSession()
// Generate structured data from natural language
let prompt = "Create a daily journal entry from these notes: \(userNotes)"
let response = try await session.respond(
to: prompt,
generating: JournalEntry.self
)
// The model runs entirely on-device, protecting user privacy
let journalEntry = response.content
```
### @Liquid Glass Command
Update your UI with the new Liquid Glass design system. Here is an example of how to use the `@Liquid Glass` command:
```
@Liquid Glass Update the custom button to use the new Liquid Glass design
```
## Combining Commands
Use multiple commands together for better results. Here is an example of how to use the `@WWDC25`, `@Liquid Glass`, and `@Foundation Models` commands together:
```
@WWDC25 @Liquid Glass @Foundation Models
Create an AI-powered notes app with speech transcription and the new design system
```
This combination:
1. Uses SpeechAnalyzer for transcription (@WWDC25)
2. Applies Liquid Glass design throughout the app (@Liquid Glass)
3. Uses Foundation Models for summarization (@Foundation Models)
## Quick Reference
| Feature | Command | Example Usage |
| --------------- | ------------------ | -------------------------------------------------------------------- |
| SpeechAnalyzer | @WWDC25 | `@WWDC25 Add real-time transcription` |
| Liquid Glass UI | @Liquid Glass | `@Liquid Glass Apply glass effects to my cards` |
| On-device AI | @Foundation Models | `@Foundation Models Generate text summaries locally` |
| 3D Charts | @WWDC25 | `@WWDC25 Create 3D charts in the given view with the new Charts API` |
| Rich Text | @WWDC25 | `@WWDC25 Add rich text editing to my app` |
Alex Sidebar makes it simpler to adopt Apple's latest features and APIs announced at WWDC 2025.
# Discord Community
Source: https://alexcode.ai/docs/support/discord-channels
Understanding Alex Sidebar's Discord channels and community
The community is here to help! Do not hesitate to ask questions, but remember
to use the appropriate channel for your topic.
## Getting Started
1. Introduce yourself in #general
2. Read pinned messages in channels
3. Join relevant discussions
4. Share your experience
5. Ask questions in appropriate channels
## Best Practices
* Check pinned messages before posting
* Use threads for detailed discussions
* Share learning resources in #ios
* Report bugs with clear reproduction steps
* Help others when possible
* Stay on topic in each channel
## Channel Overview
The official channel for all important updates from our team.
Here you'll find the latest product releases, new features, critical changes, and upcoming community events.
Our welcoming community hub for all members.
Feel free to introduce yourself, engage in iOS development discussions, or join casual conversations with fellow developers.
Your go-to channel for all technical assistance needs.
Get help with troubleshooting, installation guidance, feature usage, and version-specific issues from our helpful community.
The central space for shaping the future of our products.
Share your experience with beta features, report bugs, suggest improvements, and discuss performance with other testers.
The hub for all things AI and automation.
Discuss model behavior, share success stories, request features, and learn tips for getting the most out of AI features.
A space to celebrate and share your achievements.
Present your integration examples, success stories, app releases, and implementation demos with fellow developers.
Your essential iOS development knowledge base.
Find curated learning materials, development tips, best practices, and discover recommended tools for iOS development.
## Posting Guidelines
### Support Channel Guidelines
When posting in #support, include:
* Version Information
* App version number
* OS version
* Build number (for beta)
* Device model
* Problem Description
* Expected behavior
* Actual behavior
* Impact and frequency
* Reproduction Steps
* Numbered step-by-step guide
* Required conditions
* Screenshots/recordings if applicable
### Beta Feedback Guidelines
When posting in #beta-feedback, provide:
* Detailed Report
* Clear description
* Current vs expected behavior
* Impact on workflow
* Supporting Information
* Use case examples
* Related GitHub issues
* Visual mockups (if applicable)
* Environment details
### Showcase Guidelines
When sharing in #showcase, include:
* Project Overview
* Core features and purpose
* Target audience
* Technical implementation
* Supporting Materials
* Screenshots or demos
* GitHub repository (if public)
* App Store listing (if published)
* Integration details
# Getting Help
Source: https://alexcode.ai/docs/support/getting-help
Learn about Alex Sidebar's support channels and how to get assistance
## Support Channels
Join our active community for feedback, support, and tips
Tag @Alex in Discord to automatically create issue reports or feature requests
Get direct support for business inquiries and enterprise-level assistance
Access guides, troubleshooting tips, and best practices
## Getting the Best Support
Search this documentation first - your question might already be answered!
Use **Command + K** to open the AI search assistant to answer your questions and queries directly from the documentation.
Check Discord channels for similar problems and solutions shared by the community.
Please provide for the best support:
* Alex Sidebar version (e.g. 3.2.22)
* Xcode version (e.g. 16.2)
* Steps to reproduce (if reporting an issue)
## Reporting Issues
In any Discord channel, tag @Alex with your issue description. The bot will automatically create and track your issue report.
Example: `@Alex I'm experiencing crashes when using inline completions with Swift 6`
```markdown
**System Information:**
- Alex Sidebar Version: x.x.x
- macOS Version: xx.xx
- Xcode Version: xx.x
**Description:**
Clear description of the issue
**Steps to Reproduce:**
1. Step one
2. Step two
3. Step three
**Expected Behavior:**
What should happen
**Actual Behavior:**
What actually happens
**Screenshots/Recordings:**
If applicable
```
For visual issues or complex workflows:
1. Use macOS Screen Recording (Shift + Command + 5)
2. Keep recordings focused and under 2 minutes
3. Share via Discord when tagging @Alex
## Feature Requests
Tag @Alex in Discord with your feature request. The bot will create and track your suggestion.
Example: `@Alex Feature request: Add support for SwiftUI previews in chat`
```markdown
**Describe the feature**
A description of what is happening.
**Screenshots/Screen recordings**
Please attach any screen shots or screen recordings here.
**What version are you on currently?**
- Version [e.g. 3.2.22]
```
Share your idea on Discord to gather community feedback and discuss implementation possibilities
## Community Guidelines
When participating in our community:
* Be respectful and constructive
* Stay on topic
* Help others when you can
* Follow channel-specific guidelines
## Support Hours
Our team is primarily based in PST (Pacific Standard Time).
* Discord: Community help available 24/7
* Alex Bot: Automatically creates and tracks issues and feature requests
* Email Support: Response within 1-2 business days
# Rate Limits Guide
Source: https://alexcode.ai/docs/support/rate-limits
Handle API rate limits like a pro when using your own keys
If you're using your own API keys with Alex Sidebar, you'll eventually hit rate limits. This guide helps you understand, diagnose, and fix rate limit issues for each provider.
## What You'll See When You Hit Rate Limits
### The Dreaded 429 Error
All providers return a `429` HTTP status code when you exceed rate limits, but the error messages differ:
**Anthropic (Claude)**
```
429 {"type":"error","error":{"type":"rate_limit_error","message":"Number of request tokens has exceeded your per-minute rate limit"}}
```
**OpenAI**
```
Error: 429 - Rate limit exceeded: You exceeded your current quota, please check your plan and billing details
```
**Gemini**
```
Error 429: RESOURCE_EXHAUSTED - Quota exceeded for quota metric
```
## Understanding Rate Limits
Each provider measures limits differently:
### Anthropic
* **RPM**: Requests per minute
* **ITPM**: Input tokens per minute
* **OTPM**: Output tokens per minute
### OpenAI
* **RPM**: Requests per minute
* **TPM**: Total tokens per minute (input + output)
* **RPD**: Requests per day (for some models)
### Gemini
* **RPM**: Requests per minute
* **TPD**: Tokens per day
* **RPD**: Requests per day
## Check Your Current Limits
### Anthropic Console
1. Go to [console.anthropic.com](https://console.anthropic.com)
2. Click on "Usage" in the sidebar.
3. Check "Rate-limited requests" to see the number of requests that were blocked due to rate limits.
### OpenAI Platform
1. Visit [platform.openai.com/account/limits](https://platform.openai.com/account/limits)
2. See your tier and current limits
3. Check usage at [platform.openai.com/usage](https://platform.openai.com/usage)
### Google Cloud Console
1. Go to [console.cloud.google.com/apis/dashboard](https://console.cloud.google.com/apis/dashboard)
2. Select your project
3. Click "Quotas & System Limits"
## How to Increase Your Limits
### Anthropic
* Spend more to automatically get higher limits
* Contact sales for enterprise needs
### OpenAI
* Increase limits by spending (not just depositing) money
* Multiple tiers available with different requirements
* Check [platform.openai.com/account/limits](https://platform.openai.com/account/limits) for current tier info
### Gemini
* Request increases through Google Cloud Console
* Manual approval required
## Quick Fixes When You're Rate Limited
### 1. Switch Models Temporarily
Each model has separate limits. If one model is rate limited, try:
* A different model from the same provider
* Switch to another provider (OpenAI, Anthropic, Gemini)
* Use Alex's built-in credits instead
### 2. Wait Before Retrying
If you hit a rate limit, wait a bit before trying again. The error message might tell you how long to wait.
### 3. Reduce Your Usage
* Ask for shorter responses
* Send fewer messages
* Use a model with higher limits
## Common Scenarios & Solutions
### "I just created an account and I'm already rate limited!"
New accounts typically have very low default limits. You'll need to add credits or enable billing to get usable limits. Check each provider's documentation for current requirements.
### "I added money but limits didn't increase"
* Some providers require you to actually spend money, not just add it
* Limit increases aren't always instant
* Check your provider's console for current limits
### "Rate limits are killing my productivity"
Consider using Alex Sidebar's built-in credits. You won't have to worry about:
* Managing multiple API keys
* Tracking spending across providers
* Dealing with rate limits
* Waiting for tier upgrades
## Best Practices
1. **Monitor usage proactively** - Check your provider's dashboard regularly
2. **Set up billing alerts** - Know before you hit spending limits
3. **Track when you hit limits** - Notice patterns in your usage
## Provider-Specific Tips
### Anthropic
* Workspaces let you set custom limits per project
* Different models have different limits
### OpenAI
* Different models have different rate limits
* Some models may have special restrictions
### Gemini
* Vertex AI and AI Studio have separate quotas
* Location can affect your limits
## Still Stuck?
If you're consistently hitting rate limits despite following this guide:
1. **Check your code** - You might be making more requests than you think
2. **Contact support** - Each provider has ways to request custom limits
3. **Consider Alex credits** - Our Pro and Unlimited plans eliminate these headaches
Rate limits exist to ensure fair usage and system stability. Understanding how they work helps you plan your development workflow better.
# Troubleshooting Guide
Source: https://alexcode.ai/docs/support/troubleshooting
Common issues, solutions, and performance optimization tips for Alex Sidebar
## Common Issues and Solutions
### Chat and Response Issues
**Symptoms:** - No responses in chat - Server timeouts - "Error connecting
to LLM API" - Rainbow wheel appearing - Infinite spinners **Solutions:** 1.
Check API Connection: - Verify internet connection - If using custom API
key, ensure it's valid - Check your API key balance and rate limits 2.
If App Freezes: - Force quit Alex Sidebar - Restart Xcode - Clear chat
history 3. For Server Timeouts: - Reduce context size - Break large requests
into smaller ones - Check if you're exceeding context limits
### Project Indexing and File Issues
**Symptoms:**
* Stuck on indexing
* Files not being created properly
* Wrong file modifications
* Issues with multiple Xcode projects
**Solutions:**
1. For Indexing Problems:
* Restart Alex Sidebar
* Clear Xcode's derived data
* Check project permissions
2. File Creation Issues:
* Use menu options instead of + button
* Verify write permissions
* Check for path existence
3. Multiple Projects:
* Keep only one project active when possible
* Verify correct project selection
* Double-check file paths before modifications
### UI and Window Management
**Symptoms:**
* Incorrect window resizing
* Text truncation
* Sidebar growing to full screen
* Font size issues
**Solutions:**
1. Window Issues:
* Use Cmd+ and Cmd- for font scaling
* Restart app if window becomes unresponsive
* Maintain minimum window width
2. Display Problems:
* Toggle fullscreen mode
* Reset window position
* Check display scaling settings
## Performance Optimization
### Model Selection and API Usage
**Best Practices for API Usage:**
* Use appropriate models for different tasks:
* GPT-4 for complex code generation
* Claude for documentation and explanations
* GPT-3.5 for quick queries
* When using custom API keys:
* Verify correct model selection
* Monitor credit usage
* Check for [rate limits](/support/rate-limits)
### Keyboard and Input
**Current Issues:**
* Escape key capture affecting Vim users
* Dvorak keyboard layout conflicts
* Some shortcuts may conflict with Xcode
**Workarounds:**
* Use menu options instead of shortcuts
* Check for keyboard shortcut conflicts in System Preferences
* Wait for upcoming customizable shortcuts feature
**Known Issues:**
* Crashes when pasting in input field
* Text loss in prompt inputs
* Duplicate text in inputs
**Temporary Solutions:**
* Type text manually instead of pasting
* Break large pastes into smaller chunks
* Save important prompts externally
## Reporting New Issues
If you encounter issues not covered here:
1. Check the version number
2. Document the steps to reproduce
3. Capture relevant screenshots/recordings
4. Report through appropriate channels:
* Discord for quick help
* GitHub for bug tracking
* Email for account/license issues
For fastest resolution: - Include your system information - Provide clear
reproduction steps - Mention any recent changes or updates - Include relevant
error messages
# Activation
Source: https://alexcode.ai/docs/windows/activation
Control when and how Alex Sidebar becomes active
Activation settings determine how Alex Sidebar responds to your interactions with Xcode and maintains focus during your development workflow.
## Activation Settings
### Bring Alex to front when Xcode is clicked
When enabled, Alex Sidebar automatically comes to the foreground whenever you click on or activate your Xcode window. This ensures your AI assistant is always readily accessible alongside your code editor.
**Benefits:**
* Seamless workflow between code and AI assistance
* No manual window switching required
* Maintains context awareness as you code
### Stay on top
This setting keeps Alex Sidebar floating above all other windows on your screen, ensuring it remains visible and accessible at all times.
**Use cases:**
* Multi-monitor setups where you want Alex always visible
* When working with multiple applications
* During live coding or presentations
## How to Configure
1. Open Settings (gear icon in the top right)
2. Navigate to **Workspace Configuration** → **Window Management**
3. Toggle the desired activation options:
* **Bring Alex to front when Xcode is clicked** - For automatic focus management
* **Stay on top** - For persistent visibility
These settings work together with positioning options to create your ideal development environment. Consider your workflow and screen setup when choosing which options to enable.
## Best Practices
* **For focused coding**: Enable "Bring Alex to front" for seamless transitions
* **For reference work**: Enable "Stay on top" when you need constant AI assistance
* **For presentations**: Use "Stay on top" to keep Alex visible during demos
# Tips & Best Practices
Source: https://alexcode.ai/docs/windows/interface-hints
Best practices for using Alex Sidebar's window settings
Get the most out of Alex Sidebar's window management features with these tips and recommendations.
## Quick Setup Guide
For the best experience, we recommend enabling all window settings:
1. **Bring Alex to front when Xcode is clicked** - Keeps Alex accessible
2. **Auto-Snap Alex next to Xcode** - Perfect side-by-side layout
3. **Let Alex fill rest of the screen** - Maximum workspace efficiency
4. **Match height with Xcode** - Clean, aligned interface
5. **Stay on top** - Always visible when needed
## Common Configurations
Enable auto-snap and fill screen options to maximize your limited screen space. Consider disabling "Stay on top" to reduce visual clutter.
Place Xcode on one monitor and Alex on another. Disable auto-positioning for manual control, but keep "Stay on top" for easy reference.
Use all automatic positioning features to make the most of your screen. Toggle "Stay on top" based on your current task.
Enable "Stay on top" and position Alex strategically for demos. Disable auto-positioning for predictable window placement.
## Troubleshooting
### Windows not aligning properly?
1. Ensure Xcode is the active window
2. Toggle auto-snap off and on again
3. Check that both windows are on the same screen
### Alex Sidebar hidden behind Xcode?
* Enable "Stay on top" in Window Settings
* Or enable "Bring Alex to front when Xcode is clicked"
### Need more screen space?
* Disable "Let Alex fill rest of the screen"
* Manually resize Alex Sidebar to your preference
# Overview
Source: https://alexcode.ai/docs/windows/overview
Configure how Alex Sidebar integrates with your Xcode workspace
Window Settings allow you to control how Alex Sidebar behaves and positions itself alongside Xcode. Access these settings through Settings → Workspace Configuration → Window Management.
## Available Settings
Alex Sidebar provides five key window management options:
Automatically brings Alex Sidebar to the foreground whenever you interact with Xcode, ensuring it's always accessible when you need it.
Automatically positions Alex Sidebar adjacent to your Xcode window, maintaining optimal placement as you work.
Allows Alex Sidebar to expand and use all available screen space not occupied by Xcode, maximizing your workspace efficiency.
Keeps Alex Sidebar's height synchronized with your Xcode window for a clean, aligned interface.
Ensures Alex Sidebar remains visible above other windows, so it's always available when you need assistance.
## Configuration Pages
Window focus and activation behaviors
Automatic positioning and snapping
Window management tips and configurations
# Positioning
Source: https://alexcode.ai/docs/windows/positioning
Configure automatic positioning and sizing of Alex Sidebar
Positioning settings help you create an optimal layout between Alex Sidebar and Xcode, maximizing your screen real estate and workflow efficiency.
## Positioning Settings
### Auto-Snap Alex next to Xcode
Automatically positions Alex Sidebar adjacent to your Xcode window, creating a seamless side-by-side development environment.
**Features:**
* Snaps to the right edge of Xcode
* Maintains position when Xcode moves
* Adjusts automatically when switching between Xcode windows
### Let Alex fill rest of the screen
When enabled, Alex Sidebar expands to use all available horizontal screen space not occupied by Xcode.
**Benefits:**
* Maximizes chat area for better readability
* Uses screen space efficiently
* Automatically adjusts when Xcode is resized
### Match height with Xcode
Synchronizes Alex Sidebar's height with your Xcode window for a clean, professional appearance.
**Results in:**
* Perfectly aligned top and bottom edges
* Consistent visual layout
* Unified workspace appearance
## How to Configure
1. Open Settings (gear icon in the top right)
2. Navigate to **Workspace Configuration** → **Window Management**
3. Enable your preferred positioning options:
* **Auto-Snap Alex next to Xcode** - For automatic side-by-side placement
* **Let Alex fill rest of the screen** - For maximum workspace utilization
* **Match height with Xcode** - For aligned window heights
These settings work best when used together. Enable all three for the best integration with Xcode.
## Recommended Configurations
Enable all positioning options for a fully integrated development environment where Alex Sidebar perfectly complements your Xcode window.
Disable auto-positioning if you prefer to manually arrange windows or work with multiple monitors.
Click "Continue" to allow Alex Sidebar to authenticate with your Google account.
# Introduction
Source: https://alexcode.ai/docs/get-started/introduction
AI Assisted Coding for Xcode
Welcome to **Alex Sidebar**, your AI companion for Xcode development. This documentation will help you understand and make the most of Alex's features to assist your Apple Platform development workflow!
## Essentials
Get up and running in under 2 minutes
Create your account and get started
## Core Features
Select any code in Xcode and instantly start a chat about it. Get immediate AI assistance for code understanding and solutions.
Transform designs into code. Simply drag any image into the sidebar and let
Alex generate the corresponding code for you.
Generate in-file suggestions instantly. Get smart code completions and improvements without breaking your flow.
## Advanced Features
Apply suggested code changes with a single click. Use Quick Apply (⏩) for instant changes without diff panel.
One-click automatic build and error resolution. Alex continuously builds, detects errors, applies fixes, and rebuilds until your project compiles successfully.
## Support and Community
Multiple channels for assistance
Solutions to common issues
How to report bugs effectively
Submit and track feature ideas
# Pricing Plans
Source: https://alexcode.ai/docs/get-started/pricing
Choose the plan that works best for your development workflow
Alex Sidebar offers different plans based on how much you use the chat features. The Pro plan includes a 7-day free trial so you can test everything out before committing.
All users (including free) get access to GitHub and Linear integrations.
## Pro Plan - \$30/month
Our most popular plan for active developers.
* 600 Chat Credits per month
* Unlimited Code Applies
* Unlimited Git Commit Generation
* Unlimited Tab-to-Complete
* Unlimited Voice Inputs
* Unlimited Codebase Embeddings
* Top-up available: \$12.50 for 250 extra credits
* 7-day free trial
## Unlimited Plan - \$200/month
For power users who don't want to think about credits.
* Unlimited Chat Credits
* All Pro features included
* No rate limits
* 1 device limit
* 7-day free trial
## How Chat Credits Work
Each interaction with Alex uses chat credits:
* Sending a message: 1 credit
* Agent follow-up actions: 1 credit per action (for example, if the agent performs 3 actions autonomously, that's 3 credits)
* Image generation: 2 credits for the first image, 1 credit for each additional image
### Credit Rollover Policy
* Monthly credits do not roll over to the next month
* Purchased top-up credits roll over to the next month
## Grandfather Clauses
We take care of our existing subscribers:
* Premium subscribers (old plan) are grandfathered—you keep your plan until you choose to switch or cancel
* Mini plan subscribers are also grandfathered
## Frequently Asked Questions
### Can I change plans?
Yes, you can upgrade or downgrade at any time. Changes take effect at the next billing cycle.
### What payment methods do you accept?
We accept all major credit cards through Stripe.
### Do you offer team or enterprise pricing?
Yes! Contact [team@alexcodes.app](mailto:team@alexcodes.app) for team and enterprise pricing options.
### What happens when I run out of credits?
You can purchase top-ups at \$12.50 for 250 credits, or upgrade to the Unlimited plan.
# Which models should I use?
Source: https://alexcode.ai/docs/get-started/which-models-should-i-use
A guide to picking models
Models have different levels of quality and speed. Here's a list of our recommendations:
### Best Models (in General)
**Claude Sonnet 4** - This is currently the best overall model for coding tasks.
**Gemini 2.5 Pro** - Excellent quality but may have longer response times due to reasoning.
If one isn't giving you good results, try the other. Sometimes one model is good at a thing that the other model is bad at.
> Note: Claude Sonnet 4 is a very eager model, and tries to run lots of actions.
### Best Thinking Model
**OpenAI o3** - Takes time to think through problems but delivers often perfect results.
o3 does not have access to tools in Alex, in order to keep the output quality high. So make sure to pass all the files it needs into its context first.
### All Available Models
Here's the ranking of all models available in Alex:
1. Claude Sonnet 4
2. Gemini 2.5 Pro
3. Claude 3.5 Sonnet
4. Gemini 2.5 Flash
5. OpenAI o3
6. OpenAI o4 Mini (06.19)
7. OpenAI GPT 4.1
8. DeepSeek R1
9. DeepSeek V3 (03.24)
These are just our rankings, based on our experience with general iOS/Swift development. For general SWE rankings, see Aider's Leaderboard: [https://aider.chat/docs/leaderboards/](https://aider.chat/docs/leaderboards/)
### Local Models
If you'd like to use local models, here's our ranking:
1. Qwen2.5 Coder 32B (Best, but slowest to run)
2. Qwen2.5 Coder 14B
3. Gemma3 27b QAT
4. Gemma3 12b QAT
We generally don't recommend running local models, due to their poor performance compared to hosted models.
# Adding your API Key for Claude (Anthropic)
Source: https://alexcode.ai/docs/keys/adding-claude-anthropic-api-key
Learn how to get your API Key
To use Claude's models (such as Claude 3.5 Sonnet and Claude 3.7 Sonnet) in Xcode with Alex Sidebar without paying a subscription for Alex, you'll need an Anthropic API key.
Here's how to get one:
1. Visit [Anthropic's Console](https://console.anthropic.com/)
2. Create an account or sign in if you already have one
3. Once logged in, navigate to the API Keys section in your account settings
4. Click "Create New API Key"
5. Give your key a name (e.g., "Alex Sidebar") and create it
6. Copy the API key - make sure to save it somewhere secure as you won't be able to see it again
7. In Alex Sidebar:
* Open Settings (⚙️)
* Select "Models" at the bottom of the page
* Paste your Anthropic API key in the Anthropic text field
Keep your API key secure and never share it publicly. If you suspect your key has been compromised, you should immediately rotate it in the Anthropic Console.
## Usage & Billing
* Anthropic bills based on the number of tokens used
* You can monitor your usage in the Anthropic Console
* Set up billing alerts to avoid unexpected charges
* New accounts typically come with some free credits to get started
For more information about Claude's pricing and usage, visit [Anthropic's pricing page](https://www.anthropic.com/pricing).
Enabling Anthropic does not give you access to all of Alex's features. To enable codebase indexing, follow the [VoyageAI API Key Instructions](/get-started/adding-voyage-ai-api-key), and to enable Thinking mode, follow the [FireworksAI API Key Instructions](/get-started/adding-fireworks-ai-api-key).
For other models like GPT 4o and the o-series (o1, o3, o4-mini), follow the [OpenAI API Key Instructions](/get-started/adding-openai-api-key).
# Adding your API Key for Fireworks AI
Source: https://alexcode.ai/docs/keys/adding-fireworks-ai-api-key
Learn how to get your API Key
To use Fireworks AI's models (Thinking mode, DeepSeek R1, and DeepSeek V3 New) in Xcode with Alex Sidebar without paying a subscription for Alex, you'll need a Fireworks AI API key.
Here's how to get one:
1. Visit [Fireworks AI's Console](https://fireworks.ai)
2. Create an account or sign in if you already have one
3. Once logged in, navigate to the [API Keys page](https://fireworks.ai/account/api-keys) in your account settings
4. Click "Create API Key"
5. Give your key a name (e.g., "Alex Sidebar") and create it
6. Copy the API key - make sure to save it somewhere secure as you won't be able to see it again
7. In Alex Sidebar:
* Open Settings (⚙️)
* Select "Models" at the bottom of the page
* Paste your Fireworks AI API key in the Fireworks AI text field
Keep your API key secure and never share it publicly. If you suspect your key has been compromised, you should immediately rotate it in the Fireworks AI Console.
## Usage & Billing
* Fireworks AI bills based on the number of tokens used
* You can monitor your usage in the Fireworks AI Console
* Set up billing alerts to avoid unexpected charges
* New accounts typically come with some free credits to get started
For more information about Fireworks AI's pricing and usage, visit [Fireworks AI's pricing page](https://fireworks.ai/pricing).
Enabling Fireworks AI does not give you access to all of Alex's features. To enable codebase indexing, follow the [VoyageAI API Key Instructions](/get-started/adding-voyage-ai-api-key), and to enable Claude models, follow the [Anthropic API Key Instructions](/get-started/adding-claude-anthropic-ai-api-key).
For other models like GPT 4o and the o-series (o1, o3, o4-mini), follow the [OpenAI API Key Instructions](/get-started/adding-openai-api-key).
# Adding your API Key for Gemini (Google)
Source: https://alexcode.ai/docs/keys/adding-gemini-api-key
Learn how to get your API Key
To use Gemini's models (Gemini 2.5 Pro, Gemini 2.0 Flash) in Xcode with Alex Sidebar without paying a subscription for Alex, you'll need a Google AI Studio API key.
Here's how to get one:
1. Visit [Google Cloud Console](https://aistudio.google.com)
2. Create an account or sign in if you already have one
3. Go to the (API Keys page)([https://aistudio.google.com/apikey](https://aistudio.google.com/apikey))
4. Click "Create API Key" and select a project to enable it for
5. Copy the API key - make sure to save it somewhere secure
6. In Alex Sidebar:
* Open Settings (⚙️)
* Select "Models" at the bottom of the page
* Paste your AI Studio API key in the Gemini text field
Keep your API key secure and never share it publicly. If you suspect your key has been compromised, you should immediately rotate it in the Google Cloud Console.
## Usage & Billing
* Google Cloud bills based on the number of tokens used
* You can monitor your usage in the Google Cloud Console
* Set up billing alerts to avoid unexpected charges
* New accounts typically come with some free credits to get started
For more information about Gemini's pricing and usage, visit [Google Cloud's pricing page](https://cloud.google.com/vertex-ai/pricing#gemini).
Enabling Gemini does not give you access to all of Alex's features. To enable codebase indexing, follow the [VoyageAI API Key Instructions](/get-started/adding-voyage-ai-api-key), and to enable Thinking mode, follow the [FireworksAI API Key Instructions](/get-started/adding-fireworks-ai-api-key).
For other models like GPT 4o and the o-series (o1, o3, o4-mini), follow the [OpenAI API Key Instructions](/get-started/adding-openai-ai-api-key). For Anthropic's models (Claude 3.5 Sonnet, Claude 3.7 Sonnet) follow the [Anthropic API Key Instructions](/get-started/adding-claude-anthropic-ai-api-key).
# Adding your API Key for OpenAI
Source: https://alexcode.ai/docs/keys/adding-openai-api-key
Learn how to get your API Key
To use OpenAI's models (such as GPT 4.1, o3, and o4 Mini) in Xcode with Alex Sidebar without paying a subscription for Alex, you'll need an OpenAI API key.
Here's how to get one:
1. Visit [OpenAI's Platform](https://platform.openai.com/)
2. Create an account or sign in if you already have one
3. Once logged in, navigate to the API Keys section in your account settings
4. Click "Create New API Key"
5. Give your key a name (e.g., "Alex Sidebar"), select a project (or default project) and create it
6. Copy the API key - make sure to save it somewhere secure as you won't be able to see it again
7. In Alex Sidebar:
* Open Settings (⚙️)
* Select "Models" at the bottom of the page
* Paste your OpenAI API key in the OpenAI text field
Keep your API key secure and never share it publicly. If you suspect your key has been compromised, you should immediately rotate it in the OpenAI Platform.
## Usage & Billing
* OpenAI bills based on the number of tokens used
* You can monitor your usage in the OpenAI Platform
* Set up billing alerts to avoid unexpected charges
* New accounts typically come with some free credits to get started
For more information about OpenAI's pricing and usage, visit [OpenAI's pricing page](https://openai.com/pricing).
Enabling OpenAI does not give you access to all of Alex's features. To enable codebase indexing, follow the [VoyageAI API Key Instructions](/get-started/adding-voyage-ai-api-key), and to enable Thinking mode, follow the [FireworksAI API Key Instructions](/get-started/adding-fireworks-ai-api-key).
For Claude models like Claude Opus 4 and Sonnet 4, follow the [Anthropic API Key Instructions](/get-started/adding-claude-anthropic-ai-api-key).
# Adding your API Key for OpenRouter
Source: https://alexcode.ai/docs/keys/adding-openrouter-api-key
Learn how to get your API Key
To use OpenRouter, a great way to add AI models and control spend, you'll need an OpenRouter API key.
Here's how to get one:
1. Visit [OpenRouter's API Key Settings](https://openrouter.ai/settings/keys)
2. Create an account or sign in if you already have one
3. Click "Create API Key"
4. Give your key a name (e.g., "Alex Sidebar") and optionally set a credit spend limit
5. Copy the API key - make sure to save it somewhere secure as you won't be able to see it again
6. In Alex Sidebar:
* Open Settings (⚙️)
* Select "Models and API Keys" under the "Tools & Features" section
* Paste your OpenRouter API key in the OpenRouter key text field under the OpenRouter Models
Keep your API key secure and never share it publicly. If you suspect your key has been compromised, you should immediately rotate it in your OpenRouter settings.
## Usage & Billing
* OpenRouter is a unified API for all the major LLMs on the market, along with several minor ones. It allows users to aggregate their billing in one place and make use of several nice features such as analytics and fallbacks.
* OpenRouter is **not** an AI model. It is a platform in which you can connect to various models with various pricing and various limitations.
You should familiarize yourself with their platform and [documentation](https://openrouter.ai/docs) before proceeding, if you haven't already.
# Adding your API Key for Voyage AI
Source: https://alexcode.ai/docs/keys/adding-voyage-ai-api-key
Learn how to get your API Key
To use codebase indexing in Xcode, we use Voyage AI's code embedding models.
To use Voyage AI in Alex Sidebar without paying a subscription for Alex, you'll need a Voyage AI API key.
Here's how to get one:
1. Visit [Voyage AI's Console](https://voyageai.com/)
2. Create an account or sign in if you already have one
3. Once logged in, navigate to the [API Keys page](https://dashboard.voyageai.com/api-keys)
4. Click "Create New Secret Key"
5. Give your key a name (e.g., "Alex Sidebar") and create it
6. Copy the API key - make sure to save it somewhere secure as you won't be able to see it again
7. In Alex Sidebar:
* Open Settings (⚙️)
* Select "Models" at the bottom of the page
* Paste your Voyage AI API key in the Voyage AI text field
Keep your API key secure and never share it publicly. If you suspect your key has been compromised, you should immediately rotate it in the Voyage AI Console.
## Usage & Billing
* Voyage AI bills based on the number of tokens used
* You can monitor your usage in the Voyage AI Console
* Set up billing alerts to avoid unexpected charges
* New accounts typically come with some free credits to get started
For more information about Voyage AI's pricing and usage, visit [Voyage AI's pricing page](https://docs.voyageai.com/docs/pricing).
Enabling Voyage AI does not give you access to all of Alex's features. For other models like Claude Sonnet or GPT 4o, follow the [Anthropic API Key Instructions](/get-started/adding-claude-anthropic-ai-api-key) and [OpenAI API Key Instructions](/get-started/adding-openai-api-key) respectively. To enable Thinking mode, follow the [FireworksAI API Key Instructions](/get-started/adding-fireworks-ai-api-key).
# WWDC 2025 Modes
Source: https://alexcode.ai/docs/new-additions/wwdc-2025
Use the latest WWDC 2025 features and commands in Alex Sidebar

Alex Sidebar now supports the contexts for the features announced at WWDC 2025, including the Liquid Glass design system, and the latest APIs. This guide shows you how to use these new features in your apps.
### Key Announcements
A new design system with translucent, adaptive interfaces
Access Apple Intelligence's language model on-device with just a few lines of code
Faster and better speech recognition with improved accuracy
Faster list loading and updates on macOS
## Commands in Alex Sidebar
There are new commands to help you implement the new design and work with the latest APIs. Use these command tags to access specific capabilities:
### @WWDC25 Mode
Access the latest Apple documentation related to WWDC 2025 by prefixing your requests with `@WWDC25`. For example, to get the context for the latest documentation for the SpeechAnalyzer API, you can use the following command:
```
@WWDC25 Implement the new SpeechAnalyzer API for real-time transcription
```
This mode gives Alex the context of:
* All iOS 26, macOS 26, and visionOS 26 APIs
* Liquid Glass design implementation
* New SwiftUI features like Rich Text Editor and 3D Charts
* Performance optimizations and best practices
**Example Uses:**
```
@WWDC25 Create a 3D chart in the given view with the new Charts API
@WWDC25 Implement the new WebKit APIs for in-app browsers
```
### @Foundation Models Command
Use Apple's language model directly in your apps. Here is an example of how to use the `@Foundation Models` command:
```
@FoundationModel Create a suggestion system using the new Foundation Models API for generating name recommendations
```
**Example Implementation:**
```swift
import FoundationModels
// Access Apple's on-device foundation model with just a few lines
let session = try await LanguageModelSession()
// Generate structured data from natural language
let prompt = "Create a daily journal entry from these notes: \(userNotes)"
let response = try await session.respond(
to: prompt,
generating: JournalEntry.self
)
// The model runs entirely on-device, protecting user privacy
let journalEntry = response.content
```
### @Liquid Glass Command
Update your UI with the new Liquid Glass design system. Here is an example of how to use the `@Liquid Glass` command:
```
@Liquid Glass Update the custom button to use the new Liquid Glass design
```
## Combining Commands
Use multiple commands together for better results. Here is an example of how to use the `@WWDC25`, `@Liquid Glass`, and `@Foundation Models` commands together:
```
@WWDC25 @Liquid Glass @Foundation Models
Create an AI-powered notes app with speech transcription and the new design system
```
This combination:
1. Uses SpeechAnalyzer for transcription (@WWDC25)
2. Applies Liquid Glass design throughout the app (@Liquid Glass)
3. Uses Foundation Models for summarization (@Foundation Models)
## Quick Reference
| Feature | Command | Example Usage |
| --------------- | ------------------ | -------------------------------------------------------------------- |
| SpeechAnalyzer | @WWDC25 | `@WWDC25 Add real-time transcription` |
| Liquid Glass UI | @Liquid Glass | `@Liquid Glass Apply glass effects to my cards` |
| On-device AI | @Foundation Models | `@Foundation Models Generate text summaries locally` |
| 3D Charts | @WWDC25 | `@WWDC25 Create 3D charts in the given view with the new Charts API` |
| Rich Text | @WWDC25 | `@WWDC25 Add rich text editing to my app` |
Alex Sidebar makes it simpler to adopt Apple's latest features and APIs announced at WWDC 2025.
# Discord Community
Source: https://alexcode.ai/docs/support/discord-channels
Understanding Alex Sidebar's Discord channels and community
The community is here to help! Do not hesitate to ask questions, but remember
to use the appropriate channel for your topic.
## Getting Started
1. Introduce yourself in #general
2. Read pinned messages in channels
3. Join relevant discussions
4. Share your experience
5. Ask questions in appropriate channels
## Best Practices
* Check pinned messages before posting
* Use threads for detailed discussions
* Share learning resources in #ios
* Report bugs with clear reproduction steps
* Help others when possible
* Stay on topic in each channel
## Channel Overview
The official channel for all important updates from our team.
Here you'll find the latest product releases, new features, critical changes, and upcoming community events.
Our welcoming community hub for all members.
Feel free to introduce yourself, engage in iOS development discussions, or join casual conversations with fellow developers.
Your go-to channel for all technical assistance needs.
Get help with troubleshooting, installation guidance, feature usage, and version-specific issues from our helpful community.
The central space for shaping the future of our products.
Share your experience with beta features, report bugs, suggest improvements, and discuss performance with other testers.
The hub for all things AI and automation.
Discuss model behavior, share success stories, request features, and learn tips for getting the most out of AI features.
A space to celebrate and share your achievements.
Present your integration examples, success stories, app releases, and implementation demos with fellow developers.
Your essential iOS development knowledge base.
Find curated learning materials, development tips, best practices, and discover recommended tools for iOS development.
## Posting Guidelines
### Support Channel Guidelines
When posting in #support, include:
* Version Information
* App version number
* OS version
* Build number (for beta)
* Device model
* Problem Description
* Expected behavior
* Actual behavior
* Impact and frequency
* Reproduction Steps
* Numbered step-by-step guide
* Required conditions
* Screenshots/recordings if applicable
### Beta Feedback Guidelines
When posting in #beta-feedback, provide:
* Detailed Report
* Clear description
* Current vs expected behavior
* Impact on workflow
* Supporting Information
* Use case examples
* Related GitHub issues
* Visual mockups (if applicable)
* Environment details
### Showcase Guidelines
When sharing in #showcase, include:
* Project Overview
* Core features and purpose
* Target audience
* Technical implementation
* Supporting Materials
* Screenshots or demos
* GitHub repository (if public)
* App Store listing (if published)
* Integration details
# Getting Help
Source: https://alexcode.ai/docs/support/getting-help
Learn about Alex Sidebar's support channels and how to get assistance
## Support Channels
Join our active community for feedback, support, and tips
Tag @Alex in Discord to automatically create issue reports or feature requests
Get direct support for business inquiries and enterprise-level assistance
Access guides, troubleshooting tips, and best practices
## Getting the Best Support
Search this documentation first - your question might already be answered!
Use **Command + K** to open the AI search assistant to answer your questions and queries directly from the documentation.
Check Discord channels for similar problems and solutions shared by the community.
Please provide for the best support:
* Alex Sidebar version (e.g. 3.2.22)
* Xcode version (e.g. 16.2)
* Steps to reproduce (if reporting an issue)
## Reporting Issues
In any Discord channel, tag @Alex with your issue description. The bot will automatically create and track your issue report.
Example: `@Alex I'm experiencing crashes when using inline completions with Swift 6`
```markdown
**System Information:**
- Alex Sidebar Version: x.x.x
- macOS Version: xx.xx
- Xcode Version: xx.x
**Description:**
Clear description of the issue
**Steps to Reproduce:**
1. Step one
2. Step two
3. Step three
**Expected Behavior:**
What should happen
**Actual Behavior:**
What actually happens
**Screenshots/Recordings:**
If applicable
```
For visual issues or complex workflows:
1. Use macOS Screen Recording (Shift + Command + 5)
2. Keep recordings focused and under 2 minutes
3. Share via Discord when tagging @Alex
## Feature Requests
Tag @Alex in Discord with your feature request. The bot will create and track your suggestion.
Example: `@Alex Feature request: Add support for SwiftUI previews in chat`
```markdown
**Describe the feature**
A description of what is happening.
**Screenshots/Screen recordings**
Please attach any screen shots or screen recordings here.
**What version are you on currently?**
- Version [e.g. 3.2.22]
```
Share your idea on Discord to gather community feedback and discuss implementation possibilities
## Community Guidelines
When participating in our community:
* Be respectful and constructive
* Stay on topic
* Help others when you can
* Follow channel-specific guidelines
## Support Hours
Our team is primarily based in PST (Pacific Standard Time).
* Discord: Community help available 24/7
* Alex Bot: Automatically creates and tracks issues and feature requests
* Email Support: Response within 1-2 business days
# Rate Limits Guide
Source: https://alexcode.ai/docs/support/rate-limits
Handle API rate limits like a pro when using your own keys
If you're using your own API keys with Alex Sidebar, you'll eventually hit rate limits. This guide helps you understand, diagnose, and fix rate limit issues for each provider.
## What You'll See When You Hit Rate Limits
### The Dreaded 429 Error
All providers return a `429` HTTP status code when you exceed rate limits, but the error messages differ:
**Anthropic (Claude)**
```
429 {"type":"error","error":{"type":"rate_limit_error","message":"Number of request tokens has exceeded your per-minute rate limit"}}
```
**OpenAI**
```
Error: 429 - Rate limit exceeded: You exceeded your current quota, please check your plan and billing details
```
**Gemini**
```
Error 429: RESOURCE_EXHAUSTED - Quota exceeded for quota metric
```
## Understanding Rate Limits
Each provider measures limits differently:
### Anthropic
* **RPM**: Requests per minute
* **ITPM**: Input tokens per minute
* **OTPM**: Output tokens per minute
### OpenAI
* **RPM**: Requests per minute
* **TPM**: Total tokens per minute (input + output)
* **RPD**: Requests per day (for some models)
### Gemini
* **RPM**: Requests per minute
* **TPD**: Tokens per day
* **RPD**: Requests per day
## Check Your Current Limits
### Anthropic Console
1. Go to [console.anthropic.com](https://console.anthropic.com)
2. Click on "Usage" in the sidebar.
3. Check "Rate-limited requests" to see the number of requests that were blocked due to rate limits.
### OpenAI Platform
1. Visit [platform.openai.com/account/limits](https://platform.openai.com/account/limits)
2. See your tier and current limits
3. Check usage at [platform.openai.com/usage](https://platform.openai.com/usage)
### Google Cloud Console
1. Go to [console.cloud.google.com/apis/dashboard](https://console.cloud.google.com/apis/dashboard)
2. Select your project
3. Click "Quotas & System Limits"
## How to Increase Your Limits
### Anthropic
* Spend more to automatically get higher limits
* Contact sales for enterprise needs
### OpenAI
* Increase limits by spending (not just depositing) money
* Multiple tiers available with different requirements
* Check [platform.openai.com/account/limits](https://platform.openai.com/account/limits) for current tier info
### Gemini
* Request increases through Google Cloud Console
* Manual approval required
## Quick Fixes When You're Rate Limited
### 1. Switch Models Temporarily
Each model has separate limits. If one model is rate limited, try:
* A different model from the same provider
* Switch to another provider (OpenAI, Anthropic, Gemini)
* Use Alex's built-in credits instead
### 2. Wait Before Retrying
If you hit a rate limit, wait a bit before trying again. The error message might tell you how long to wait.
### 3. Reduce Your Usage
* Ask for shorter responses
* Send fewer messages
* Use a model with higher limits
## Common Scenarios & Solutions
### "I just created an account and I'm already rate limited!"
New accounts typically have very low default limits. You'll need to add credits or enable billing to get usable limits. Check each provider's documentation for current requirements.
### "I added money but limits didn't increase"
* Some providers require you to actually spend money, not just add it
* Limit increases aren't always instant
* Check your provider's console for current limits
### "Rate limits are killing my productivity"
Consider using Alex Sidebar's built-in credits. You won't have to worry about:
* Managing multiple API keys
* Tracking spending across providers
* Dealing with rate limits
* Waiting for tier upgrades
## Best Practices
1. **Monitor usage proactively** - Check your provider's dashboard regularly
2. **Set up billing alerts** - Know before you hit spending limits
3. **Track when you hit limits** - Notice patterns in your usage
## Provider-Specific Tips
### Anthropic
* Workspaces let you set custom limits per project
* Different models have different limits
### OpenAI
* Different models have different rate limits
* Some models may have special restrictions
### Gemini
* Vertex AI and AI Studio have separate quotas
* Location can affect your limits
## Still Stuck?
If you're consistently hitting rate limits despite following this guide:
1. **Check your code** - You might be making more requests than you think
2. **Contact support** - Each provider has ways to request custom limits
3. **Consider Alex credits** - Our Pro and Unlimited plans eliminate these headaches
Rate limits exist to ensure fair usage and system stability. Understanding how they work helps you plan your development workflow better.
# Troubleshooting Guide
Source: https://alexcode.ai/docs/support/troubleshooting
Common issues, solutions, and performance optimization tips for Alex Sidebar
## Common Issues and Solutions
### Chat and Response Issues
**Symptoms:** - No responses in chat - Server timeouts - "Error connecting
to LLM API" - Rainbow wheel appearing - Infinite spinners **Solutions:** 1.
Check API Connection: - Verify internet connection - If using custom API
key, ensure it's valid - Check your API key balance and rate limits 2.
If App Freezes: - Force quit Alex Sidebar - Restart Xcode - Clear chat
history 3. For Server Timeouts: - Reduce context size - Break large requests
into smaller ones - Check if you're exceeding context limits
### Project Indexing and File Issues
**Symptoms:**
* Stuck on indexing
* Files not being created properly
* Wrong file modifications
* Issues with multiple Xcode projects
**Solutions:**
1. For Indexing Problems:
* Restart Alex Sidebar
* Clear Xcode's derived data
* Check project permissions
2. File Creation Issues:
* Use menu options instead of + button
* Verify write permissions
* Check for path existence
3. Multiple Projects:
* Keep only one project active when possible
* Verify correct project selection
* Double-check file paths before modifications
### UI and Window Management
**Symptoms:**
* Incorrect window resizing
* Text truncation
* Sidebar growing to full screen
* Font size issues
**Solutions:**
1. Window Issues:
* Use Cmd+ and Cmd- for font scaling
* Restart app if window becomes unresponsive
* Maintain minimum window width
2. Display Problems:
* Toggle fullscreen mode
* Reset window position
* Check display scaling settings
## Performance Optimization
### Model Selection and API Usage
**Best Practices for API Usage:**
* Use appropriate models for different tasks:
* GPT-4 for complex code generation
* Claude for documentation and explanations
* GPT-3.5 for quick queries
* When using custom API keys:
* Verify correct model selection
* Monitor credit usage
* Check for [rate limits](/support/rate-limits)
### Keyboard and Input
**Current Issues:**
* Escape key capture affecting Vim users
* Dvorak keyboard layout conflicts
* Some shortcuts may conflict with Xcode
**Workarounds:**
* Use menu options instead of shortcuts
* Check for keyboard shortcut conflicts in System Preferences
* Wait for upcoming customizable shortcuts feature
**Known Issues:**
* Crashes when pasting in input field
* Text loss in prompt inputs
* Duplicate text in inputs
**Temporary Solutions:**
* Type text manually instead of pasting
* Break large pastes into smaller chunks
* Save important prompts externally
## Reporting New Issues
If you encounter issues not covered here:
1. Check the version number
2. Document the steps to reproduce
3. Capture relevant screenshots/recordings
4. Report through appropriate channels:
* Discord for quick help
* GitHub for bug tracking
* Email for account/license issues
For fastest resolution: - Include your system information - Provide clear
reproduction steps - Mention any recent changes or updates - Include relevant
error messages
# Activation
Source: https://alexcode.ai/docs/windows/activation
Control when and how Alex Sidebar becomes active
Activation settings determine how Alex Sidebar responds to your interactions with Xcode and maintains focus during your development workflow.
## Activation Settings
### Bring Alex to front when Xcode is clicked
When enabled, Alex Sidebar automatically comes to the foreground whenever you click on or activate your Xcode window. This ensures your AI assistant is always readily accessible alongside your code editor.
**Benefits:**
* Seamless workflow between code and AI assistance
* No manual window switching required
* Maintains context awareness as you code
### Stay on top
This setting keeps Alex Sidebar floating above all other windows on your screen, ensuring it remains visible and accessible at all times.
**Use cases:**
* Multi-monitor setups where you want Alex always visible
* When working with multiple applications
* During live coding or presentations
## How to Configure
1. Open Settings (gear icon in the top right)
2. Navigate to **Workspace Configuration** → **Window Management**
3. Toggle the desired activation options:
* **Bring Alex to front when Xcode is clicked** - For automatic focus management
* **Stay on top** - For persistent visibility
These settings work together with positioning options to create your ideal development environment. Consider your workflow and screen setup when choosing which options to enable.
## Best Practices
* **For focused coding**: Enable "Bring Alex to front" for seamless transitions
* **For reference work**: Enable "Stay on top" when you need constant AI assistance
* **For presentations**: Use "Stay on top" to keep Alex visible during demos
# Tips & Best Practices
Source: https://alexcode.ai/docs/windows/interface-hints
Best practices for using Alex Sidebar's window settings
Get the most out of Alex Sidebar's window management features with these tips and recommendations.
## Quick Setup Guide
For the best experience, we recommend enabling all window settings:
1. **Bring Alex to front when Xcode is clicked** - Keeps Alex accessible
2. **Auto-Snap Alex next to Xcode** - Perfect side-by-side layout
3. **Let Alex fill rest of the screen** - Maximum workspace efficiency
4. **Match height with Xcode** - Clean, aligned interface
5. **Stay on top** - Always visible when needed
## Common Configurations
Enable auto-snap and fill screen options to maximize your limited screen space. Consider disabling "Stay on top" to reduce visual clutter.
Place Xcode on one monitor and Alex on another. Disable auto-positioning for manual control, but keep "Stay on top" for easy reference.
Use all automatic positioning features to make the most of your screen. Toggle "Stay on top" based on your current task.
Enable "Stay on top" and position Alex strategically for demos. Disable auto-positioning for predictable window placement.
## Troubleshooting
### Windows not aligning properly?
1. Ensure Xcode is the active window
2. Toggle auto-snap off and on again
3. Check that both windows are on the same screen
### Alex Sidebar hidden behind Xcode?
* Enable "Stay on top" in Window Settings
* Or enable "Bring Alex to front when Xcode is clicked"
### Need more screen space?
* Disable "Let Alex fill rest of the screen"
* Manually resize Alex Sidebar to your preference
# Overview
Source: https://alexcode.ai/docs/windows/overview
Configure how Alex Sidebar integrates with your Xcode workspace
Window Settings allow you to control how Alex Sidebar behaves and positions itself alongside Xcode. Access these settings through Settings → Workspace Configuration → Window Management.
## Available Settings
Alex Sidebar provides five key window management options:
Automatically brings Alex Sidebar to the foreground whenever you interact with Xcode, ensuring it's always accessible when you need it.
Automatically positions Alex Sidebar adjacent to your Xcode window, maintaining optimal placement as you work.
Allows Alex Sidebar to expand and use all available screen space not occupied by Xcode, maximizing your workspace efficiency.
Keeps Alex Sidebar's height synchronized with your Xcode window for a clean, aligned interface.
Ensures Alex Sidebar remains visible above other windows, so it's always available when you need assistance.
## Configuration Pages
Window focus and activation behaviors
Automatic positioning and snapping
Window management tips and configurations
# Positioning
Source: https://alexcode.ai/docs/windows/positioning
Configure automatic positioning and sizing of Alex Sidebar
Positioning settings help you create an optimal layout between Alex Sidebar and Xcode, maximizing your screen real estate and workflow efficiency.
## Positioning Settings
### Auto-Snap Alex next to Xcode
Automatically positions Alex Sidebar adjacent to your Xcode window, creating a seamless side-by-side development environment.
**Features:**
* Snaps to the right edge of Xcode
* Maintains position when Xcode moves
* Adjusts automatically when switching between Xcode windows
### Let Alex fill rest of the screen
When enabled, Alex Sidebar expands to use all available horizontal screen space not occupied by Xcode.
**Benefits:**
* Maximizes chat area for better readability
* Uses screen space efficiently
* Automatically adjusts when Xcode is resized
### Match height with Xcode
Synchronizes Alex Sidebar's height with your Xcode window for a clean, professional appearance.
**Results in:**
* Perfectly aligned top and bottom edges
* Consistent visual layout
* Unified workspace appearance
## How to Configure
1. Open Settings (gear icon in the top right)
2. Navigate to **Workspace Configuration** → **Window Management**
3. Enable your preferred positioning options:
* **Auto-Snap Alex next to Xcode** - For automatic side-by-side placement
* **Let Alex fill rest of the screen** - For maximum workspace utilization
* **Match height with Xcode** - For aligned window heights
These settings work best when used together. Enable all three for the best integration with Xcode.
## Recommended Configurations
Enable all positioning options for a fully integrated development environment where Alex Sidebar perfectly complements your Xcode window.
Disable auto-positioning if you prefer to manually arrange windows or work with multiple monitors.